CRM Service / Product Charging Notes
::: note ::: title Note :::
For a complete end-to-end guide covering product definition, provisioning, addons, and deprovisioning with detailed Ansible examples and pricing strategy, see Complete Product Lifecycle Guide . :::
Products & Services Overview
Product (Menu Item):
A Product is like a specific dish on a restaurant menu, such as a "Spaghetti Carbonara."
It has a clear description, a list of ingredients (like pasta, cream, eggs, cheese, and bacon), and a price.
In OmniCRM, a Product similarly contains the details of what is included --- features, specifications, and pricing.
Often, customers may want modifications, like "hold the onions" or "add extra cheese" to their meal. Within OmniCRM, this corresponds to customizing a service before creation. The level of customizations or modifications to a service are up to you (the operator) to define.
In OmniCRM, customers or staff might modify a Product to better suit a specific customer's needs, such as upgrading their Internet speed or adding specific features. This customization is reflected in the specific Service provided.
A product is essentially an offering that customers can choose to order from, similar to reading and picking a dish from the menu.

Product Catalog (Restaurant Menu):
The Product Catalog is like the entire menu in a restaurant, which lists all the dishes available --- from appetizers to desserts.
It is the complete collection of everything the restaurant (or in your case, the Service Provider) has to offer.
In the business context, the Product Catalog provides customers with all available Products, so they can choose the one that best meets their needs.
Service (Prepared Dish):
When a customer orders an item from the menu, the dish is prepared in the kitchen. This is akin to creating a Service from a Product.
In OmniCRM, when a customer selects a Product, an instance of that Product is created and delivered as a Service.
It is customized and prepared specifically for that customer, just like a meal prepared for a diner.
For example, when someone selects the "Internet Bronze Plan" from the Product Catalog, the provisioning system "cooks" up an instance of that plan from the ingredients (IP addresses, Modems and Ports) --- i.e., activates the plan and delivers it to the specific customer.
Bundled Products (Combo Meals):
The Product Catalog might also offer bundles, like a combo meal that includes an appetizer, main course, and dessert together for a special price.
In OmniCRM, bundled Products combine multiple individual Products into one convenient package --- like a "Home Essentials Bundle" that includes Internet, cable, and phone services at a discounted rate.
Once selected, this bundle is turned into multiple Services tailored for the customer.
Product Definitions
A product is a template that is used to create a service / addon / discount / bolt on, etc.
Inside the definition we include:
-
Information about the product (features, inclusions, T&Cs, contract length, icon, etc) that is displayed to the user of the CRM (Customer or Staff).
-
The business logic around who can purchase the product (Business or Residential), if it relies on having a parent service provisioned (like mobile addons only available to customers with a mobile service), if it can be ordered directly by a customer via self care or only by a customer service agent, and when the product can be purchased (Allowing for a product to only be available for a set period of time).
-
When Inventory items are to be included (such as Modems or SIM Cards) these are specified as Inventory Items List, for example the below service requires a SIM Card and a Phone Number to be assigned:
['SIM Card', 'Phone Number']These correlate to the Inventory Items defined in the CRM. -
Reference an Ansible Playbook to provision the service Provisioning Play as well as the variables to pass to Ansible. These variables to pass are magic, in that they may be variables like
service_idthat are defined by the product we're adding it to, or they may be likeICCID&MSISDNwhere we have selected inventory items that are passed over when assigning the inventory. Bundling is handled in the provisioning play to contain multiple services, for example a bundled home internet, TV & Voice product, may provision a service for each.
Product Categories and Service Types
Products use two classification fields to help organize and filter offerings:
Product Categories
The category field controls where products are displayed in the UI.
Common values include:
- standalone - Shown as a base service option when creating a new service
- addon - Shown when adding to an existing service
- bundle - Shown as a bundled service option (provisioned like an addon to existing services)
- promo - Special promotional offerings
These categories are purely organizational and don't dictate what gets
provisioned. The actual provisioning behavior is determined entirely by
the Ansible playbook referenced in provisioning_play.
For example: - A standalone product typically creates a new service
object - An addon or bundle product is typically added to an
existing service - But this is up to the implementer writing the
playbook - you could create multiple service objects from an addon, or
modify existing services from a standalone product if needed
The category simply controls the UI flow and where customers/staff see the product option.
Service Types
The service_type field categorizes what kind of service is being
provided.
These are entirely defined by the user, but common values include:
- mobile - Mobile phone services with voice, SMS, and data
- fixed - Fixed wireless or wired internet services
- fixed-voice - Fixed-line voice services (VoIP, landline)
- hotspot - Mobile hotspot or rental devices
- dongle - USB modem or dongle services
- voice - Voice-only services
- data - Data-only services
Like categories, service types are customizable based on your offerings. They help in:
- Filtering which addons apply to which base services
- Organizing products in the customer portal
- Matching inventory requirements
- Determining provisioning workflows
Example: A customer with a mobile service can see mobile addons, while
a customer with a fixed service sees fixed-line addons.
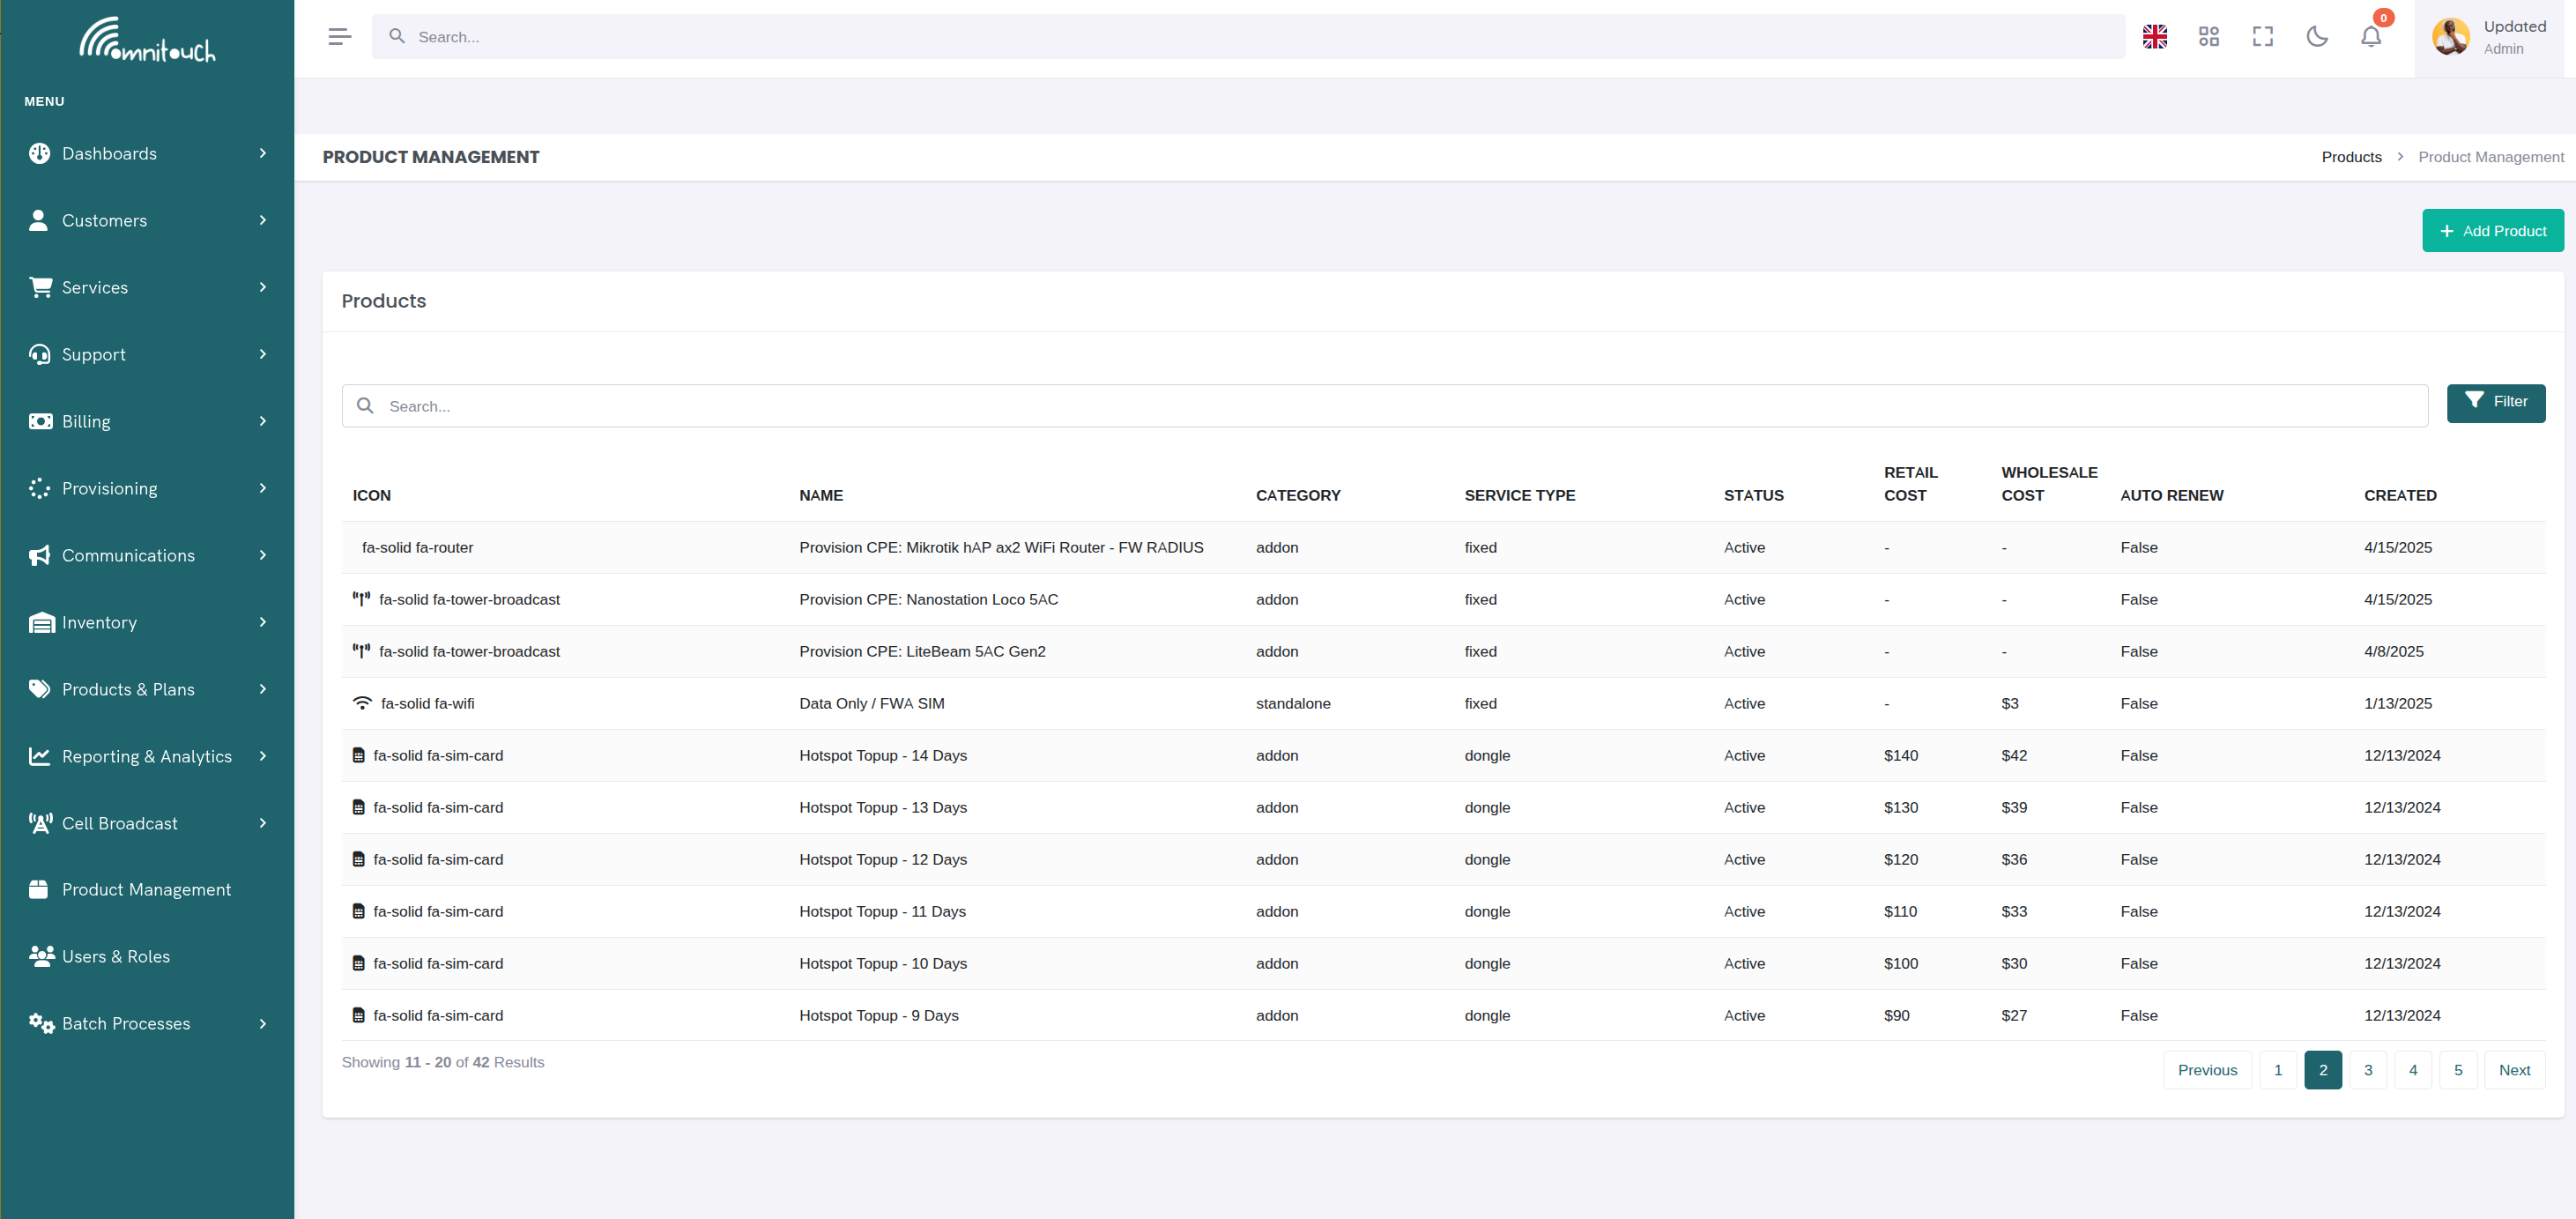
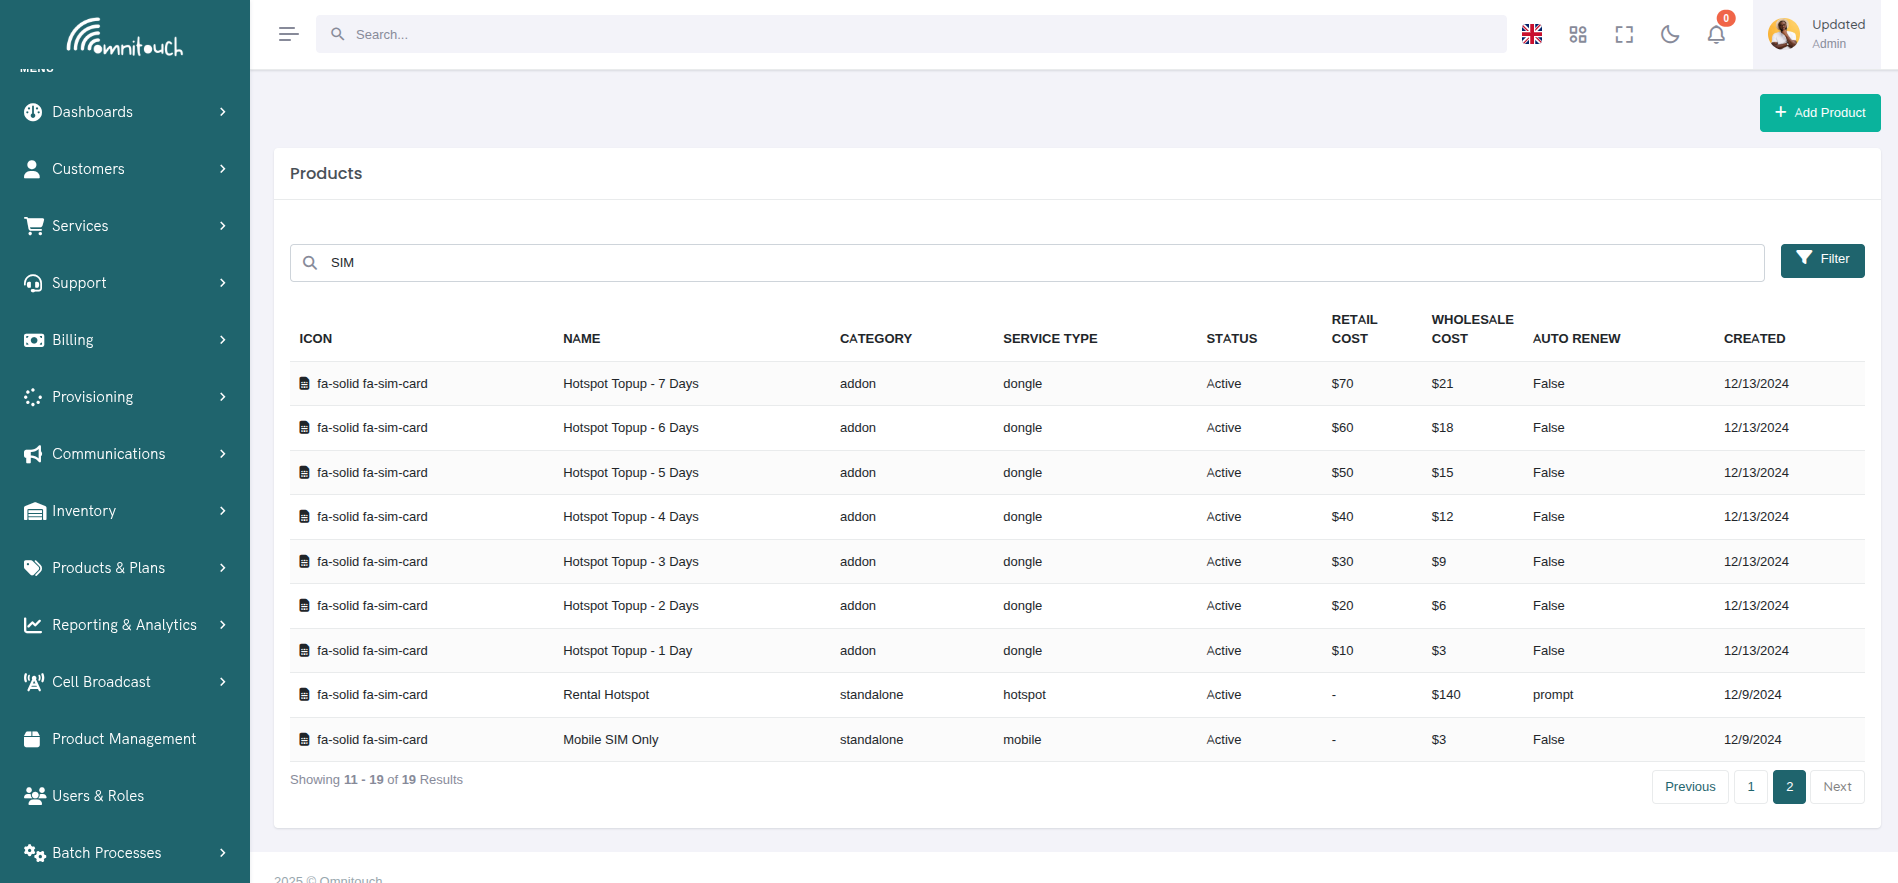
Managing Products
Products are managed through the Product Management page, where you can view, search, filter, and edit all available products.
 {.align-center
width="800px"}
{.align-center
width="800px"}
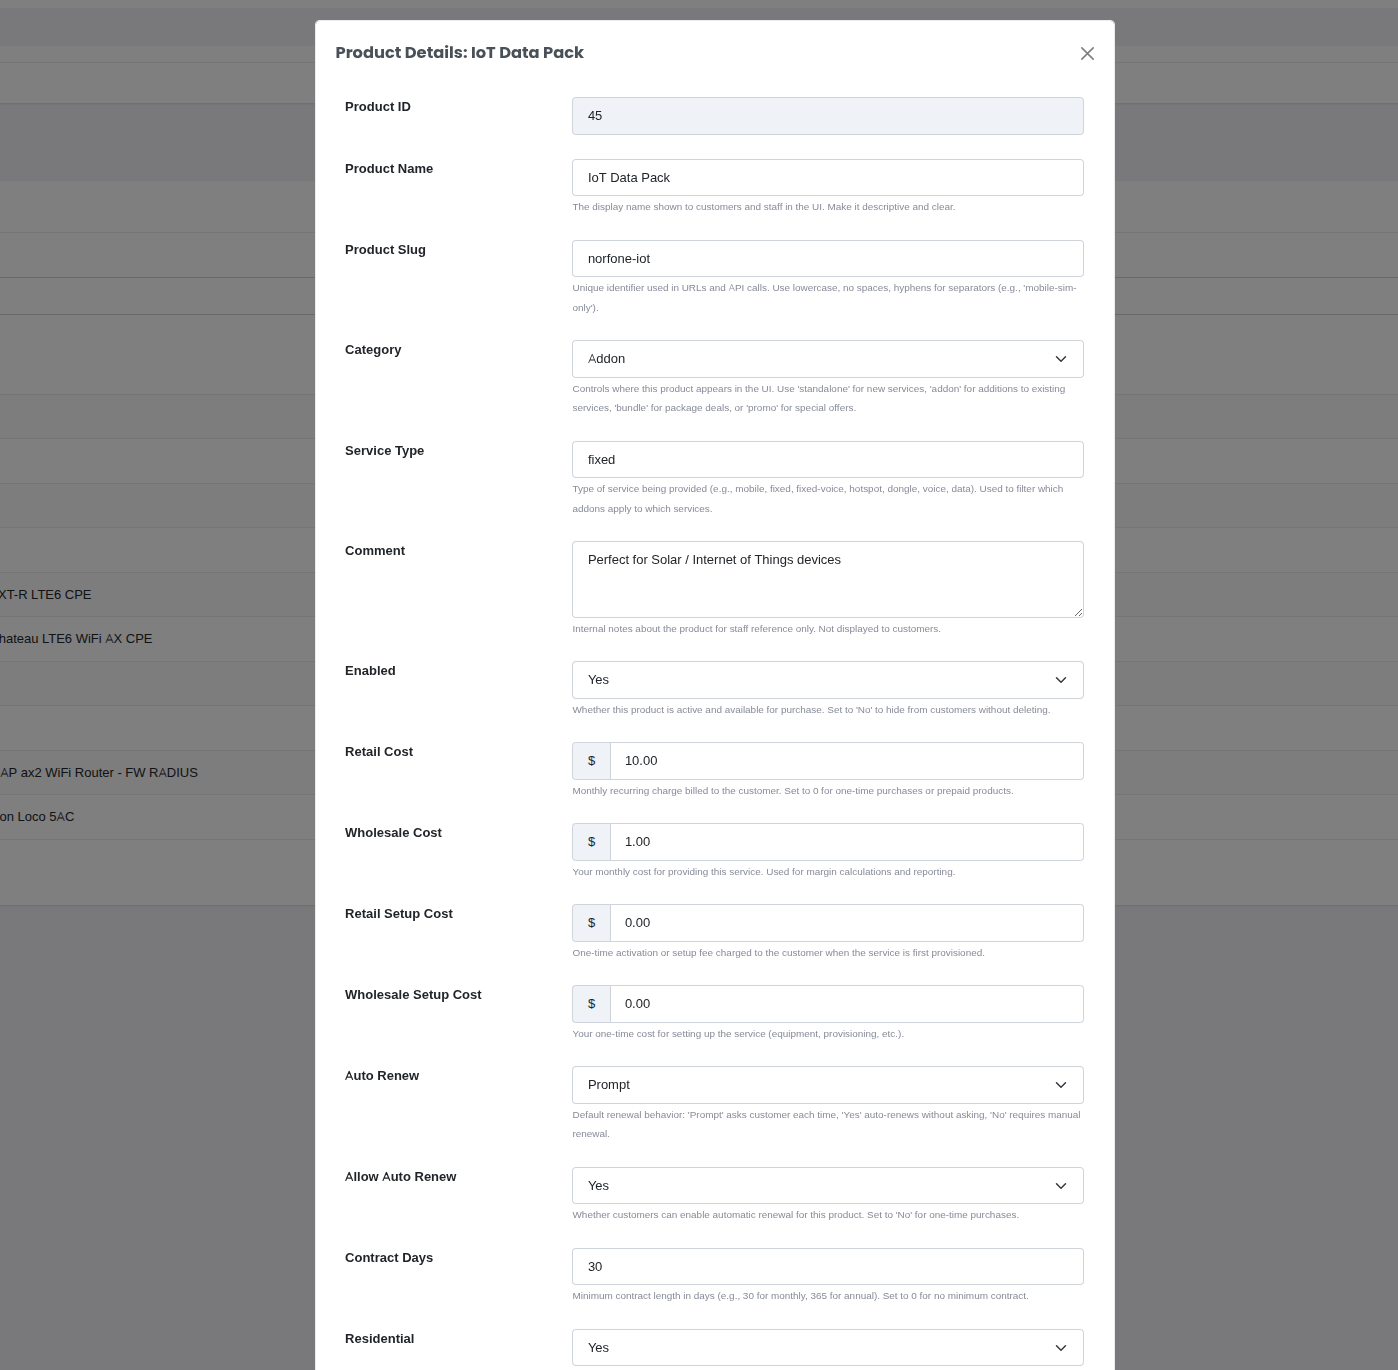
Product Modal Interface
Clicking on any product opens an enhanced tabbed interface that organizes all product settings into logical groups for easier navigation and editing.
 {.align-center
width="800px"}
{.align-center
width="800px"}
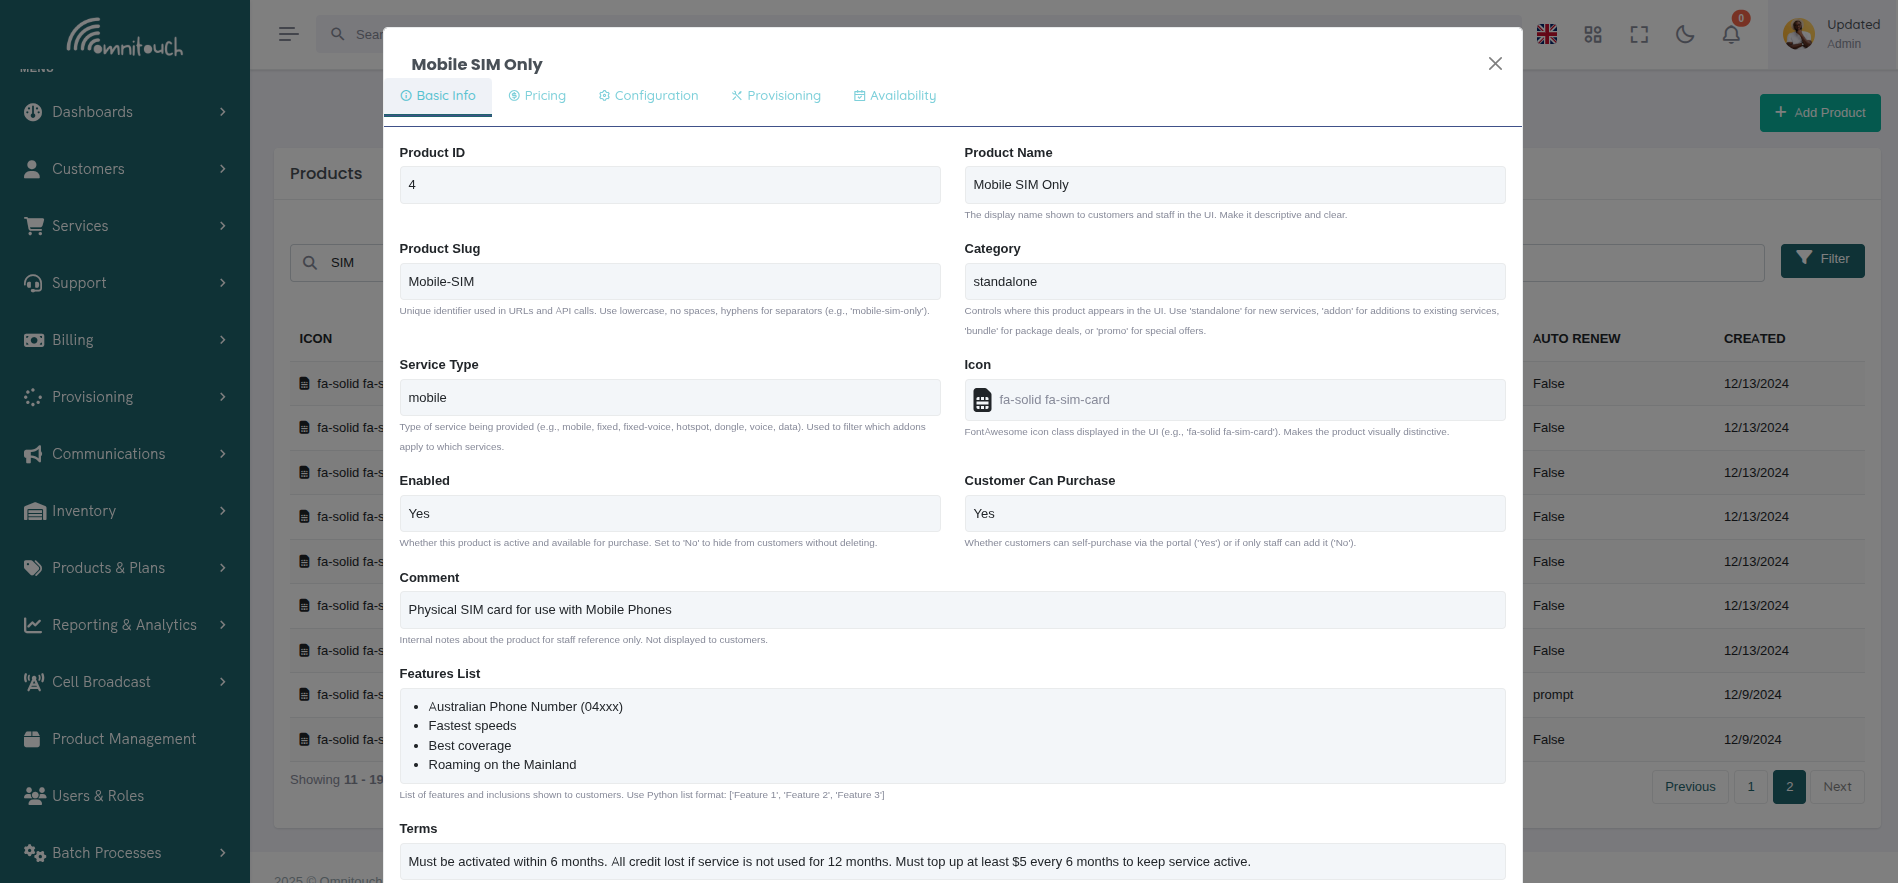
The product management modal features five organized tabs:
- 📋 Basic Info - Core product information (name, slug, category, icon, features, terms)
- 💰 Pricing - All cost-related fields including recurring costs, setup costs, and tax percentage
- ⚙️ Configuration - Renewal settings, customer types, and dependencies
- 🔧 Provisioning - Ansible playbook configuration and inventory requirements
- 📅 Availability - Date ranges and system timestamps
 {.align-center
width="800px"}
{.align-center
width="800px"}
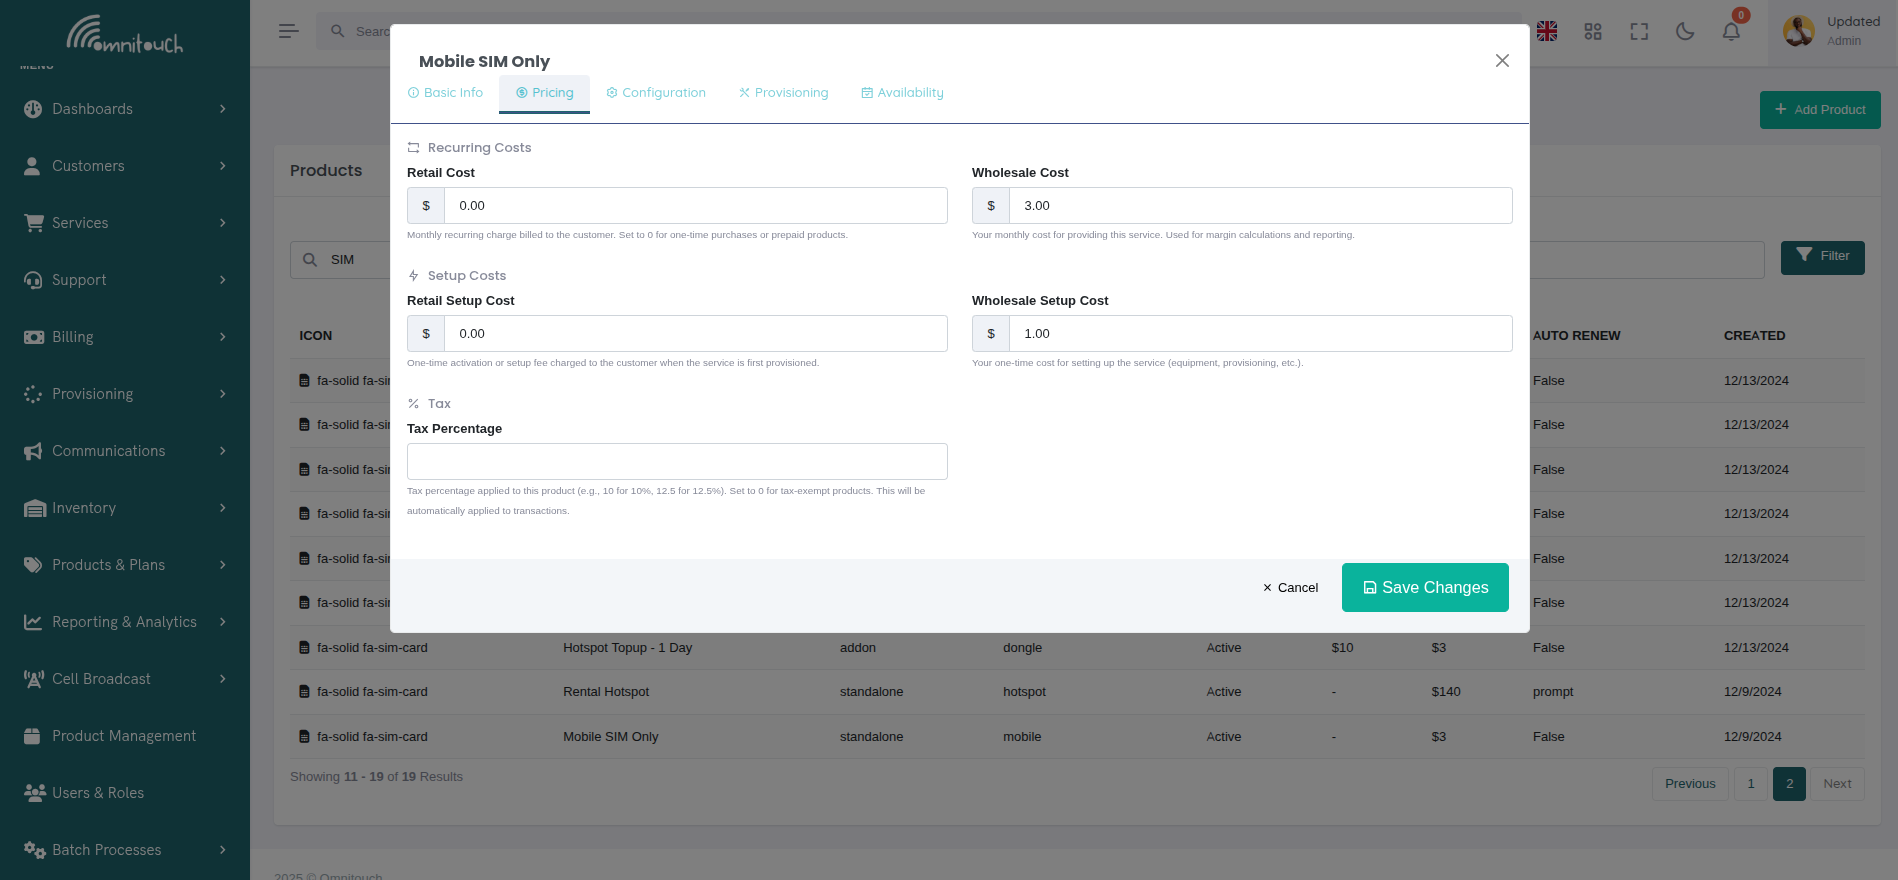
Pricing Tab Organization:
The Pricing tab groups cost fields into logical sections:
- Recurring Costs - Monthly retail and wholesale costs side-by-side
- Setup Costs - One-time activation fees for retail and wholesale
- Tax - Tax percentage configuration with automatic calculation
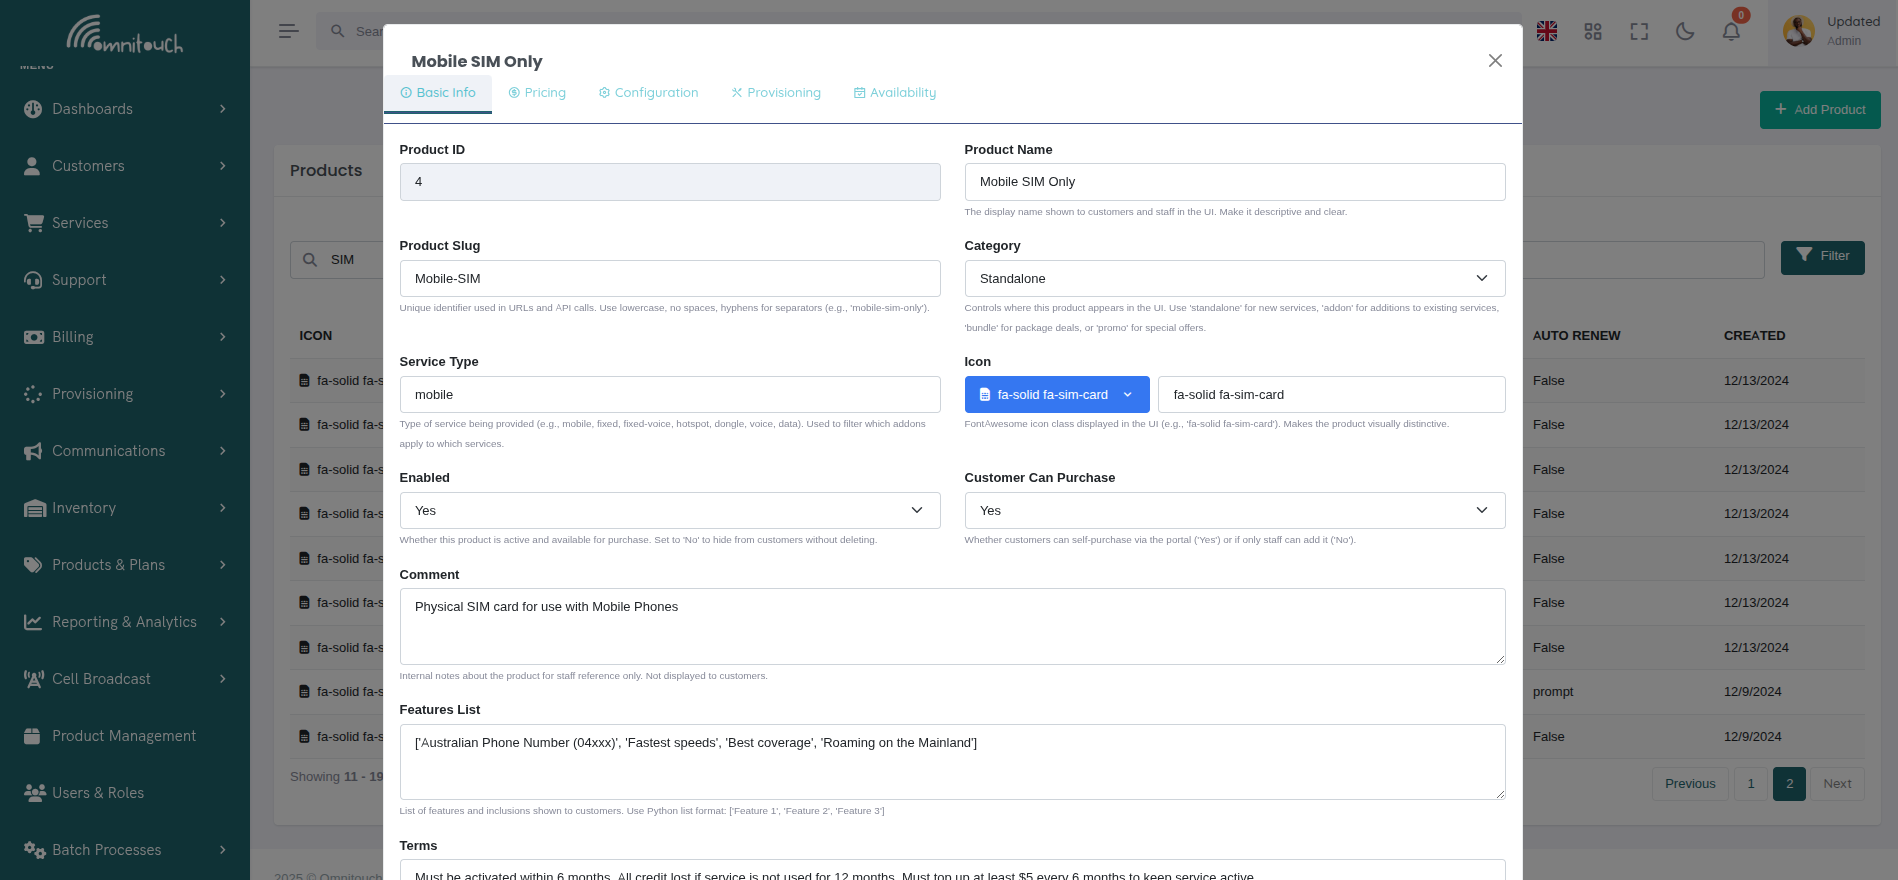
Edit Mode Features:
- Icon Picker - Search and select FontAwesome icons visually
- Inventory Items Picker - Select from available inventory item types
- Date/Time Picker - Easy selection of availability windows
- Currency Formatting - Automatic $ prefix for cost fields
- Dropdown Selectors - Pre-defined options for categories and boolean fields
 {.align-center
width="800px"}
{.align-center
width="800px"}
Icon Picker:
When editing the icon field, a searchable icon picker interface appears allowing you to visually browse and select from thousands of FontAwesome icons.
![]() {.align-center
width="800px"}
{.align-center
width="800px"}
Features: * Search icons by keyword (e.g., "wrench", "mobile", "wifi") * Preview icon appearance in real-time * Shows icon class name for reference * Dropdown selection for quick access
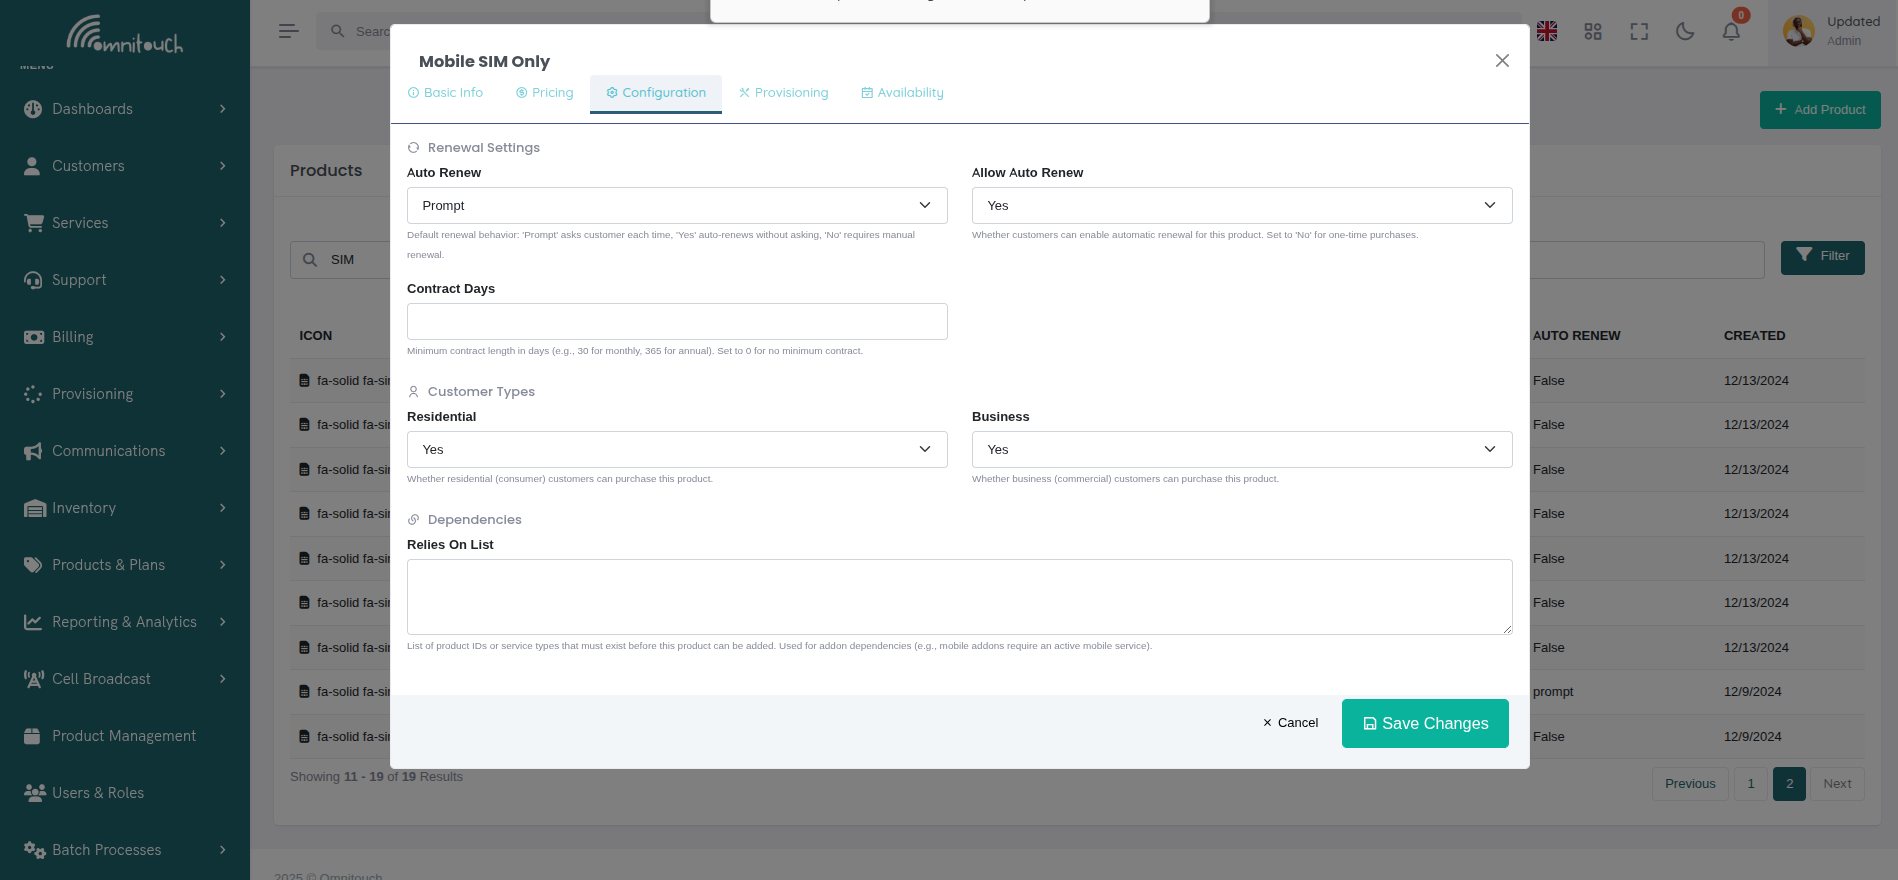
Configuration Tab:
The Configuration tab organizes product behavior settings into logical groups.
 {.align-center
width="800px"}
{.align-center
width="800px"}
Configuration Sections:
- Renewal Settings:
- Auto Renew - Default renewal behavior (Prompt/Yes/No)
- Allow Auto Renew - Whether customers can enable auto-renewal
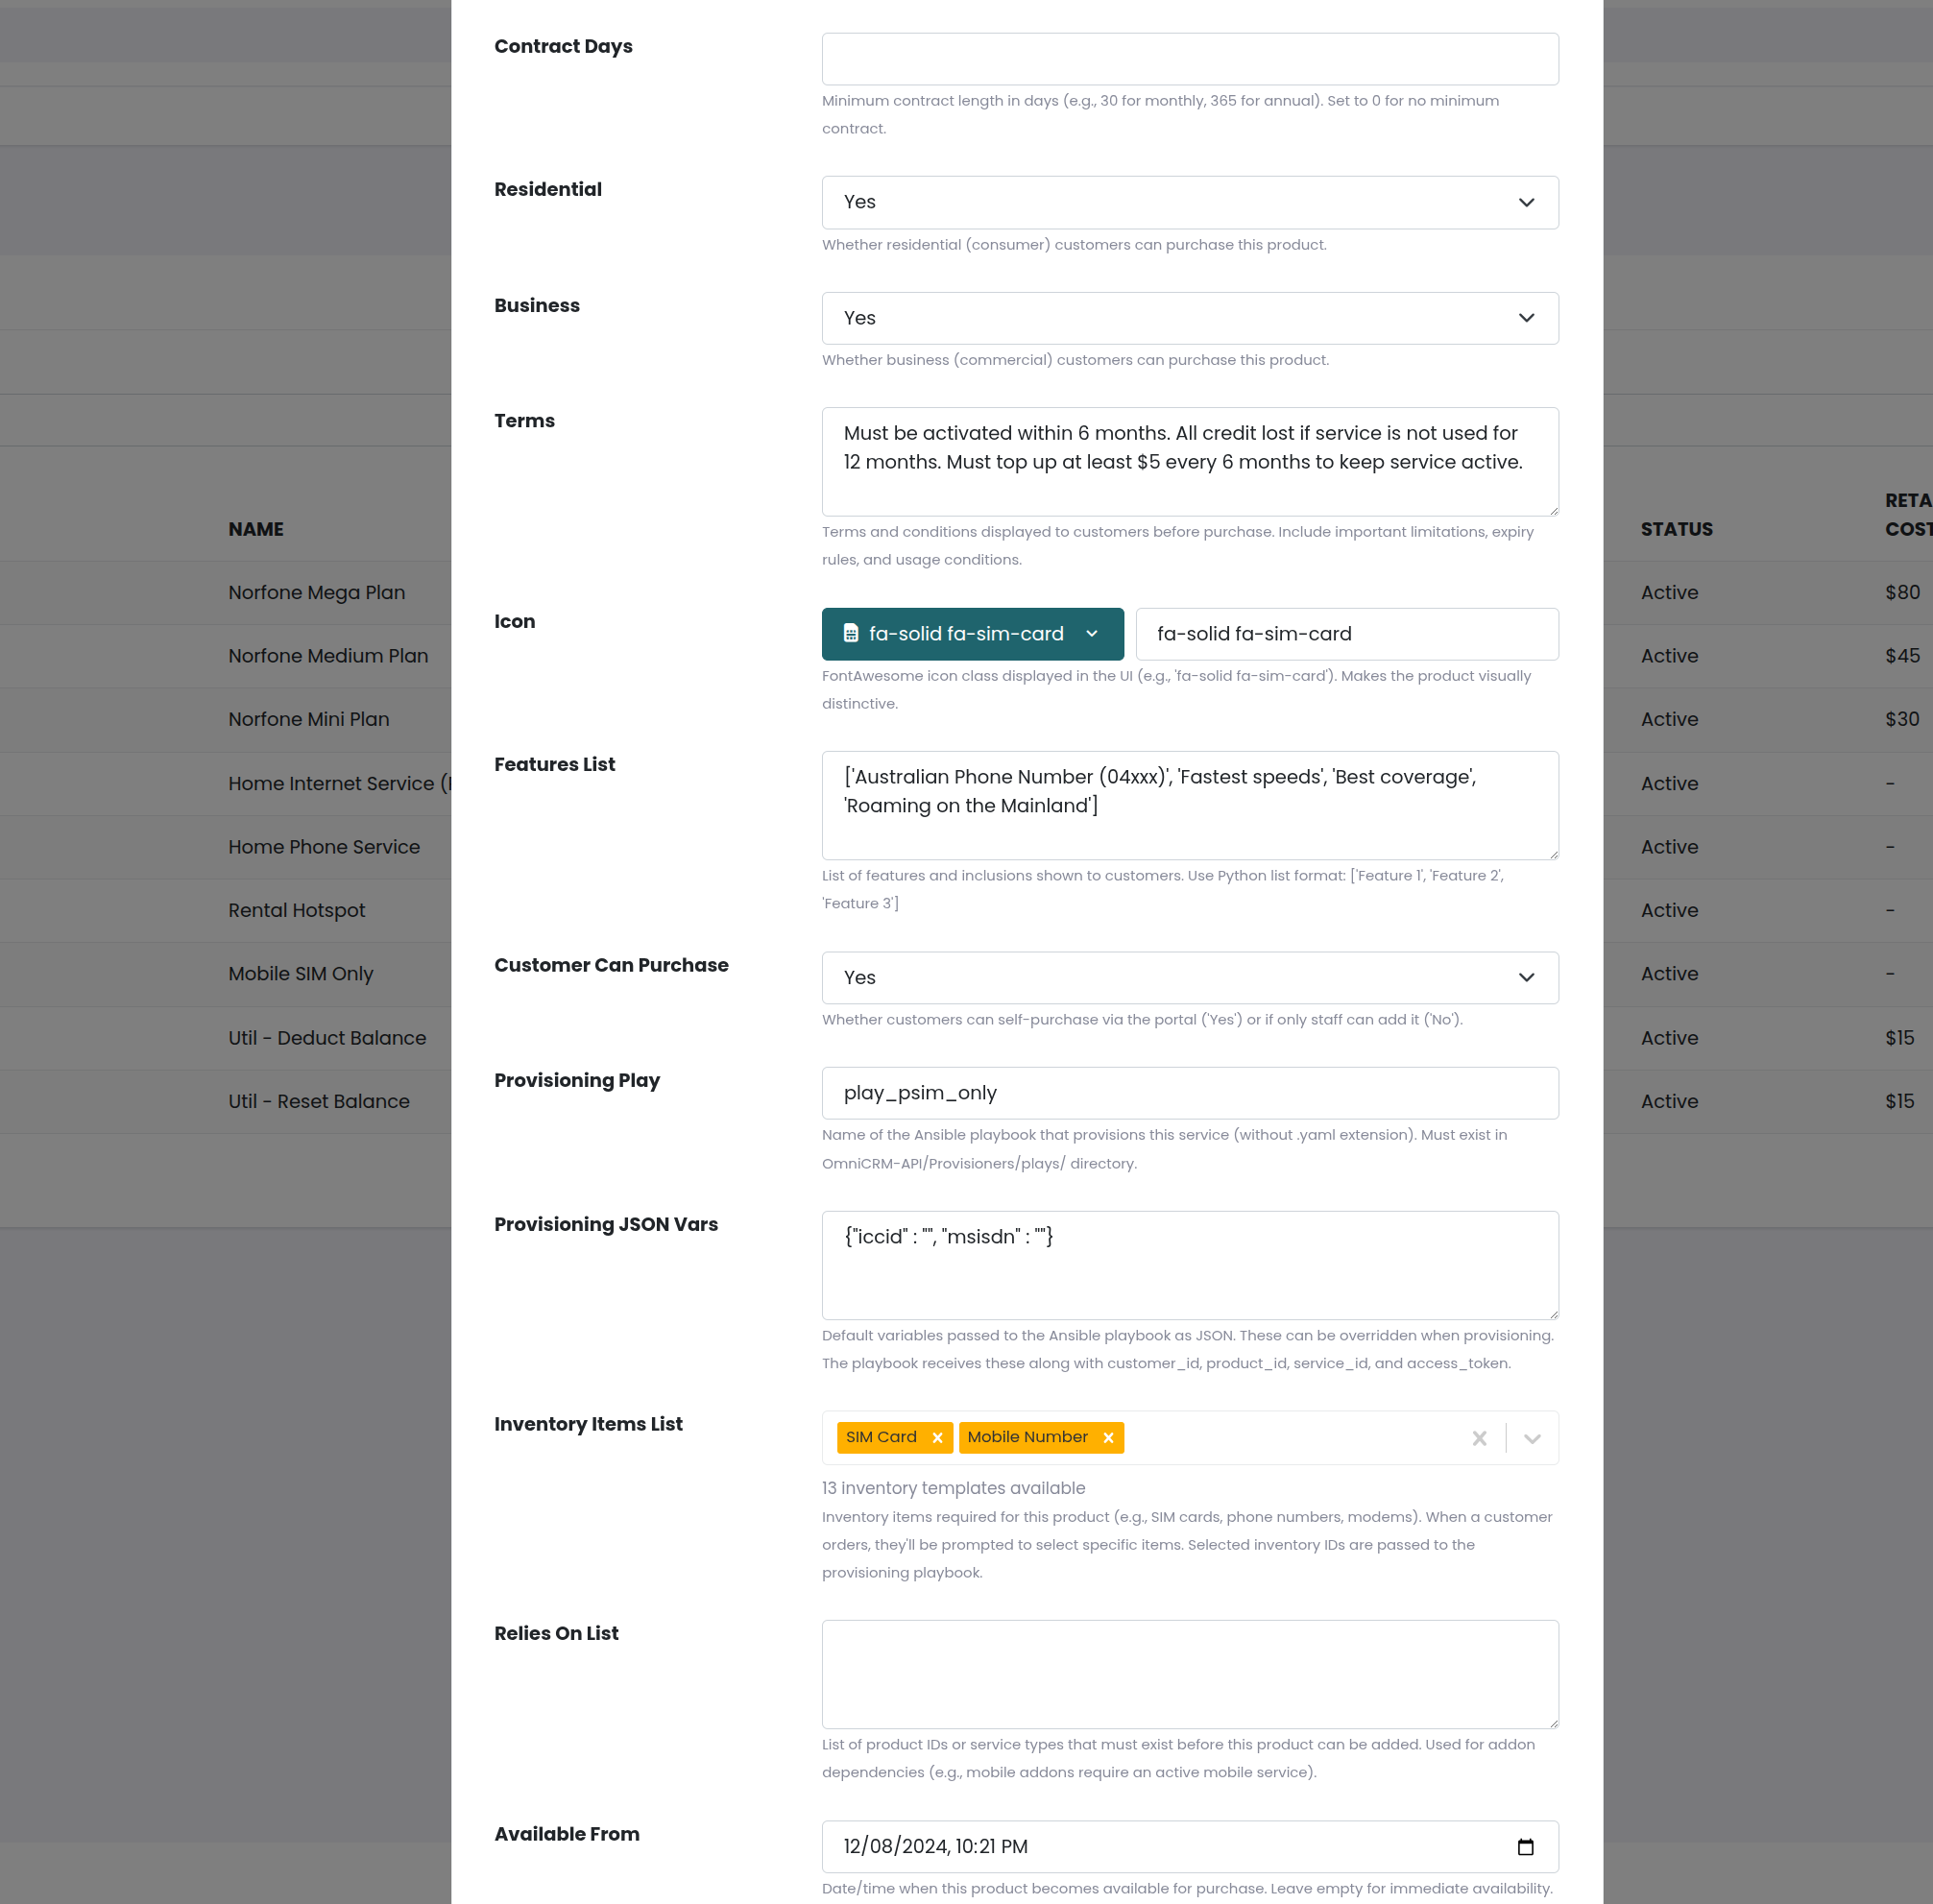
- Contract Days - Minimum contract length (e.g., 30 for monthly, 365 for annual)
- Customer Types:
- Residential - Available to consumer customers
- Business - Available to commercial customers
- Dependencies:
- Relies On List - Product IDs or service types required before this product can be added
- Used for addon dependencies (e.g., mobile addons require active mobile service)
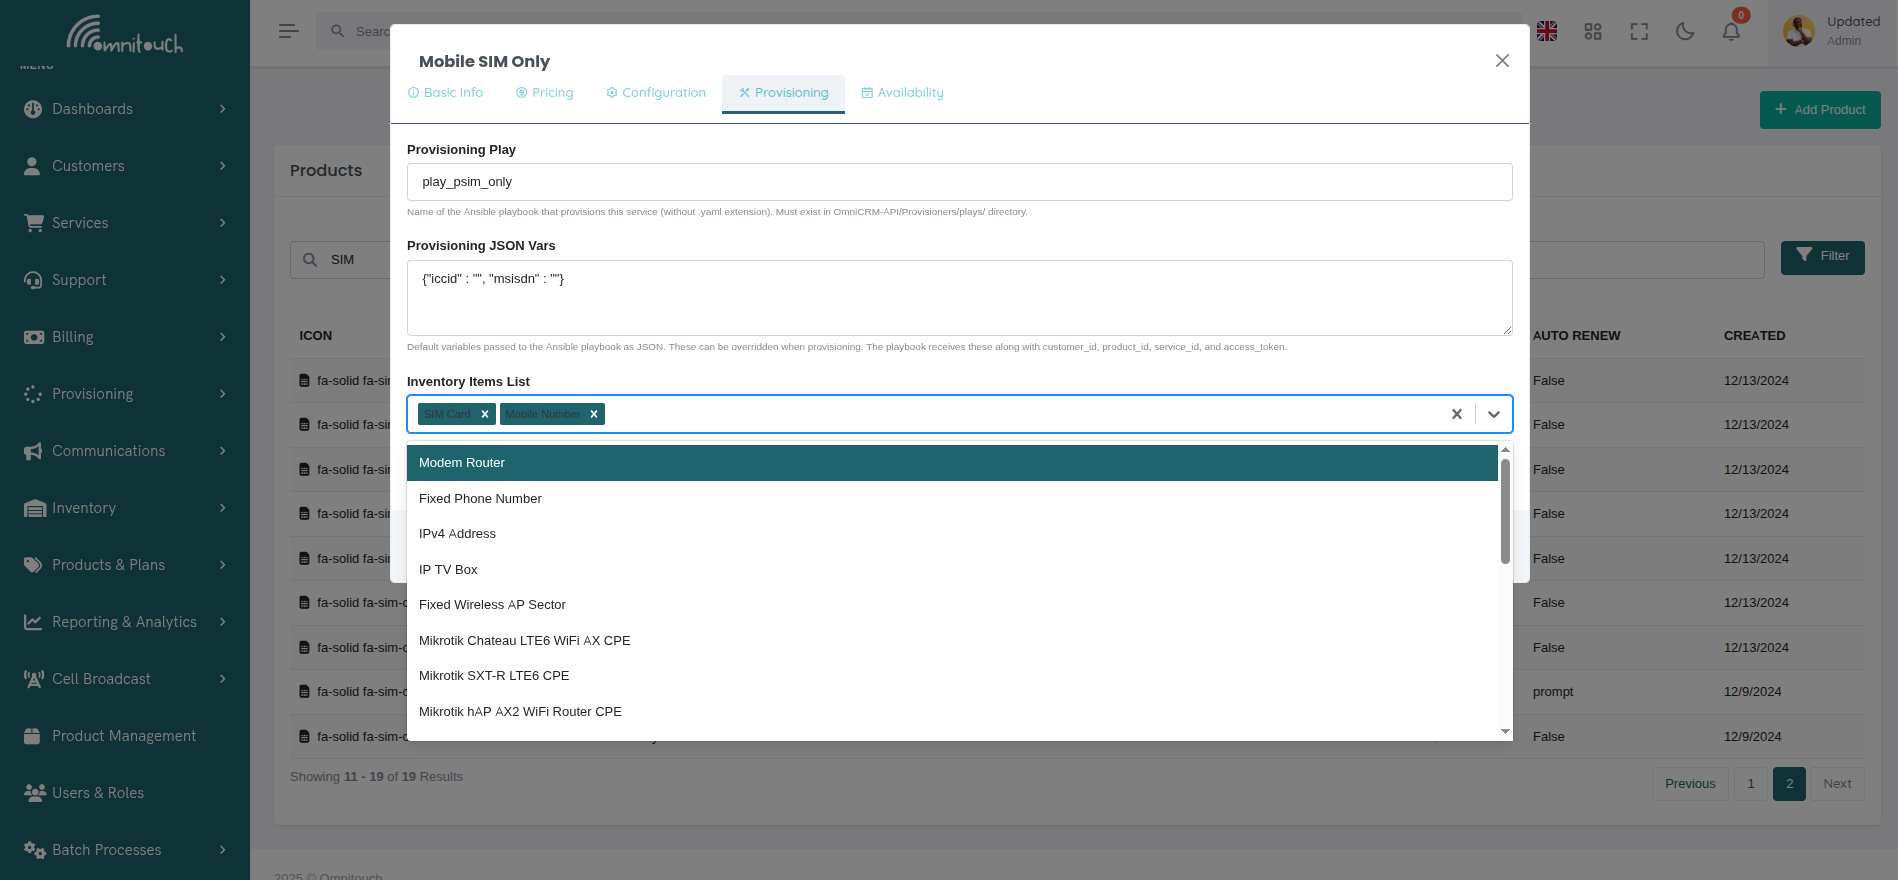
Provisioning Tab:
The Provisioning tab handles Ansible automation and inventory requirements.
 {.align-center
width="800px"}
{.align-center
width="800px"}
Provisioning Fields:
- Provisioning Play:
- Name of Ansible playbook (without .yaml extension)
- Must exist in OmniCRM-API/Provisioners/plays/ directory
- Called when service is created, updated, or deprovisioned
- Provisioning JSON Vars:
- Default variables passed to Ansible playbook as JSON
- Can be overridden during provisioning
- Playbook receives these plus customer_id, product_id, service_id, access_token
- Inventory Items List:
- Multi-select picker showing available inventory item types
- Examples: SIM Card, Phone Number, Modem Router, IPv4 Address
- Customer/staff selects specific items from available inventory during ordering
- Selected inventory IDs passed to playbook with inventory type as variable name
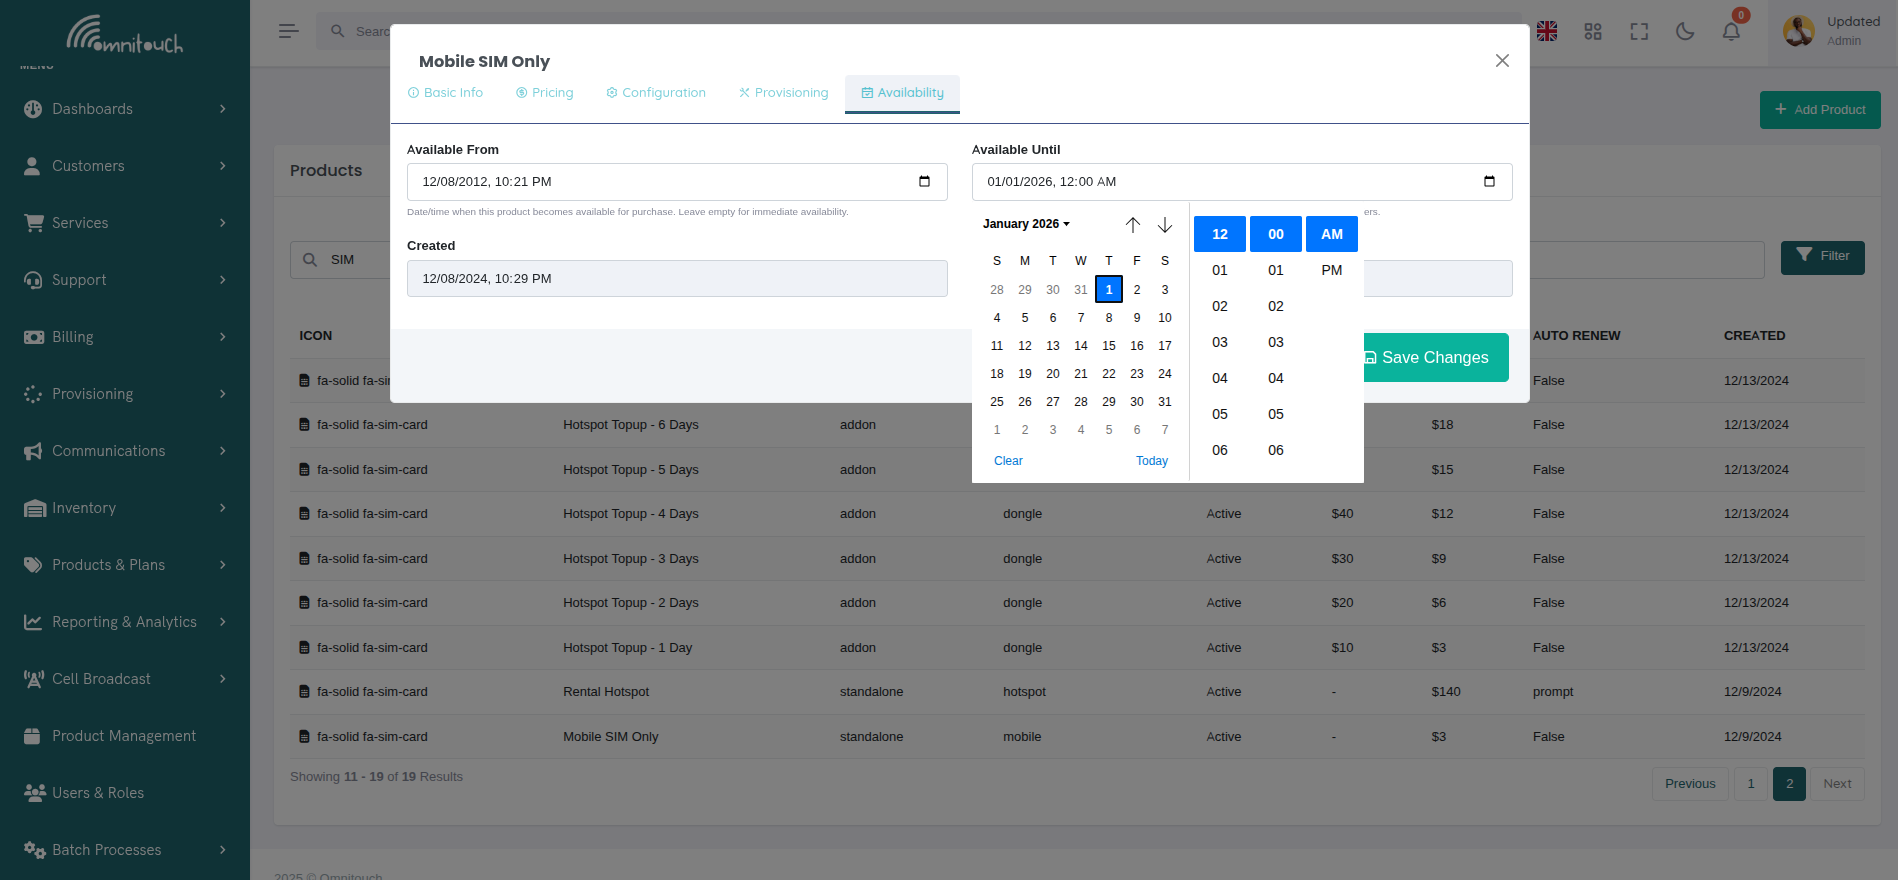
Availability Tab:
The Availability tab controls when the product can be purchased and displays system metadata.
 {.align-center
width="800px"}
{.align-center
width="800px"}
Availability Settings:
- Available From:
- Date/time when product becomes available for purchase
- Leave empty for immediate availability
- Useful for pre-announcing new products
- Available Until:
- Date/time when product is no longer available for purchase
- Leave empty for indefinite availability
- Perfect for limited-time promotions or end-of-life products
- System Metadata (Read-Only):
- Created - Timestamp when product was first created
- Last Modified - Timestamp of most recent update
- Automatically maintained by the system
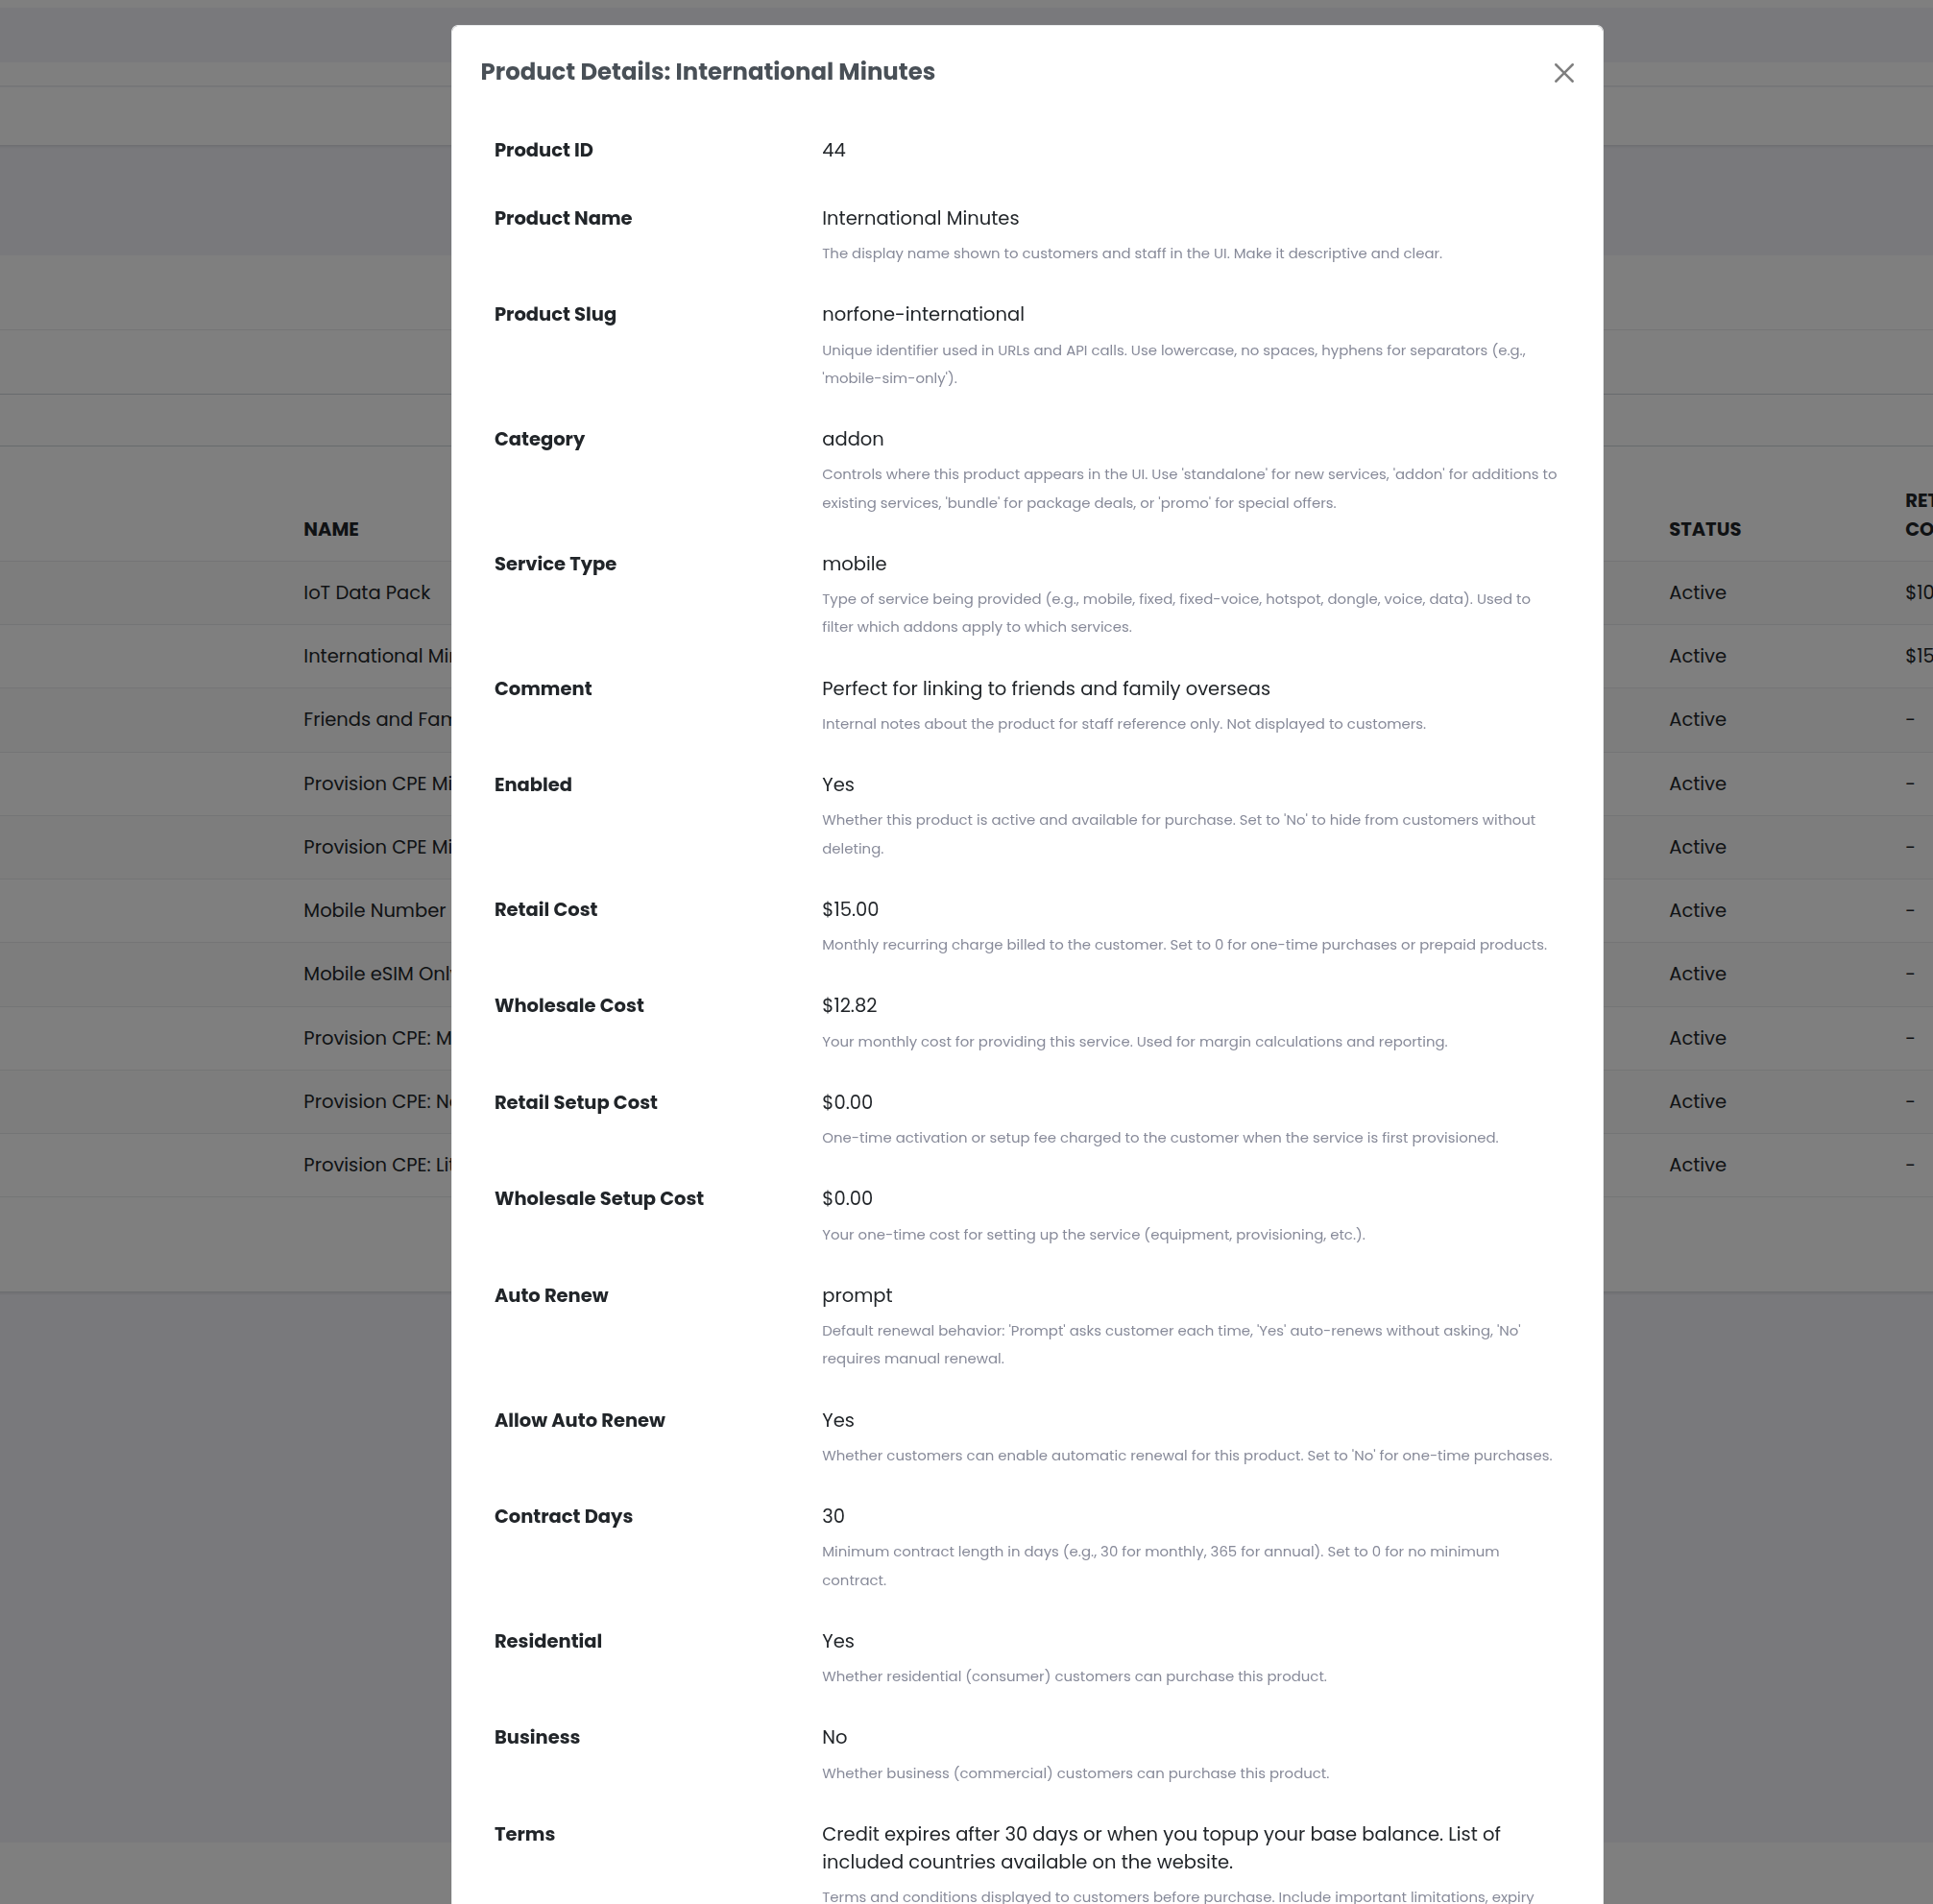
Modal Actions:
- View Mode:
- Close - Dismiss modal
- Clone Product - Create a copy with "_clone" suffix
- Edit Product - Switch to edit mode
- Edit/Create Mode:
- Cancel - Discard changes and close
- Save Changes - Create or update product (large button for emphasis)
Product Fields
The Product model contains all the information needed to define an offering and how it should be provisioned. These fields are managed through the Product Management modal interface described above.
Basic Information
- product_id - Unique identifier automatically assigned by the system
- product_name - Display name shown to customers and staff in the UI
- product_slug - Unique identifier used in URLs and API calls (lowercase, no spaces, use hyphens)
- category - Controls where this product appears in the UI:
standalone- Shown as a base service option when creating a new serviceaddon- Shown when adding to an existing servicebundle- Shown as a bundled service optionpromo- Special promotional offerings
- service_type - Type of service being provided (e.g., mobile, fixed, fixed-voice, hotspot, dongle, voice, data). Used to filter which addons apply to which services.
- comment - Internal notes about the product for staff reference only (not shown to customers)
- icon - FontAwesome icon class displayed in the UI (e.g.,
fa-solid fa-sim-card)
Pricing Fields
- retail_cost - Monthly recurring charge billed to the customer (set to 0 for one-time purchases or prepaid products)
- wholesale_cost - Your monthly cost for providing this service (used for margin calculations)
- retail_setup_cost - One-time activation or setup fee charged to the customer
- wholesale_setup_cost - Your one-time cost for setting up the service
- tax_percentage - Tax percentage applied to this product (e.g., 10 for 10%, 12.5 for 12.5%). Set to 0 for tax-exempt products. This tax rate is automatically applied to transactions created from this product.
 {.align-center
width="800px"}
{.align-center
width="800px"}
Tax Application:
When a transaction is created from this product, the tax percentage is automatically copied to the transaction and the tax amount is calculated. For example:
- Product with 10% tax, $50.00 retail cost → Transaction has $5.00 tax
- Product with 0% tax (tax-exempt) → Transaction has $0.00 tax
- Manual transaction override → Staff can change tax percentage per transaction
Customer Visibility and Access
- enabled - Whether this product is active and available for purchase (set to false to hide without deleting)
- residential - Whether residential (consumer) customers can purchase this product
- business - Whether business (commercial) customers can purchase this product
- customer_can_purchase - Whether customers can self-purchase via the portal (true) or if only staff can add it (false)
- available_from - Date/time when this product becomes available for purchase (optional)
- available_until - Date/time when this product is no longer available for purchase (optional, useful for limited-time offers)
Contract and Renewal
- contract_days - Minimum contract length in days (e.g., 30 for monthly, 365 for annual, 0 for no minimum contract)
- auto_renew - Default renewal behavior:
prompt- Asks customer each time whether to renewtrue- Automatically renews without askingfalse- Requires manual renewal
- allow_auto_renew - Whether customers can enable automatic renewal (set to false for one-time purchases)
Customer-Facing Content
- terms - Terms and conditions displayed to customers before purchase (include limitations, expiry rules, usage conditions)
- features_list - List of features and inclusions shown to
customers (Python list format:
['Feature 1', 'Feature 2'])
Provisioning Configuration
- provisioning_play - Name of the Ansible playbook that provisions
this service (without .yaml extension). Must exist in
OmniCRM-API/Provisioners/plays/directory. - provisioning_json_vars - Default variables passed to the Ansible
playbook as JSON. These can be overridden when provisioning. The
playbook receives these along with
customer_id,product_id,service_id, andaccess_token. - inventory_items_list - List of inventory items required for this
product (e.g.,
['SIM Card', 'Mobile Number']). When a customer orders, they'll be prompted to select specific items from available inventory. Selected inventory IDs are passed to the provisioning playbook with the inventory type as the variable name. - relies_on_list - List of product IDs or service types that must exist before this product can be added. Used for addon dependencies (e.g., mobile addons require an active mobile service).
System Metadata
- created - Timestamp when the product was created (automatically set)
- last_modified - Timestamp when the product was last updated (automatically updated)
Example Product Definitions
Standalone Product (Mobile SIM)
{
  "product_id": 1,
  "product_slug": "Mobile-SIM",
  "product_name": "Mobile SIM Only",
  "category": "standalone",
  "service_type": "mobile",
  "provisioning_play": "play_psim_only",
  "provisioning_json_vars": "{\"iccid\": \"\", \"msisdn\": \"\"}",
  "inventory_items_list": "['SIM Card', 'Mobile Number']",
  "retail_cost": 0,
  "retail_setup_cost": 0,
  "wholesale_cost": 3,
  "wholesale_setup_cost": 1,
  "contract_days": 0,
  "residential": true,
  "business": true,
  "enabled": true,
  "customer_can_purchase": true,
  "icon": "fa-solid fa-sim-card",
  "features_list": "['Australian Phone Number (04xxx)', 'Fastest speeds', 'Best coverage', 'Roaming on the Mainland']",
  "terms": "Must be activated within 6 months. All credit lost if service is not used for 12 months.",
  "comment": "Physical SIM card for use with Mobile Phones"
}
This standalone product requires two inventory items (SIM Card and Mobile Number) and creates a new service when provisioned.
Addon Product (Monthly Data Plan)
{
  "product_slug": "norfone-mobile-prepaid-mini",
  "product_name": "Norfone Mini Plan",
  "category": "addon",
  "service_type": "mobile",
  "provisioning_play": "play_topup_charge_then_action",
  "provisioning_json_vars": "",
  "inventory_items_list": "[]",
  "retail_cost": 30,
  "retail_setup_cost": 0,
  "wholesale_cost": 5.84,
  "contract_days": 30,
  "residential": true,
  "business": false,
  "enabled": true,
  "customer_can_purchase": true,
  "auto_renew": "prompt",
  "icon": "fa-solid fa-sim-card",
  "features_list": "['8GB of Ultra fast data', 'Unlimited Calls & Texts to Norfone users', '100 Minutes of Talk to Australia', '100 SMS to Australia', '30 Day Expiry']",
  "terms": "Credit expires after 30 days. Once data, voice or sms is used up, you will need to top up to continue using the service.",
  "comment": "Our smallest plan for light users"
}
This addon product doesn't require inventory and is applied to an existing service. It charges the customer and adds credits/balances to their service.
Bundle Product (Seniors Package)
{
  "product_slug": "Bundle-Seniors",
  "product_name": "Seniors Bundle",
  "category": "bundle",
  "service_type": "fixed",
  "provisioning_play": "play_seniors_package",
  "provisioning_json_vars": "{\"IPTV_Service_ID\": \"SeniorBundle\"}",
  "inventory_items_list": "['Modem Router']",
  "retail_cost": 30,
  "retail_setup_cost": 0,
  "wholesale_cost": 10,
  "wholesale_setup_cost": 11,
  "contract_days": 180,
  "residential": true,
  "business": false,
  "enabled": true,
  "icon": "fa-solid fa-person-walking-with-cane",
  "features_list": "['20Mbps Download', '5Mbps Upload', 'Unlimited Data', 'Home Voice', 'TV: Extra +£5 per month', '£60 Installation Fee']",
  "terms": "6 Month Contract, must show senior citizen's card to qualify",
  "comment": "20Mbps/2Mbps GPON Service + IPTV + Phone"
}
This bundle product provisions multiple services (Internet + IPTV + Phone) using a single playbook. It requires one inventory item (Modem Router).
Addon Product (Simple Top-up)
{
  "product_slug": "Mobile-Topup-5",
  "product_name": "PAYG £5 Topup",
  "category": "addon",
  "service_type": "mobile",
  "provisioning_play": "play_topup_monetary",
  "provisioning_json_vars": "{\"service_id\": \"\"}",
  "inventory_items_list": "[]",
  "retail_cost": 5,
  "retail_setup_cost": 0,
  "wholesale_cost": 0,
  "contract_days": 0,
  "residential": true,
  "business": false,
  "enabled": true,
  "customer_can_purchase": true,
  "icon": "fa-solid fa-coins",
  "features_list": "['£5 credit', 'Valid for 180 days']",
  "terms": "Valid for 180 days or until all credit is used. See our website for full rates",
  "comment": "£5 to use for Calls, SMS & Data"
}
This addon simply adds monetary credit to an existing service. No
inventory required, and it uses service_id to identify which service
to top up.
How Variables are Passed to Ansible
Understanding how variables flow from the product definition through the API to the Ansible playbook is critical for writing effective provisioning playbooks.
Variable Sources and Merging
When a provisioning job is created, variables come from multiple sources and are merged together in this order (later sources override earlier ones):
- Product's provisioning_json_vars - Default variables from the product definition
- Request body - Variables passed in the API call (can override product defaults)
- System-added variables - Automatically added by the provisioning system
- Inventory selections - IDs of selected inventory items (if
inventory_items_listis not empty)
Variable Merging Process
The system merges variables from all sources, with later sources overriding earlier ones. This allows for flexible customization at provision time.
For example, if your product has:
"provisioning_json_vars": "{\"monthly_cost\": 50, \"data_gb\": 100}"
And your API request includes:
{
  "product_id": 10,
  "customer_id": 456,
  "monthly_cost": 45,
  "custom_param": "value"
}
The final extra_vars passed to Ansible will be:
{
    "monthly_cost": 45,        # Overridden from request
    "data_gb": 100,            # From provisioning_json_vars
    "product_id": 10,          # From request
    "customer_id": 456,        # From request
    "custom_param": "value",   # From request
    "access_token": "eyJ..."   # Added by system
}
System-Added Variables
The provisioning system automatically adds:
access_token- JWT token for authenticating API calls back to the CRM (fromg.access_tokenfor IP/API key auth, or generated fromrefresh_tokenfor user auth)initiating_user- The user ID who triggered the provisioning (or first admin for automated systems)- Any fields from the request body (
product_id,customer_id,service_id, etc.)
Inventory Variables
When a product requires inventory items (e.g.,
inventory_items_list: "['SIM Card', 'Mobile Number']"), the process
works as follows:
- UI/API prompts for selection - User selects specific inventory items from available stock
- Inventory IDs are added to variables - The selected inventory item IDs are added with the inventory type as the variable name
- Playbook accesses inventory IDs - The provisioning playbook can then retrieve full inventory details from the CRM API
For example, if a user selects: - SIM Card with inventory_id: 789 - Mobile Number with inventory_id: 101
The variables passed to the playbook include: - SIM Card: 789 -
Mobile Number: 101
The playbook can then use these IDs to fetch the complete inventory records (ICCID, IMSI, MSISDN, etc.) from the CRM API and use that information to provision the service on network equipment.
How Ansible Receives Variables
The provisioning system passes all merged variables to the Ansible
playbook as extravars. Inside the playbook, these variables are
available through Ansible's standard variable system and can be used in
tasks.
Variables can be referenced directly in playbook tasks using the
{{ variable_name }} syntax. For example, {{ product_id }},
{{ customer_id }}, {{ monthly_cost }}, etc.
Variables Passed to Addon Products
When an addon product is provisioned, the system automatically passes:
product_id- The ID of the addon product being provisionedcustomer_id- The customer who owns the serviceservice_id- The ID of the service this addon is being added to (critical for addons)access_token- Authentication token for API calls- Any variables from
provisioning_json_vars - Any additional variables from the API request
Example Addon Provisioning Flow
When a customer adds the "£5 Topup" addon to their mobile service (service_id: 123), the playbook receives variables including:
product_id: 45 (the topup product)customer_id: 456 (the customer)service_id: 123 (the service to add credit to)access_token: Authentication token- Plus any variables from the product's
provisioning_json_vars
The playbook then uses these variables to:
- Fetch service details from the CRM API using the
service_id - Extract the service UUID and other information from the service record
- Add credit to the billing system (OCS) using the service UUID
- Record the transaction in the CRM for billing purposes
This flow allows the addon to identify exactly which service to modify and apply the changes appropriately.
Difference Between Standalone and Addon Variables
Standalone Products receive:
product_id- The product being provisionedcustomer_id- The customer ordering the service- Inventory item IDs (e.g.,
SIM Card,Mobile Number) if the product requires them access_token- For API authentication
Addon Products receive:
product_id- The addon product being provisionedcustomer_id- The customer who owns the serviceservice_id- The ID of the existing service to modify (this is the key difference)access_token- For API authentication
The key difference is service_id - this tells the playbook which
existing service to modify or add to.
Bundle Products
Bundle products are provisioned like addons but their playbook may create multiple service records. They receive the same variables as addons, including:
product_id- The bundle productcustomer_id- The customerservice_id- Parent service (if applicable)- Inventory item IDs (e.g.,
Modem Router) if required access_token- For API authentication
The bundle playbook (e.g., play_seniors_package) then creates multiple
related services (Internet, IPTV, Phone) and links them together.
Services
A service is an instance of a product that belongs to a customer, that they get billed for.
It is essentially a link to an OCS (Online Charging System) account which handles the charge generation and the actual balances and usages for the account. The OCS is powered by CGRateS and manages monetary balances, unitary balances (data, voice, SMS), ActionPlans for auto-renewal, and ThresholdS for spending limits.
Adding a Service: Product Selection and Filtering
When adding a service to a customer (either a new standalone service or an addon to an existing service), the system displays available products in a carousel interface. The products shown are filtered based on several criteria:
Product Filtering for Standalone Services
When creating a new service for a customer, the UI displays products filtered by:
- Customer Type - Products are categorized as:
- Individual (Residential): Products where
residential = trueorbusiness = false - Business: Products where
business = true
- Individual (Residential): Products where
- Category - Products are separated into:
- Service Plans: Products with
category=standaloneorbundle - Addons: Products with
category=addon(shown in separate carousel)
- Service Plans: Products with
- Availability - Products are only shown if:
enabled = true- Product is active and not disabled- Current date is between
available_fromandavailable_until- Product is within its availability window customer_can_purchase = true(if customer is self-purchasing) - Product allows direct customer purchase
::: note ::: title Note :::
API-Level Filtering: The API automatically filters products by enabled status and availability dates at two levels:
- Purchase/Selection Endpoints (
/crm/product/) - Used by Addons modal and PlanList for product selection. Automatically filters to show ONLY enabled products within their availability date range. This ensures customers and staff can only select products that are currently available for purchase. - Management Endpoints (
/crm/product/paginated) - Used by Product Management page. Shows ALL products including disabled and outside availability dates, allowing administrators to manage the full product catalog including inactive products.
Pass include_disabled=true to the base product endpoint to bypass
filtering (only for administrative use).
:::
The UI displays separate carousels for:
- Individual Service Plans - Residential products for consumer customers
- Business Service Plans - Commercial products for business customers
- Individual Addons - Residential addon packs
- Business Addons - Commercial addon packs
Product Filtering for Addon Services
When adding an addon to an existing service, additional filtering is applied:
- Service Type Matching - Only addons with matching
service_typeare shown:- If the existing service has
service_type = "mobile", only addons withservice_type = "mobile"are displayed - This ensures mobile customers only see mobile addons, internet customers only see internet addons, etc.
- If the existing service has
- Dependency Checking - If an addon has a
relies_on_list:- The system checks if the customer has the required products/services
- Only addons whose dependencies are satisfied are shown
- Same Customer Type Filter - Addons are still filtered by
residentialvsbusinessto match the customer type
Example Filtering Scenario
For a business customer with an existing mobile service
(service_type = "mobile"):
- Standalone Products Shown: All business standalone/bundle
products (
business = true,category != "addon") - Addon Products Shown: Only business mobile addons
(
business = true,category = "addon",service_type = "mobile") - Products Hidden: Residential products, addons for other service types (internet, voice, etc.), disabled products
Service Fields
The Service model contains fields that track the provisioned service instance and its relationship to the customer, product, and billing system.
Basic Service Information
- service_id - Unique identifier automatically assigned by the system (read-only)
- customer_id - Link to the customer who owns this service (read-only after creation)
- product_id - Link to the product this service was created from (read-only after creation)
- service_name - Display name shown to customers (editable)
- service_type - Type of service: mobile, internet, voip, iptv, bundle, etc. (editable)
- service_uuid - Unique identifier used in OCS/CGRateS for billing (read-only, auto-generated)
- icon - FontAwesome icon class for display in self-care portal (editable)
Service Status and Dates
- service_status - Current status: Active, Inactive, Suspended, etc. (editable)
- service_provisioned_date - When the service was first provisioned (auto-set, read-only)
- service_active_date - When the service became active (editable)
- service_deactivate_date - When the service expires or will be deactivated (editable)
- contract_end_date - End date of contract commitment (editable)
Billing and Pricing
- retail_cost - Monthly recurring charge to customer (editable)
- wholesale_cost - Your cost for providing the service (editable)
- service_billed - Whether this service appears on invoices (editable, default: true)
- service_taxable - Whether taxes apply to this service (editable, default: true)
- invoiced - Whether the service has been invoiced (auto-set by billing system)
- promo_code - Promotional code used when service was created (editable)
Customer Visibility
- service_visible_to_customer - Whether customer can see this service in self-care portal (editable, default: true)
- service_usage_visible_to_customer - Whether customer can view usage/balance details (editable, default: true)
Provisioning Configuration
- provisioning_play - Ansible playbook used to provision this service (inherited from product, read-only)
- provisioning_json_vars - Variables passed to provisioning playbook (inherited from product, read-only)
- deprovisioning_play - Ansible playbook to run when service is deprovisioned (read-only)
- deprovisioning_json_vars - Variables for deprovisioning playbook (read-only)
Service Relationships
- bundled_parent - If this service is part of a bundle, the service_id of the parent service (read-only)
- site_id - Link to the physical site/location where service is delivered (editable)
Notes and Metadata
- service_notes - Internal notes about the service for staff reference (editable)
- created - Timestamp when service was created (auto-set, read-only)
- last_modified - Timestamp of last update (auto-updated, read-only)
Editable vs Read-Only Fields
Editable via API/UI:
Services can be updated via PATCH /crm/service/{service_id} with these
fields:
- service_name, service_type, service_status
- service_notes
- retail_cost, wholesale_cost
- service_billed, service_taxable
- service_visible_to_customer, service_usage_visible_to_customer
- service_active_date, service_deactivate_date, contract_end_date
- icon, promo_code, site_id
Read-Only (Auto-Set):
These fields cannot be directly modified after creation:
- service_id, customer_id, product_id
- service_uuid (generated during provisioning)
- service_provisioned_date
- provisioning_play, provisioning_json_vars
- deprovisioning_play, deprovisioning_json_vars
- bundled_parent
- invoiced (managed by billing system)
- created, last_modified (automatically managed)
Provisioning Products into Services
The provisioning process converts a Product (template) into a Service (customer-specific instance) through a series of coordinated steps involving the Web UI, API, and Ansible playbooks.
High-Level Provisioning Flow
- Pre-provisioning Setup - Product created in API with provisioning configuration, and corresponding Ansible playbooks written and tested
- Service Selection - From the Customer Page, staff or customer selects "Add Service"
- Product Filtering - Displayed products filtered based on:
- Customer type (residential/business)
- Existing services (for addon dependencies in
relies_on_list) - Availability dates (
available_from/available_until) enabledandcustomer_can_purchaseflags
- Customization - Option to override provisioning variables (for price adjustments, custom configurations, etc.)
- Inventory Selection - If product requires inventory
(
inventory_items_listis not empty), user selects specific items (e.g., which SIM card, which phone number) - Provision Initiation - When "Provision" button is clicked, the API creates a provisioning job
Detailed API and Ansible Integration Flow
When a service is provisioned, the following sequence occurs:
Step 1: Provision Job Creation (/routes/service.py)
The API receives the provision request and calls
create_provisioning_job() from services/provisioning_service.py
with:
provisioning_play- Name of the Ansible playbook (e.g.,play_psim_only)provisioning_json_vars- JSON string of variables from the product or overridden by requestcustomer_id- ID of the customer ordering the serviceproduct_id- ID of the product being provisionedservice_id- (Optional) ID of existing service for addons- Inventory selections - IDs of selected inventory items
Step 2: Variable Assembly (services/provisioning_service.py)
The provisioning service merges variables from multiple sources in this order:
- Product's
provisioning_json_vars(defaults from product definition) - Request body parameters (can override product defaults)
- System-added variables:
access_token- JWT token for API authentication back to CRMinitiating_user- User ID who triggered provisioningcustomer_id,product_id,service_id
- Inventory selections - Added as
{inventory_type: inventory_id}pairs
Example merged variables:
{
    "customer_id": 123,
    "product_id": 456,
    "service_id": 789,          # Only for addons
    "SIM Card": 1001,           # From inventory selection
    "Mobile Number": 1002,      # From inventory selection
    "monthly_cost": 30,         # From provisioning_json_vars
    "data_gb": 50,              # From provisioning_json_vars
    "access_token": "eyJ...",   # System-added for API callbacks
    "initiating_user": 5        # System-added
}
Step 3: Provision Record Creation (models.py - Provision model)
A Provision record is created in the database with:
provision_id- Unique identifier for trackingprovisioning_play- Playbook filenameprovisioning_json_vars- Merged variables as JSON stringtask_count- Number of tasks in the playbook (extracted from YAML)provisioning_status- Status code (initially set to 1 = running, then updated to 0 = success, 2 = failed, or may remain 1 if still in progress)product_id,customer_id,service_id- Context references
Step 4: Background Playbook Execution
(Provisioners/playbook_runner_v2.py)
The API spawns a background thread that:
- Loads the playbook YAML from
OmniCRM-API/Provisioners/plays/{playbook_name}.yaml - Calls
ansible_runner.run()with:playbook- Path to the loaded YAML fileextravars- All merged variables (passed to Ansible)inventory- Set to'localhost,'(local execution)event_handler- Custom handler to capture task execution events
- Monitors playbook execution in real-time
Step 5: Event Capture and Logging (ProvisioningEventHandler)
As each Ansible task executes, events are captured and stored as
Provision_Event records:
event_name- Task name from playbookevent_number- Sequence numberprovisioning_status- Status code indicating task outcome:- 0 = Success - Task completed successfully
- 1 = Running - Task is currently executing
- 2 = Failed - Critical failure that stops provisioning
- 3 = Failed (ignored) - Task failed but errors were ignored
(
ignore_errors: truein playbook)
provisioning_result_json- Task results with sensitive data redacted
The event handler automatically strips passwords, keys, secrets, and other sensitive data from logs.
Step 6: Ansible Playbook Execution (Provisioners/plays/*.yaml)
The Ansible playbook runs locally and typically performs these actions:
a. Fetch Product Definition - GET request to
/crm/product/product_id/{{ product_id }} using
{{ access_token }}
b. Fetch Customer Information - GET request to
/crm/customer/customer_id/{{ customer_id }}
c. Process Inventory Items (if required) - GET request to
/crm/inventory/inventory_id/{{ inventory_id }} for each selected
item to retrieve full details (ICCID, MSISDN, serial numbers, etc.)
d. Configure External Systems - Make API calls to:
- HSS (Home Subscriber Server) for subscriber provisioning
- IMS (IP Multimedia Subsystem) for voice registration
- CGRateS/OCS for account creation, charging configuration, rate plans
- ENUM servers for phone number mapping
- Network equipment (routers, switches, etc.)
e. Add Setup Costs (if applicable) - POST to /crm/transaction/ to
record one-time charges
f. Charge the Customer - POST to OCS/CGRateS to charge retail_setup_cost if configured
g. Create OCS Account - POST to OCS/CGRateS to create billing account with UUID
h. Configure Recurring Charges - Create Actions and ActionPlans in OCS/CGRateS for monthly recurring charges
i. Create Service Record - PUT/POST to /crm/service/ to create
the service record in CRM:
{
  "customer_id": 123,
  "product_id": 456,
  "service_name": "Mobile SIM - 0412345678",
  "service_uuid": "generated-uuid-for-ocs",
  "service_status": "Active",
  "service_type": "mobile",
  "retail_cost": 30,
  "wholesale_cost": 5,
  "provisioning_play": "play_psim_only",
  "provisioning_json_vars": "{...}"
}
j. Assign Inventory - PATCH to
/crm/inventory/inventory_id/{{ inventory_id }} to mark inventory
as "Assigned" to the service
k. Send Notifications (optional) - Email or SMS to customer with service details
Step 7: Completion and Status Update
When playbook completes:
- Success:
Provision.provisioning_statusupdated to 0 (Success) - Critical Failure:
Provision.provisioning_statusupdated to 2 (Failed), and failure email sent tocrm_config.provisioning.failure_list - Non-Critical Failures: Tasks that fail with
ignore_errors: trueare marked with status 3 (Failed but ignored) and do not stop provisioning
The provisioned service is now visible in the CRM and active for the customer (if provisioning succeeded).
Key Differences: Standalone vs Addon vs Bundle Provisioning
Standalone Products (category: standalone):
- Receive
customer_idandproduct_id - Typically require inventory items (SIM cards, phone numbers, modems)
- Create new service record via API PUT
/crm/service/ - Provision new resources on external systems (HSS, OCS, network equipment)
- Example: New mobile SIM activation, new internet connection
Addon Products (category: addon):
- Receive
customer_id,product_id, and ``service_id`` (existing service to modify) - Typically do NOT require inventory (or minimal inventory)
- Modify existing service or add charges to existing OCS account
- May execute actions on OCS (add data pack, add credit, enable feature)
- Do not create new service records (or create child service records linked to parent)
- Example: Monthly data plan top-up, international roaming pack, extra credit
Bundle Products (category: bundle):
- Similar to addons in terms of variables received
- May require some inventory items (e.g., modem for home bundle)
- Create multiple related service records (Internet + TV + Phone)
- Provision multiple resources across different systems
- Link services together in CRM for unified billing/management
- Example: Home bundle (Internet + IPTV + VoIP phone)
Provisioning Playbook Requirements
For a playbook to work correctly, it must:
- Be located at
OmniCRM-API/Provisioners/plays/{playbook_name}.yaml - Accept variables via Ansible's
extravars(accessed as{{ variable_name }}) - Authenticate API calls using
Authorization: Bearer {{ access_token }}header - Handle failures gracefully using
rescueblocks andignore_errorswhere appropriate - Create service record for standalone products, or modify existing service for addons
- Assign inventory if inventory items were selected
- Return meaningful error messages via
failmodule when critical errors occur
Common Variables Available in Playbooks
Every playbook receives these variables:
customer_id- Integer, customer ordering the serviceproduct_id- Integer, product being provisionedservice_id- Integer (addons/bundles only), existing service to modifyaccess_token- String, JWT token for CRM API authenticationinitiating_user- Integer, user who triggered provisioning- Plus any inventory item IDs:
{{ inventory_type }}: inventory_id - Plus any variables from
provisioning_json_vars - Plus any variables passed in the provision request
Playbooks can use these to:
- Fetch full product details:
GET /crm/product/product_id/{{ product_id }} - Fetch customer details:
GET /crm/customer/customer_id/{{ customer_id }} - Fetch inventory details:
GET /crm/inventory/inventory_id/{{ SIM_Card }} - Create transactions:
POST /crm/transaction/ - Create services:
PUT /crm/service/ - Update services:
PATCH /crm/service/{{ service_id }} - Assign inventory:
PATCH /crm/inventory/inventory_id/{{ inventory_id }}
Example: Simple Addon Playbook Flow
For a mobile data top-up addon:
- Playbook receives:
customer_id,product_id,service_id,access_token - Fetch service details:
GET /crm/service/{{ service_id }}to getservice_uuid - Fetch product details:
GET /crm/product/product_id/{{ product_id }}to get pricing and data amount - Charge customer in OCS:
POST to CGRateSto deduct retail_cost from balance - Add data credit in OCS:
POST to CGRateSto add data balance with expiry - Record transaction in CRM:
POST /crm/transaction/with charge details - Complete successfully
The entire process is tracked in the Provision and Provision_Event
tables for debugging and audit purposes.
OCS Involvement
OCS (Online Charging System), implemented via CGRateS, handles all
real-time charging and usage tracking for services. The CRM service
record acts as a pointer to the OCS account, which manages:
- Recurring charges - Monthly fees, DID rental, subscription charges
- Usage-based charging - Per-minute voice calls, per-MB data, per-SMS charges
- Balance management - Monetary balances (prepaid credit) and unitary balances (data GB, voice minutes, SMS count)
- Balance conversions - Converting monetary balances into unitary balances (e.g., spending $30 to get 10GB data pack)
- Account state - Active, suspended, disabled based on credit limits and thresholds
The CRM service record contains metadata and configuration (customer, product, pricing, visibility), while OCS contains the live billing state (balances, usage, charges).
Retrieving Service Usage and Balances
Service usage information is retrieved from OCS/CGRateS and displayed to customers and staff in real-time.
How Usage is Retrieved
When a service's usage is requested (via UI or API), the following flow occurs:
-
API Request - Frontend calls
GET /crm/service/{service_id}or views service details in UI -
Service Lookup - API retrieves service record from database, extracts
service_uuid -
CGRateS API Calls - The
cgrates_service.pymodule makes two calls to CGRateS:a. Get_Balance(service_uuid) - Retrieves account balance with
BalanceMap- Returns balances organized by type: DATA, VOICE, SMS, MONETARY, DATA_DONGLE
- Each balance includes: ID, Value, ExpirationDate, Weight, DestinationIDs
- System adds human-readable fields:
custom_Name_hr,custom_Expiration,custom_Description_Stringb. Get_ActionPlans(service_uuid) - Retrieves active auto-renewal action plans (covered in next section)
-
Response Merging - CGRateS data is merged into the service response:
{
  "service_id": 123,
  "service_name": "Mobile Service",
  "service_uuid": "abc-123-def",
  "cgrates": {
    "BalanceMap": {
      "DATA": [{
        "ID": "DATA_10GB",
        "Value": 5368709120,
        "ExpirationDate": "2025-02-01T00:00:00Z",
        "custom_Name_hr": "10GB Data Pack",
        "custom_Expiration": "Feb 1, 2025",
        "custom_Description_String": "5 GB remaining"
      }],
      "VOICE": [{
        "ID": "VOICE_UNLIMITED",
        "Value": 999999999,
        "custom_Name_hr": "Unlimited Calls",
        "custom_Description_String": "Unlimited minutes"
      }],
      "MONETARY": [{
        "ID": "PREPAID_CREDIT",
        "Value": 25.50,
        "custom_Description_String": "$25.50 credit"
      }]
    },
    "ActionPlans": [...]
  }
} -
UI Display - Frontend components display the usage data:
- ServiceUsage.js - Main usage display component with automatic refresh every 3 seconds
- UsageCard.js - Summary cards for each balance type
- UsageProgress.js - Progress bars showing percentage used/remaining
- Balances are color-coded and formatted for readability
Usage Data Structure
Each balance in the BalanceMap contains:
CGRateS Native Fields:
ID- Unique identifier for the balance (e.g., "DATA_10GB_2025_01")Value- Balance amount:- For DATA: bytes (5368709120 = 5 GB)
- For VOICE: seconds (3600 = 1 hour)
- For SMS: count (100 = 100 messages)
- For MONETARY: currency units (25.50 = $25.50)
ExpirationDate- ISO 8601 timestamp when balance expiresWeight- Priority for balance consumption (higher weight consumed first)DestinationIDs- Destinations this balance applies to (e.g., ["AU", "INTERNATIONAL"])
Human-Readable Fields (added by CRM):
custom_Name_hr- Human-readable name extracted from IDcustom_Expiration- Formatted expiration date (e.g., "Jan 15, 2025" or "in 11 days")custom_Description_String- Human-readable balance description:- DATA: "5 GB remaining" or "10 GB total"
- VOICE: "60 minutes remaining" or "Unlimited"
- SMS: "50 SMS remaining"
- MONETARY: "$25.50 credit"
Usage Visibility Control
Service usage visibility is controlled by two fields:
- service_visible_to_customer - If false, service is hidden entirely from customer's self-care portal
- service_usage_visible_to_customer - If false, service is visible but usage/balance details are hidden (customer can see they have the service, but not how much they've used)
This allows operators to:
- Hide internal/test services from customers
- Show service exists without revealing usage (useful for unlimited plans or sensitive services)
- Fully transparent usage display (default)
Real-Time Usage Updates
The Web UI automatically refreshes usage data:
- Interval: Every 3 seconds (configurable in ServiceUsage component)
- Method: Polls
GET /crm/service/{service_id}which fetches live data from CGRateS - Efficiency: Only active service views refresh; list views use cached data
This ensures customers and staff see near-real-time balance updates as usage occurs.
Recurring Charges / AutoRenew
Recurring charges, such as a Monthly Service Charge, or a Per-DID-Charge
are first created as Actions inside OCS and take the format
Action_ServiceUUID_ServiceName_WhatitDoes.
For say a $60 per month GPON service that includes 1TB of usage, the Action would look something like this:
Action_kj49-adsf-1234-9742_60_GPON_1TB_MonthlyExpiry
- Reset Monetary Balance to $0
- Send an HTTP POST to
/simple_provisionon the CRM to provision something - Add a Credit for 1TB Usage expiring in 1 month
If we want to make the MRC recurring (we do) then we would create an
ActionPlan named ActionPlan_{{ service_uuid }}_Monthly_Charge which
would have the time set to monthly to trigger every month, and assign
the ActionPlan to the account.
We can set based on the Year / Months / Days parameter an expiry date for when the MRC will stop also, for example for a fixed 12 month service that stopped after this point.
Because the Actions and ActionPlans are both unique to the service,
they do not share anything with any other services.
This means that we can provision them with adjusted values, and it will not impact any other services.
Addons & Bolt Ons
Addons / Bolt-Ons such as buying extra data, roaming packs, international minutes, etc, are handled in much the same way. An Action is created to do what is needed, such as charging a monetary value and then granting a unitary balance with a set expiry.
Rather than using ActionPlans to automatically add this to reoccur on
the account, we just trigger ExecuteAction for the Action we just
created once off from within Ansible.
Adding Prepaid Monetary Balances
For prepaid monetary balances, such as a $10 PAYG plan, this is added as a monetary balance, but with a higher priority.
The credit limit on these services for the default balance would be $0.
Credit Limits / Preventing Excessive Overspend
ThresholdS are used on each account to set the maximum spend for a
given time period.
For PAYG / Prepaid customers, this is $0.
Interacting with OCS via CRM
For each Service you can see the Balances and ActionPlans, Actions
and ThresholdS from OCS from within the CRM API.
ActionPlans can be removed as needed from the CRM API, actioned via
Ansible Playbooks. ActionPlans can be added as needed, from the CRM,
by adding an Addon/Service and actioned via Ansible Playbooks.
OCS accounts can be disabled, which will stop ActionPlans from being
executed and from services being able to be consumed.
For Credit Limits, a ThresholdS value is set per the policy for the
product.
Viewing and Managing ActionPlans in the CRM
ActionPlans (auto-renewal configurations) are displayed and managed through the CRM interface, allowing staff and customers to see upcoming automatic renewals and manage them.
How ActionPlans are Retrieved and Displayed
When viewing a service in the CRM, ActionPlans are automatically fetched and displayed:
-
API Call - When
GET /crm/service/{service_id}is called, the API:- Retrieves the service record from the database
- Extracts the
service_uuid(OCS account identifier) - Calls
get_cgrates_action_plans_by_service_uuid(service_uuid)fromcgrates_service.py - This internally calls
ocs.Get_ActionPlans(service_uuid)to fetch ActionPlans from CGRateS
-
ActionPlan Data Structure - Each ActionPlan returned contains:
{
    "ActionPlanId": "ServiceID_abc-123-def__ProductID_456__...",
    "PlanName": "Monthly_Renewal_Plan",
    "NextExecTime": "2025-02-01T00:00:00Z",
    "custom_NextExecTime_hr": "in 11 days",
    "ActionPlanId_split_dict": {
        "ServiceID": "abc-123-def",
        "ProductID": 456,
        "CustomerID": 789,
        ...
    }
}ActionPlanId- Unique identifier containing encoded service/product/customer informationPlanName- Name of the action plan (typically the renewal playbook name)NextExecTime- ISO timestamp when the ActionPlan will next executecustom_NextExecTime_hr- Human-readable time until execution (e.g., "in 11 days", "tomorrow", "Feb 1, 2025")ActionPlanId_split_dict- Dictionary with parsed components from the ActionPlanId
-
UI Display - ActionPlans are shown in the ActionPlansTable component:
Table Columns:
- Product Name - Retrieved by looking up
ProductIDfrom the ActionPlanId - Cost - Shows
retail_costfrom the product definition - Renewal Date - Displays
custom_NextExecTime_hr(human-readable) - Actions - Two buttons:
- Renew Now - Immediately provision the addon/renewal (bypasses waiting for scheduled execution)
- Remove Auto Renew - Cancels the automatic renewal
When No ActionPlans Exist:
- Table shows message: "No auto-renew enabled for this service"
- Customer can add auto-renewing addons to enable auto-renewal
- Product Name - Retrieved by looking up
Managing ActionPlans
Staff and customers can manage ActionPlans through the UI:
Removing an ActionPlan (Canceling Auto-Renewal):
- Click "Remove Auto Renew" button in ActionPlansTable
- Confirmation modal appears: "Are you sure you want to remove this auto-renewal?"
- On confirmation, frontend calls:
DELETE /crm/oam/remove_action_plan/{action_plan_id} - API removes the ActionPlan from CGRateS via
ocs.Remove_ActionPlan() - Activity is logged: "Removed ActionPlan {ActionPlanId} from service {service_id}"
- ActionPlan disappears from the table
Renewing Immediately (Manual Renewal):
- Click "Renew Now" button in ActionPlansTable
- Confirmation modal appears: "Are you sure you want to renew this now?"
- On confirmation, the system:
- Extracts product_id from ActionPlanId
- Creates a new provisioning job for that product
- Provisions the addon immediately (runs the provisioning playbook)
- Service receives the addon benefits without waiting for scheduled renewal
- Provisioning status modal shows progress
- On success, balances are immediately updated
Adding Auto-Renewal:
Auto-renewal is enabled by provisioning an addon product that has
auto_renew set:
- Products with
auto_renew = "true"- Automatically create ActionPlans during provisioning - Products with
auto_renew = "prompt"- Ask customer if they want auto-renewal (modal dialog) - Products with
auto_renew = "false"- Never create ActionPlans (one-time purchase)
The provisioning playbook creates the ActionPlan in CGRateS with:
- Unique ActionPlanId encoding service, product, and customer IDs
- Renewal schedule (monthly, yearly, custom interval)
- Action to execute (typically reprovisioning the same addon)
- Expiration date (if contract has fixed term)
ActionPlan Naming Convention
ActionPlans follow a standardized naming convention to encode metadata:
Format:
ServiceID_{service_uuid}__ProductID_{product_id}__CustomerID_{customer_id}__...
Example:
ServiceID_abc-123-def__ProductID_456__CustomerID_789__MonthlyRenewal
This encoding allows the CRM to:
- Identify which service the ActionPlan belongs to
- Look up product details (name, pricing) for display
- Track customer ownership
- Parse renewal type and schedule
The CRM automatically parses these components into
ActionPlanId_split_dict for easy access.
ActionPlans in Service View
When viewing a service in the CRM, the ActionPlans table is displayed in the service details:
Staff View (ServiceView.js):
- Shows full ActionPlans table with all management options
- Displays product names, costs, renewal dates
- Allows removal and immediate renewal
Customer Self-Care View:
- Shows upcoming renewals in a simplified view
- Displays next renewal date and amount
- May allow customers to disable auto-renewal (configurable per product)
Empty State:
- If no ActionPlans exist: "No auto-renew enabled for this service"
- Suggests adding an auto-renewing addon to enable automatic renewals
ActionPlans and Expiring Services
The CRM includes an expiring services endpoint that identifies services needing renewal:
GET /crm/service/expiring?threshold=7
This returns services expiring within the threshold days and includes:
- Services with balances expiring soon
- Services without active ActionPlans (manual renewal required)
- Services with ActionPlans scheduled to execute soon
This allows operators to:
- Send renewal reminders to customers
- Identify at-risk customers (expiring without auto-renewal)
- Monitor upcoming auto-renewals
- Proactively manage service continuity