Customer Invoices
Transactions are grouped together to form an invoice, which is sent to the customer for payment.
Invoices have a start and end date, which is the period the invoice covers, and a due date, which is the date the invoice is due for payment.
Invoices can be automatically generated by the system, for example, when a service is billed, an invoice is created for the retail cost, or they can be manually created, for example, if a customer requests a copy of an invoice, or if a customer is billed for a one-time charge.
Customer invoices are fully templated with Mailjet and can be customized to include the company logo, address, and payment details, and can be sent to the customer via email, or downloaded as a PDF.
Customizing Invoice Templates
OmniCRM uses HTML templates with Jinja2 templating to generate invoices. You can fully customize the invoice design, branding, colors, and layout.
Invoice Template Location
Invoice templates are stored in OmniCRM-API/invoice_templates/
Default Templates:
norfone_invoice_template.html- Sample invoice templatecifi_invoice_template.html- Alternative template example
Configuration:
The active invoice template is specified in
OmniCRM-API/crm_config.yaml:
invoice:
  template_filename: 'norfone_invoice_template.html'
Available Template Variables
Invoice templates have access to the following Jinja2 variables:
Invoice Information:
{{ invoice_number }}- Unique invoice ID (e.g.,INV-2025-001234){{ date }}- Invoice issue date (ISO format:2025-01-10T12:00:00){{ due_date }}- Payment due date (e.g.,2025-02-10){{ start_date }}- Billing period start date{{ end_date }}- Billing period end date{{ total_amount }}- Total invoice amount before tax (numeric){{ total_tax }}- Total tax amount calculated from all transactions (numeric)
Customer Information:
{{ client.name }}- Customer's full name or company name{{ client.address.address_line_1 }}- Address line 1{{ client.address.address_line_2 }}- Address line 2{{ client.address.city }}- City{{ client.address.state }}- State/province{{ client.address.zip_code }}- Postal/ZIP code{{ client.address.country }}- Country
Transaction Line Items:
Loop through transactions using:
{% for sub_transaction in transactions %}
    <tr>
        <td>{{ sub_transaction.transaction_id }}</td>
        <td>{{ sub_transaction.created.split("T")[0] }}</td>
        <td>{{ sub_transaction.title }}</td>
        <td>{{ sub_transaction.description }}</td>
        <td>${{ "%.2f"|format(sub_transaction.retail_cost) }}</td>
    </tr>
{% endfor %}
Transaction Fields:
sub_transaction.transaction_id- Transaction IDsub_transaction.created- Transaction date/timesub_transaction.title- Transaction titlesub_transaction.description- Detailed descriptionsub_transaction.retail_cost- Line item amountsub_transaction.tax_percentage- Tax percentage applied (e.g., 10 for 10%)sub_transaction.tax_amount- Calculated tax amount in dollars
Displaying Tax in Templates:
<td>
    {% if sub_transaction.tax_amount and sub_transaction.tax_amount > 0 %}
        ${{ "%.2f"|format(sub_transaction.tax_amount) }} ({{ sub_transaction.tax_percentage }}%)
    {% else %}
        -
    {% endif %}
</td>
Creating a Custom Invoice Template
Step 1: Copy Existing Template
cd OmniCRM-API/invoice_templates/
cp norfone_invoice_template.html your_company_invoice_template.html
Step 2: Customize HTML/CSS
Edit your_company_invoice_template.html to match your branding:
Key Customization Areas:
-
Company Logo and Branding
<!-- Replace with your logo URL -->
<img src="https://yourcompany.com/logo.png" alt="Your Company" width="200">

<!-- Update company name -->
<h1>Your Company Name</h1> -
Color Scheme
<style>
    /* Primary brand color */
    .navbar {
        background: linear-gradient(to bottom right, #your-color-1, #your-color-2);
    }

    /* Table headers */
    .table thead th {
        background-color: #your-brand-color !important;
        color: white !important;
    }

    /* Buttons and links */
    .btn-primary {
        background-color: #your-brand-color;
    }
</style> -
Company Information Footer
<footer>
    <p>Your Company Name</p>
    <p>123 Business Street, City, Country</p>
    <p>Phone: +1-555-123-4567 | Email: billing@yourcompany.com</p>
    <p>ABN/Tax ID: 12345678900</p>
</footer> -
Payment Instructions
<div class="payment-info">
    <h3>Payment Methods</h3>
    <p><strong>Online:</strong> Pay at https://yourcompany.com/pay</p>
    <p><strong>Bank Transfer:</strong></p>
    <ul>
        <li>Account Name: Your Company Ltd</li>
        <li>BSB: 123-456</li>
        <li>Account Number: 987654321</li>
        <li>Reference: {{ invoice_number }}</li>
    </ul>
</div> -
Terms and Conditions
<div class="terms">
    <h4>Payment Terms</h4>
    <p>Payment due within 30 days of invoice date.</p>
    <p>Late payment fees: 2% per month on overdue balances.</p>
    <p>For billing inquiries: billing@yourcompany.com</p>
</div>
Step 3: Update Configuration
Edit OmniCRM-API/crm_config.yaml:
invoice:
  template_filename: 'your_company_invoice_template.html'
Step 4: Restart API
cd OmniCRM-API
sudo systemctl restart omnicrm-api
Step 5: Test Invoice Generation
- Navigate to a customer with transactions
- Generate a test invoice
- Download PDF to verify formatting
- Email invoice to yourself to test email delivery
Advanced Customization
Conditional Content:
Use Jinja2 conditionals to show/hide content:
{% if total_amount > 1000 %}
    <div class="high-value-notice">
        <p><strong>Note:</strong> Large balance - Payment plan available upon request.</p>
    </div>
{% endif %}

{% if client.address.country == "Australia" %}
    <p>GST Included: ${{ "%.2f"|format(total_amount * 0.10) }}</p>
{% endif %}
Multi-Language Support:
Create language-specific templates:
invoice_template_en.html
invoice_template_es.html
invoice_template_fr.html
Configure based on customer's language preference.
Custom Calculations:
<!-- Display subtotal and tax breakdown -->
<tr>
    <td colspan="4" class="text-right"><strong>Subtotal:</strong></td>
    <td>${{ "%.2f"|format(total_amount) }}</td>
</tr>
<tr>
    <td colspan="4" class="text-right"><strong>Tax:</strong></td>
    <td>${{ "%.2f"|format(total_tax) }}</td>
</tr>
<tr>
    <td colspan="4" class="text-right"><strong>Total:</strong></td>
    <td>${{ "%.2f"|format(total_amount + total_tax) }}</td>
</tr>
Note: The total_tax variable is automatically calculated by
summing the tax_amount from all transactions in the invoice. Each
transaction's tax is calculated based on its tax_percentage field,
which defaults to the product's tax_percentage or 0% if not
specified.
QR Code for Payment:
Generate QR code for mobile payment:
<div class="qr-payment">
    <img src="https://api.qrserver.com/v1/create-qr-code/?size=150x150&data={{ payment_url }}"
         alt="Scan to Pay">
    <p>Scan with your phone to pay instantly</p>
</div>
PDF Styling Best Practices
OmniCRM uses WeasyPrint to convert HTML to PDF. Follow these guidelines:
Supported CSS:
- Most CSS 2.1 properties
- Limited CSS3 (flexbox, some transforms)
- Web fonts via
@font-face
Not Supported:
- JavaScript
- CSS Grid (use tables instead)
- Complex animations
- Some modern CSS properties
Page Size and Margins:
@page {
    size: A4;
    margin: 1cm;
}

body {
    font-family: Arial, sans-serif;
    font-size: 10pt;
}
Print-Specific Styling:
@media print {
    .no-print {
        display: none;
    }

    .page-break {
        page-break-after: always;
    }
}
Table Layout:
.table {
    table-layout: fixed;
    width: 100%;
}

.table th, .table td {
    word-wrap: break-word;
    padding: 4px;
}
Font Embedding:
For custom fonts, use web-safe fonts or embed:
@font-face {
    font-family: 'YourFont';
    src: url('https://yourcompany.com/fonts/yourfont.woff2') format('woff2');
}

body {
    font-family: 'YourFont', Arial, sans-serif;
}
Testing Invoice Templates
Test Checklist:
- Visual Inspection:
- Logo displays correctly
- Colors match brand guidelines
- Text is readable (not too small)
- Tables align properly
- All sections present
- Data Accuracy:
- Customer details correct
- Transaction amounts sum correctly
- Dates formatted properly
- All variables substituting correctly
- PDF Quality:
- File size reasonable (<5MB)
- Images sharp and clear
- No text cutoff or overflow
- Page breaks in appropriate places
- Multi-Page Invoices:
- Headers repeat on each page
- Page numbers display
- Long transaction lists paginate correctly
- Email Delivery:
- PDF attaches to email
- File size under Mailjet limit (15MB)
- Renders in Gmail, Outlook, Apple Mail
Test Command (Manual Generation):
You can test invoice generation via API:
curl -X GET "http://localhost:5000/crm/invoice/{invoice_id}/pdf" \
     -H "Authorization: Bearer YOUR_TOKEN" \
     --output test_invoice.pdf
Common Template Issues
Variables not substituting:
- Cause: Typo in variable name or missing data
- Fix: Check spelling exactly (case-sensitive), verify data exists in database
PDF styling broken:
- Cause: Unsupported CSS property
- Fix: Use CSS 2.1 properties, test with WeasyPrint-compatible CSS
Images not showing:
- Cause: Relative URLs or blocked external resources
- Fix: Use absolute HTTPS URLs, ensure images publicly accessible
Tables overflowing page:
- Cause: Fixed column widths too wide
- Fix: Use percentage widths,
table-layout: fixed
Fonts not rendering:
- Cause: Font not embedded or unavailable
- Fix: Use web-safe fonts (Arial, Times New Roman, etc.) or properly embed custom fonts
PDF generation fails:
- Cause: HTML syntax errors or WeasyPrint crash
- Fix: Validate HTML, check WeasyPrint logs, simplify complex layouts
Invoice PDF Caching
To improve performance and reduce redundant PDF generation, OmniCRM includes an Invoice PDF caching system. When an invoice PDF is first generated, it is cached in the database for subsequent requests.
How PDF Caching Works:
- First Request - When an invoice PDF is requested (download or
email), the system:
- Generates the PDF from the invoice template
- Encodes the PDF as Base64
- Calculates a SHA256 hash of the PDF content
- Stores in
Invoice_PDF_Cachetable with:- Invoice ID reference
- PDF data (Base64-encoded)
- Filename
- Content hash (for integrity verification)
- Creation timestamp
- Subsequent Requests - When the same invoice is requested again:
- System checks for cached PDF by invoice_id
- If cache exists and is valid, returns cached PDF immediately
- Updates
last_accessedtimestamp to track cache usage
- Cache Invalidation - Cached PDFs are invalidated when:
- Invoice is modified (transactions added/removed, details changed)
- Invoice template is updated
- Manual cache clearing is triggered
Benefits:
- Performance - Instant PDF delivery for repeat requests (no regeneration delay)
- Consistency - Same PDF for all downloads of an invoice (unless invoice is modified)
- Server Load - Reduces CPU usage from PDF generation
- User Experience - Loading indicator appears during initial generation, subsequent requests are instant
Cache Management:
The Invoice PDF Cache is automatically managed by the system. Old or unused cache entries can be purged periodically based on:
- Age (e.g., remove cache entries older than 90 days)
- Access patterns (remove entries not accessed in 30 days)
- Storage limits (implement cache size limits if needed)
API Behavior:
When downloading an invoice via API or UI:
- First request: Shows loading indicator while PDF generates, then caches
- Subsequent requests: Immediate download from cache
- Cache hit/miss is transparent to the user
Important: When you update your invoice template, clear the cache to ensure new invoices use the updated design:
-- Clear all cached invoice PDFs (run in MySQL)
DELETE FROM Invoice_PDF_Cache;
Or update crm_config.yaml to automatically invalidate cache on
template change.
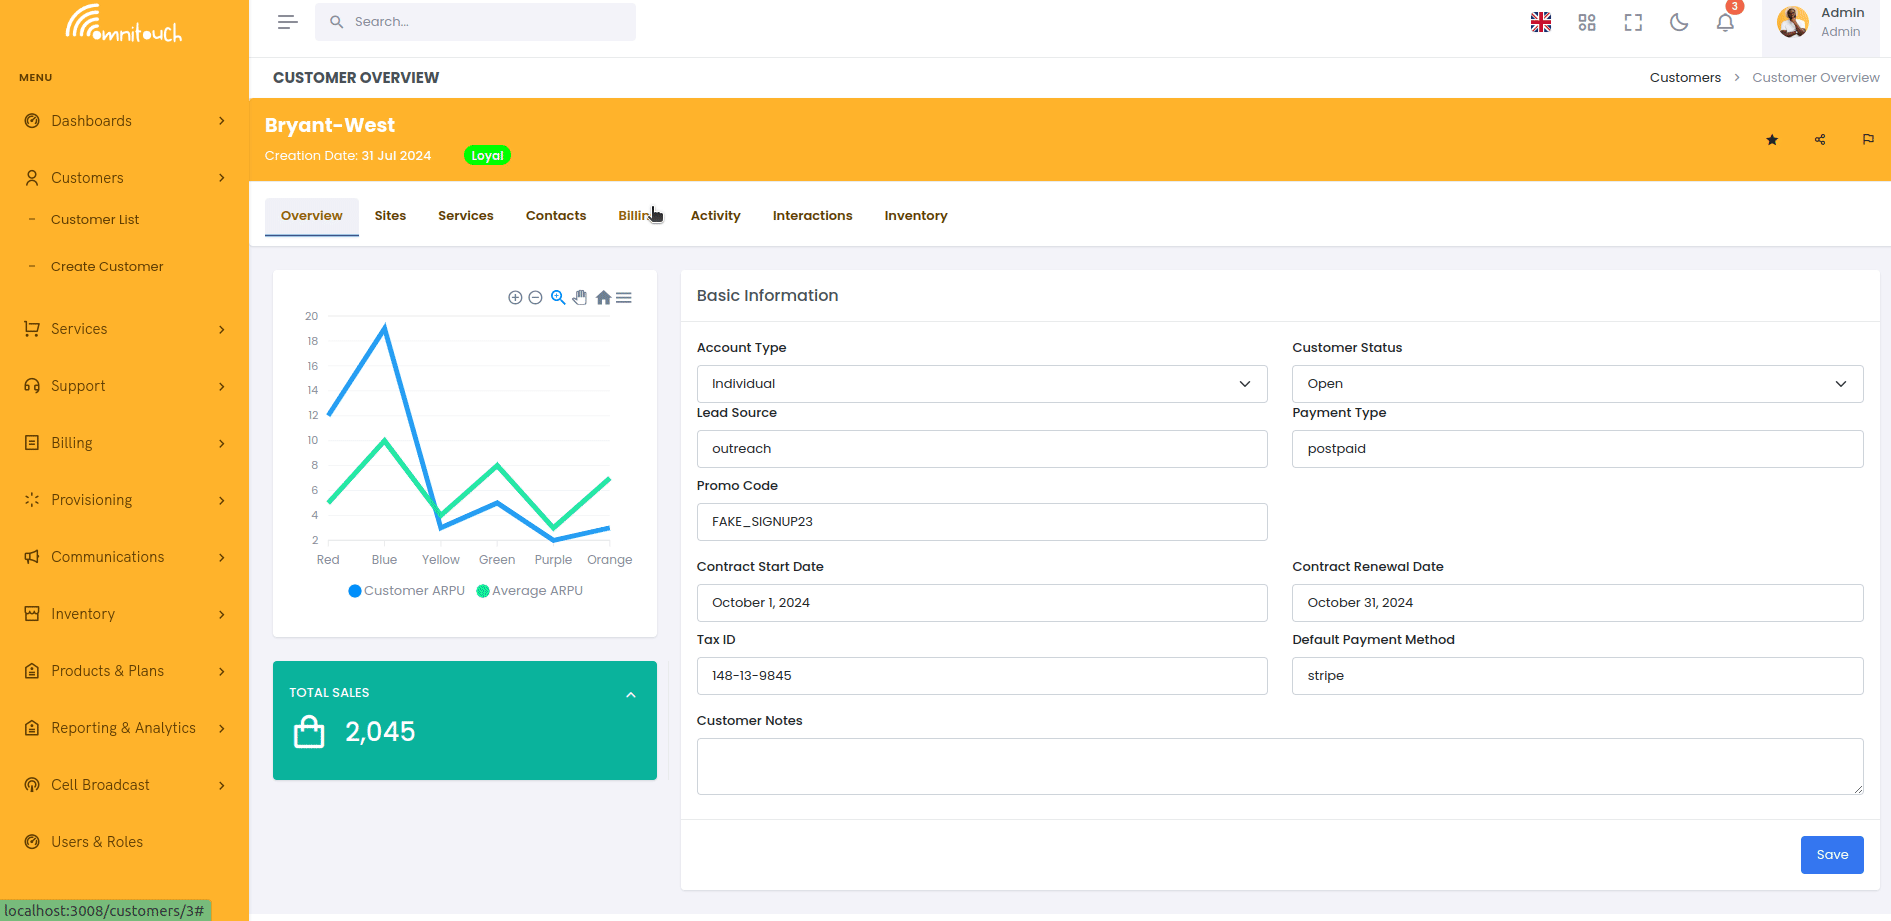
Accessing Invoices
Invoices can be viewed at the system level or per-customer:
Per-Customer View:
- Navigate to Customers → [Select Customer]
- Click Billing tab
- View invoices list in the third card
System-Wide View:
- Navigate to Billing → Invoices (from main menu)
- View all invoices across all customers
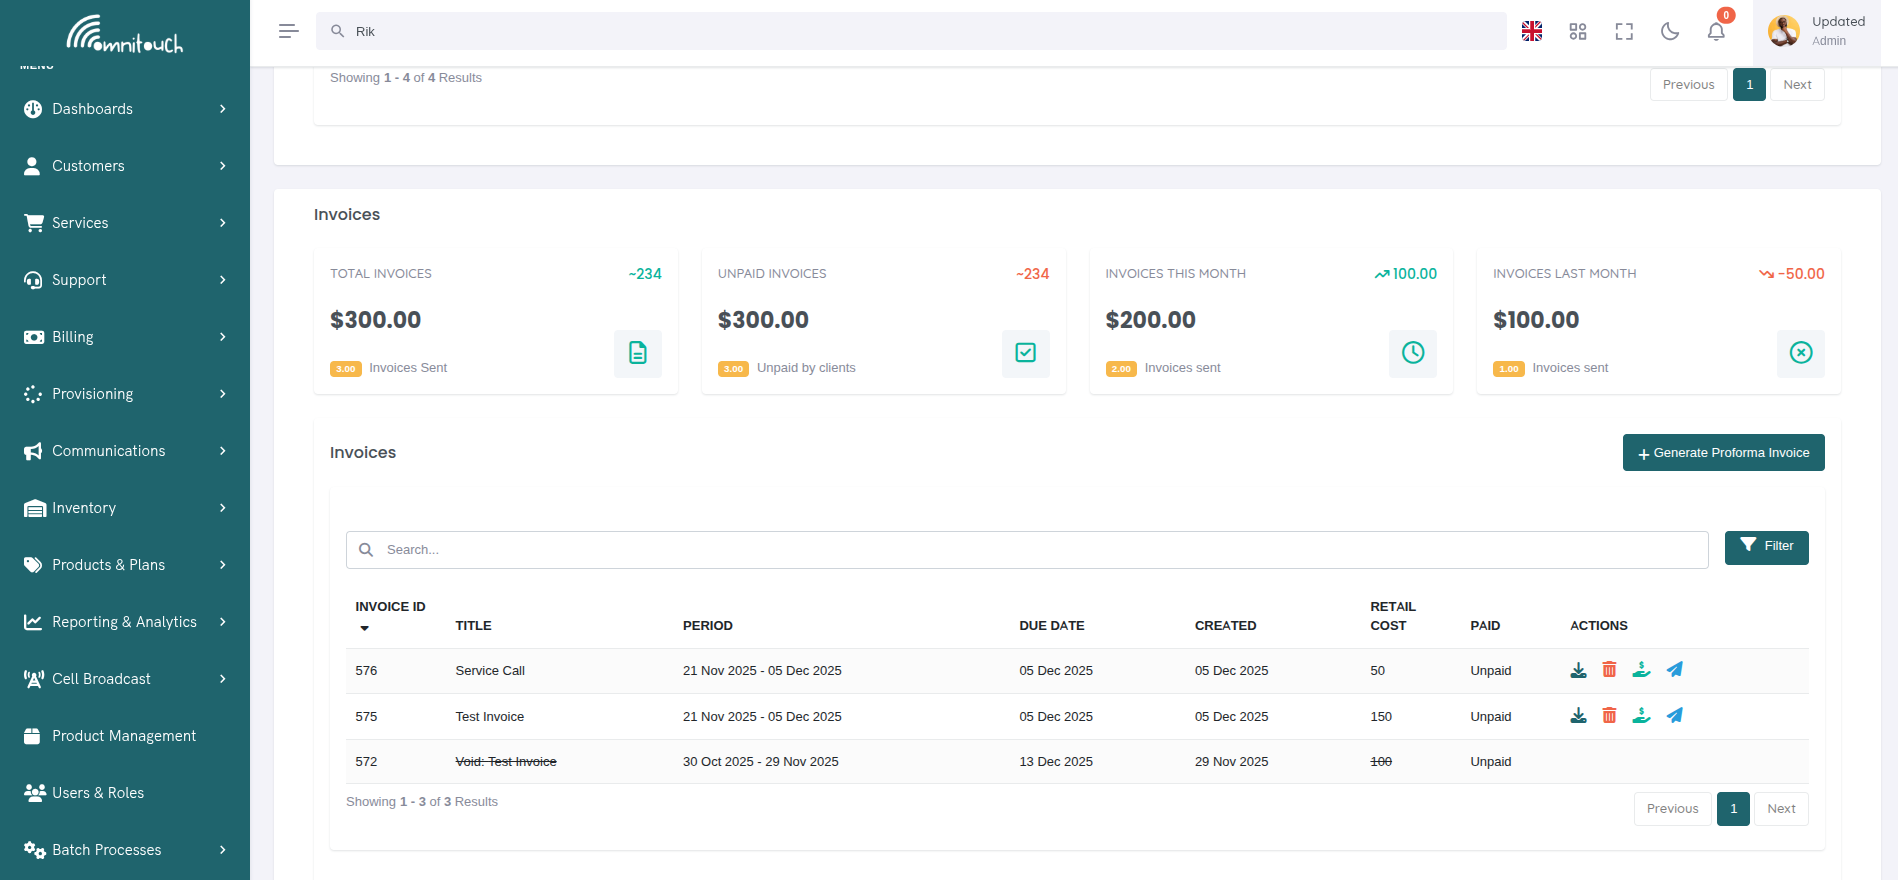
Invoice Statistics Widgets
At the top of the invoices page, four statistics cards display financial summaries.
 {.align-center
width="800px"}
{.align-center
width="800px"}
Widget Descriptions:
- Total Invoices - Sum of all invoice retail costs (all time) and count of invoices sent
- Unpaid Invoices - Sum of invoices not yet paid and count of unpaid invoices
- Invoices This Month - Sum of invoices created this calendar month with count
- Invoices Last Month - Sum of invoices created last calendar month with count
Value Formatting:
- Values over 1,000: Display as "k" suffix (e.g., $1.5k)
- Values over 1,000,000: Display as "M" suffix (e.g., $2.3M)
- Values over 1,000,000,000: Display as "B" suffix (e.g., $1.1B)
Trend Indicators:
- Widgets for "This Month" and "Last Month" show percentage change
- Green arrow up: Increase from previous period
- Red arrow down: Decrease from previous period
- Gray arrow right: No change
Invoices List
The invoices table displays all invoices with the following columns:
Column Descriptions:
- ID - Unique invoice ID
- Title - Invoice title/description
- Period - Billing period (start date - end date) or "N/A" for one-time invoices
- Due Date - Payment due date
- Created - Invoice creation date
- Amount - Total invoice amount (retail cost)
- Status - Paid, Unpaid, or Refunded
- Actions - Available actions (varies by status)
Action Icons:
- ⬇ (Download) - Download invoice PDF
- 🗑️ (Delete) - Void invoice (only if not paid)
- 💰 (Pay) - Pay invoice online (only if unpaid)
- ✉️ (Email) - Send invoice email to customer
- 💸 (Refund) - Refund Stripe payment (only for paid Stripe invoices)
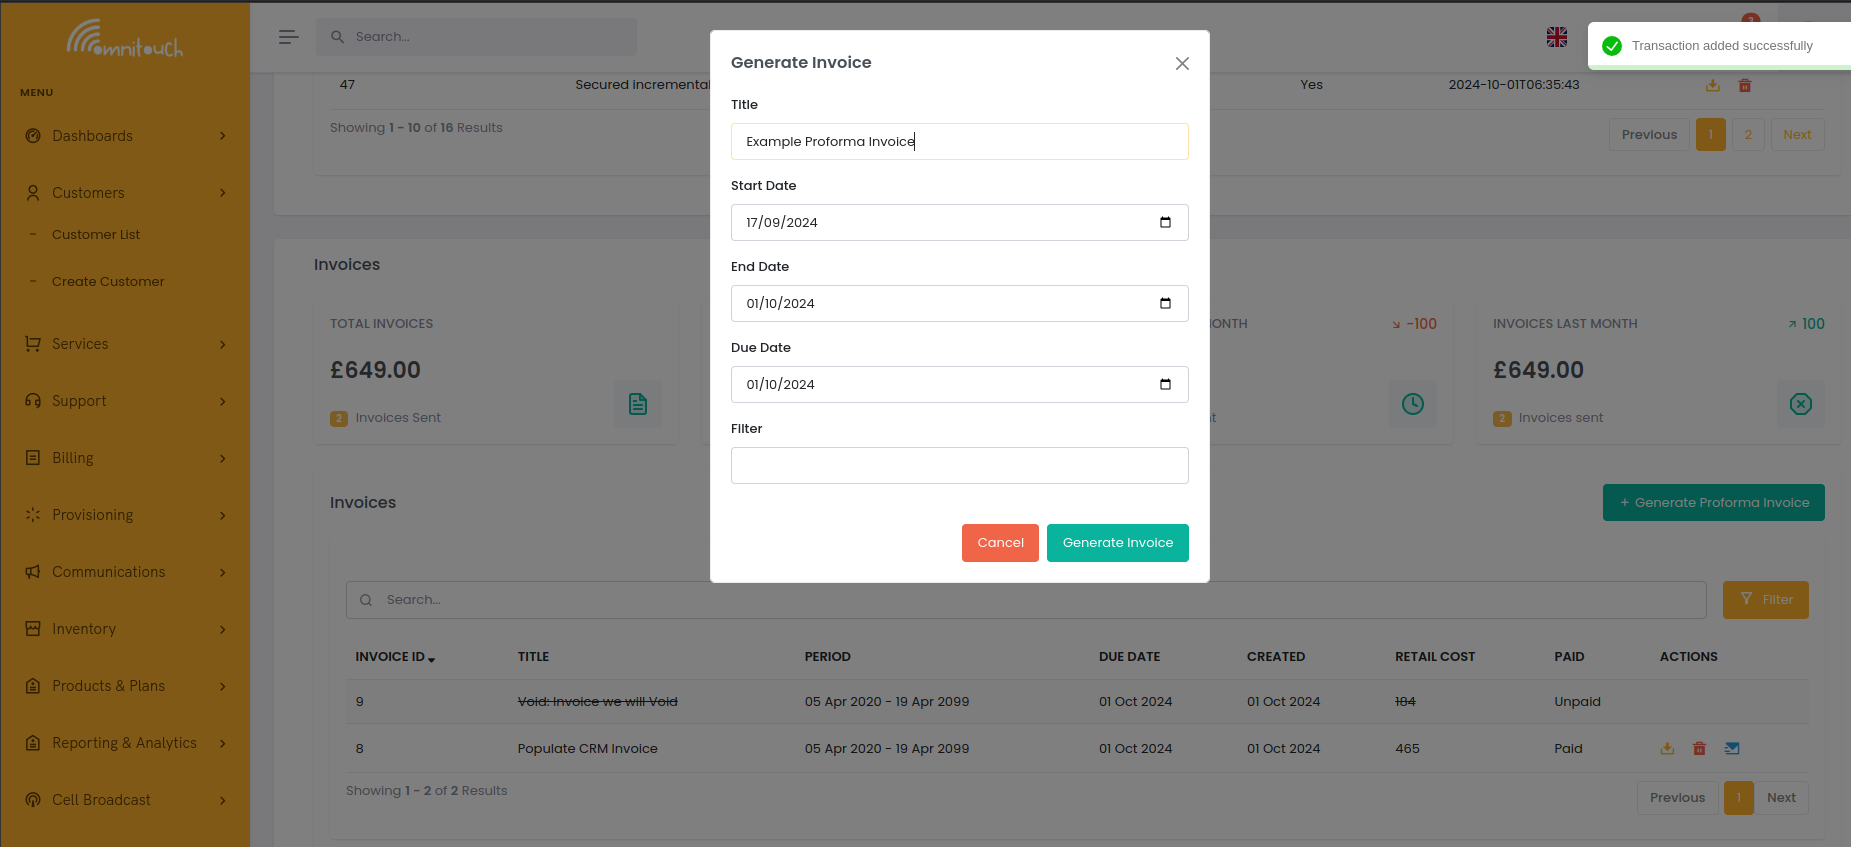
Generating an Invoice
Click "+ Generate Proforma Invoice" to create a new invoice.
 {.align-center
width="800px"}
{.align-center
width="800px"}
Field Descriptions:
- Search Customers - Select customer (only shown in system-wide view, pre-filled in customer view)
- Title - Invoice title/name (optional, defaults to "Invoice for [Period]")
- Start Date - Beginning of billing period (defaults to 14 days ago)
- End Date - End of billing period (defaults to today)
- Due Date - Payment deadline (defaults to today)
- Transaction Preview - Shows all uninvoiced transactions in date range with ability to include/exclude specific transactions
Transaction Selection:
- ✓ (Green Plus) - Click to exclude a transaction from the invoice
- × (Red X) - Click to include a previously excluded transaction
- Select All - Include all displayed transactions
- Clear All - Exclude all transactions
- Excluded transactions appear grayed out with strikethrough text
- Real-time totals update as you select/deselect transactions
What Happens:
- System finds all uninvoiced transactions for customer within date range
- Displays transaction preview with ability to include/exclude individual transactions
- Shows real-time calculation of subtotal, tax, and total based on selected transactions
- Only selected (included) transactions are added to the invoice
- Generates invoice PDF and caches it
- Marks selected transactions as invoiced (
invoice_idfield populated) - Excluded transactions remain uninvoiced and available for future invoices
- Invoice appears in list with "Unpaid" status
Example Use Cases:
Monthly Billing: Set start date to first of month, end date to last day of month, preview shows all uninvoiced transactions from that period. Select all or manually exclude specific ones.
Service-Specific Invoice: Use same date range, then manually exclude unwanted transactions (e.g., exclude non-mobile transactions to create mobile-only invoice).
One-Time Invoice: Set both start and end date to the same day, preview shows only transactions from that date. Exclude any charges not relevant to this specific invoice.
Viewing Invoice Details
Click on any invoice row in the table to view full invoice details including all transactions, totals, and available actions.
 {.align-center
width="800px"}
{.align-center
width="800px"}
Invoice Details Modal:
- Invoice Information - Shows invoice ID, title, dates, payment status, and void status
- Transactions List - Displays all transactions included in the
invoice with:
- Transaction date
- Title and description
- Retail cost
- Tax amount and percentage (formatted as
$10.00 (10%)) - Tax-exempt transactions show "-" in Tax column
- Totals Summary - Real-time calculation showing:
- Transaction count
- Subtotal (sum of all retail costs)
- Tax (sum of all tax amounts)
- Invoice Total (subtotal + tax)
- Action Buttons - Same actions available as in the table:
- Download PDF - Download invoice PDF (always available)
- Send Email - Email invoice to customer (non-voided invoices)
- Pay Invoice - Process payment (unpaid, non-voided invoices only)
- Refund - Refund Stripe payment (paid Stripe invoices only)
- Delete - Void invoice (unpaid, non-voided invoices only)
Downloading Invoice PDFs
Click the download icon (⬇) in the table or "Download PDF" button in the invoice details modal to download an invoice as PDF.
Download Process:
- Click download icon next to invoice
- Loading spinner appears during generation (first time only)
- Browser prompts to save file:
Invoice_01234.pdf - PDF opens or saves to Downloads folder
PDF Caching Behavior:
- First Download - PDF generated from template, cached in database (may take 2-3 seconds)
- Subsequent Downloads - Instant download from cache
- Cache Invalidation - Cache cleared if invoice modified or template updated
Troubleshooting Download Issues:
- Spinner never stops - Check browser console, API may be down
- PDF blank or corrupted - Check invoice template for syntax errors
- Download fails - Check popup blocker settings, try different browser
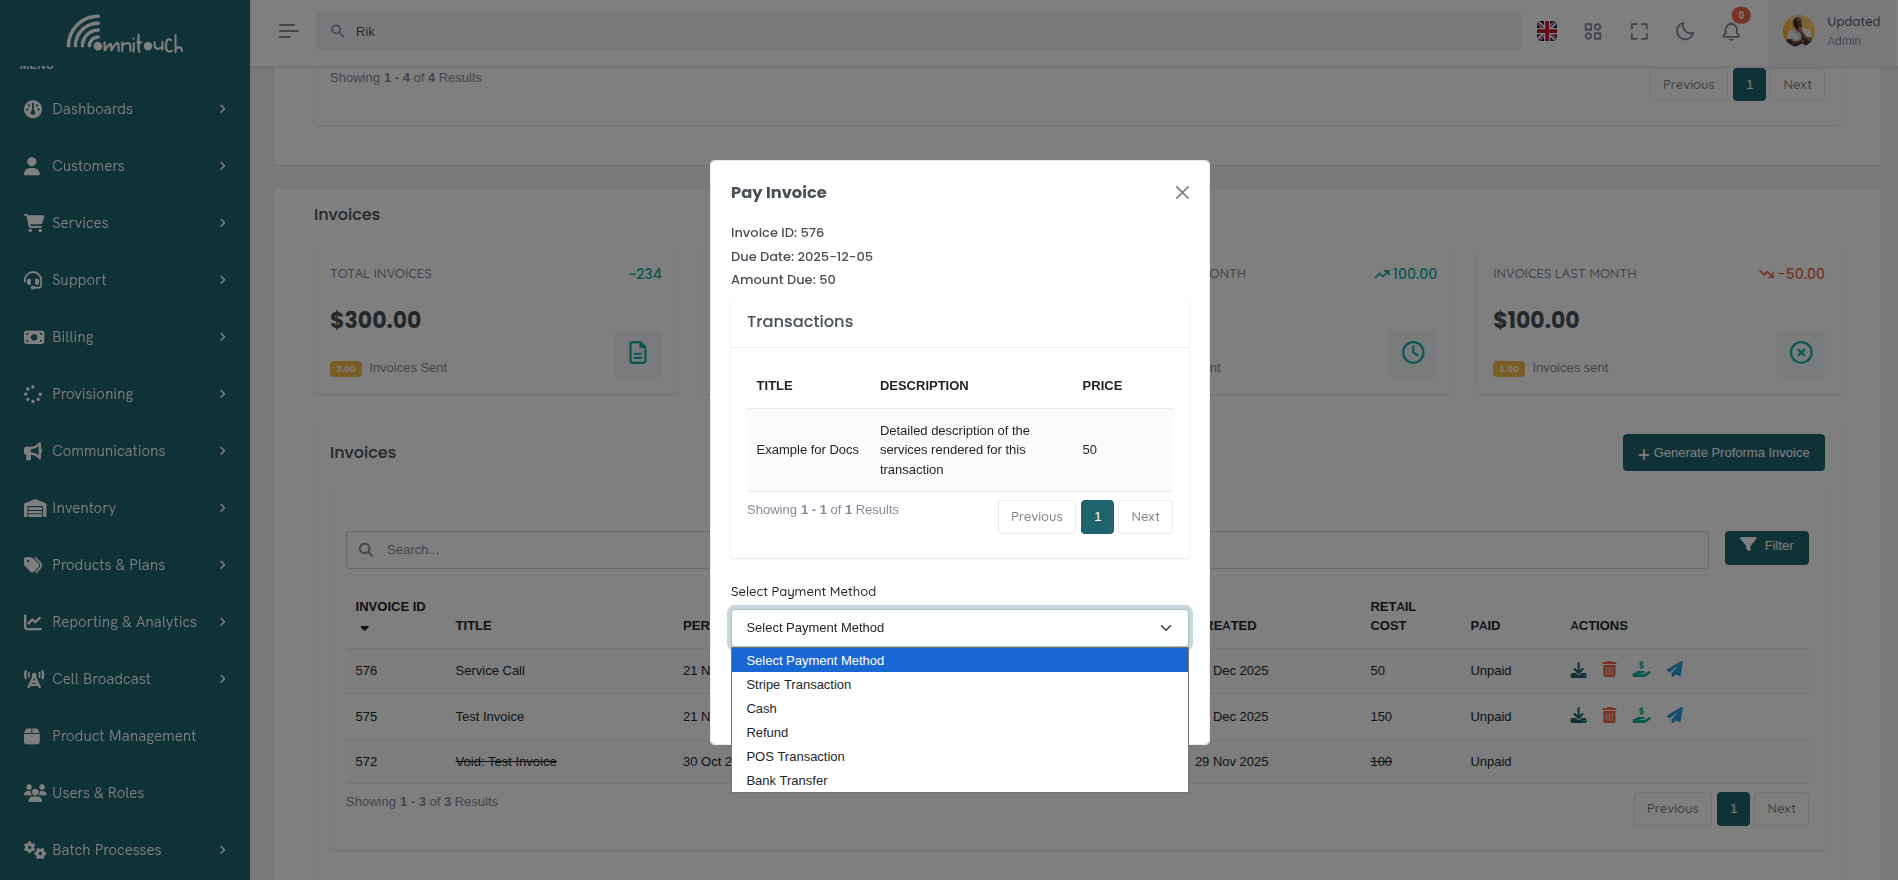
Paying Invoices
Click the pay icon (💰) to pay an invoice online.
 {.align-center
width="800px"}
{.align-center
width="800px"}
Payment Process:
- Click pay icon on unpaid invoice
- Payment modal opens showing invoice details
- Select payment method:
- Stripe Transaction - Charge saved credit card (available to all users)
- Cash - Manual cash payment (staff only)
- Refund - Apply refund as payment (staff only)
- POS Transaction - Point-of-sale terminal (staff only)
- Bank Transfer - Manual bank transfer (staff only)
- If Stripe selected:
- Select card from saved payment methods
- Default card pre-selected
- Click to select different card
- If other method selected:
- Enter reference number (optional)
- Click "Pay Invoice" to process
- System processes payment:
- Stripe - Charges card via Stripe API
- Other methods - Creates negative transaction for payment amount
- Invoice status changes to "Paid"
- Success notification displayed
Self-Care vs Staff Payment:
:doc:`Self-Care Portal <self_care_portal>` (Customers):
- Only Stripe payment available
- Must have saved payment method
- Warning shown if no payment methods exist
- Link to add payment method provided
Staff Portal (Admins):
- All payment methods available
- Can mark invoice paid manually (cash, POS, bank transfer)
- Can enter reference numbers for tracking
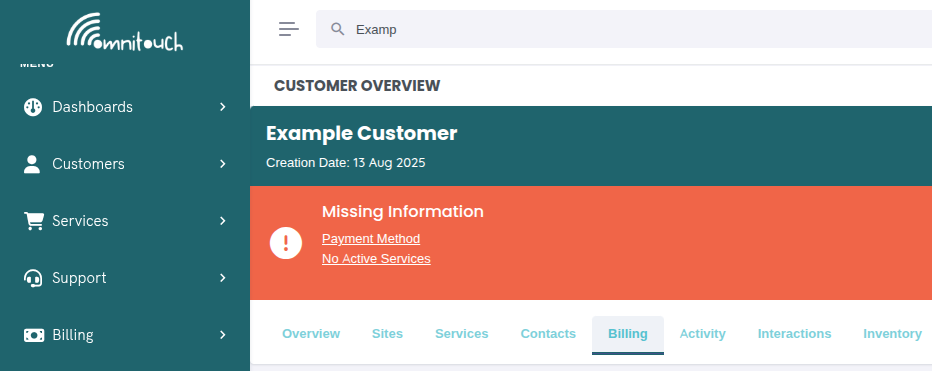
Payment Method Warning:
If customer has no saved payment methods, a warning is displayed prompting them to add a payment method before they can pay invoices.
 {.align-center
width="800px"}
{.align-center
width="800px"}
Emailing Invoices
Click the email icon (✉️) to send invoice to customer.
What Happens:
- Click email icon next to invoice
- System retrieves invoice PDF from cache (or generates if not cached)
- Sends email via Mailjet using
api_crmCommunicationCustomerInvoicetemplate - Email includes:
- Invoice PDF as attachment
- Customer name
- Invoice number and due date
- Total amount due
- Link to pay invoice online
- Link to view/download invoice
- Success notification: "Invoice email successfully sent"
Email Recipients:
Email sent to all customer contacts with type "billing" or primary contact if no billing contact exists.
Email Template Variables:
{{ var:customer_name }}- Customer's full name{{ var:invoice_number }}- Invoice ID{{ var:invoice_date }}- Invoice issue date{{ var:due_date }}- Payment due date{{ var:total_amount }}- Total amount due{{ var:invoice_url }}- Link to view/download PDF{{ var:pay_url }}- Link to pay invoice online
Troubleshooting Email Issues:
- Email not sent - Check Mailjet API credentials in
crm_config.yaml - Customer not receiving - Verify customer contact email addresses
- PDF not attaching - Check PDF generation succeeded (try downloading first)
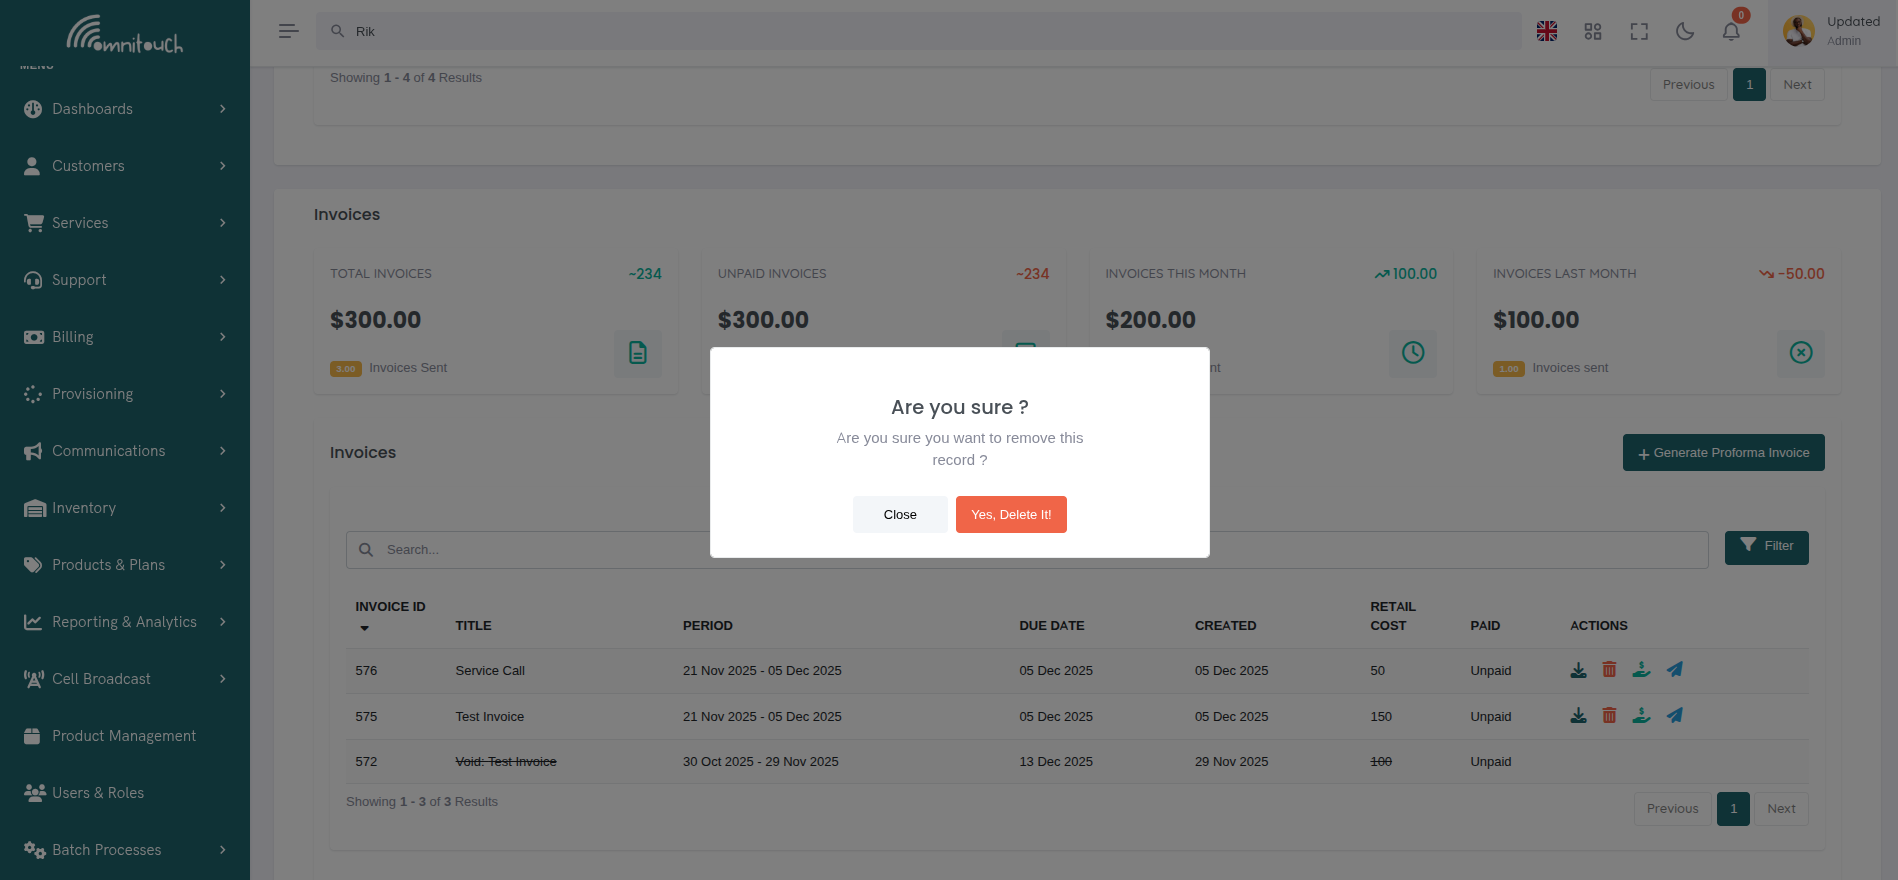
Voiding Invoices
Click the delete icon (🗑️) to void an invoice.
Requirements:
- Invoice must be Unpaid
- Paid invoices cannot be voided (must be refunded instead)
How to Void:
- Locate unpaid invoice in list
- Click delete icon (🗑️)
- Confirm in modal:
 {.align-center
width="600px"}
{.align-center
width="600px"}
What Happens:
- Invoice marked as
void = true - All transactions unlinked from invoice (
invoice_idset to null) - Transactions become "uninvoiced" again
- Transactions can be included in new invoice
- Invoice appears in list with "Void:" prefix in title
- Invoice actions disabled (no download, pay, or email)
- Can be viewed by filtering for "Void" invoices
Important Notes:
- Voiding is NOT the same as refunding
- Void = "This invoice should never have existed" (billing error, duplicate)
- Refund = "Reverse a valid paid invoice" (return money to customer)
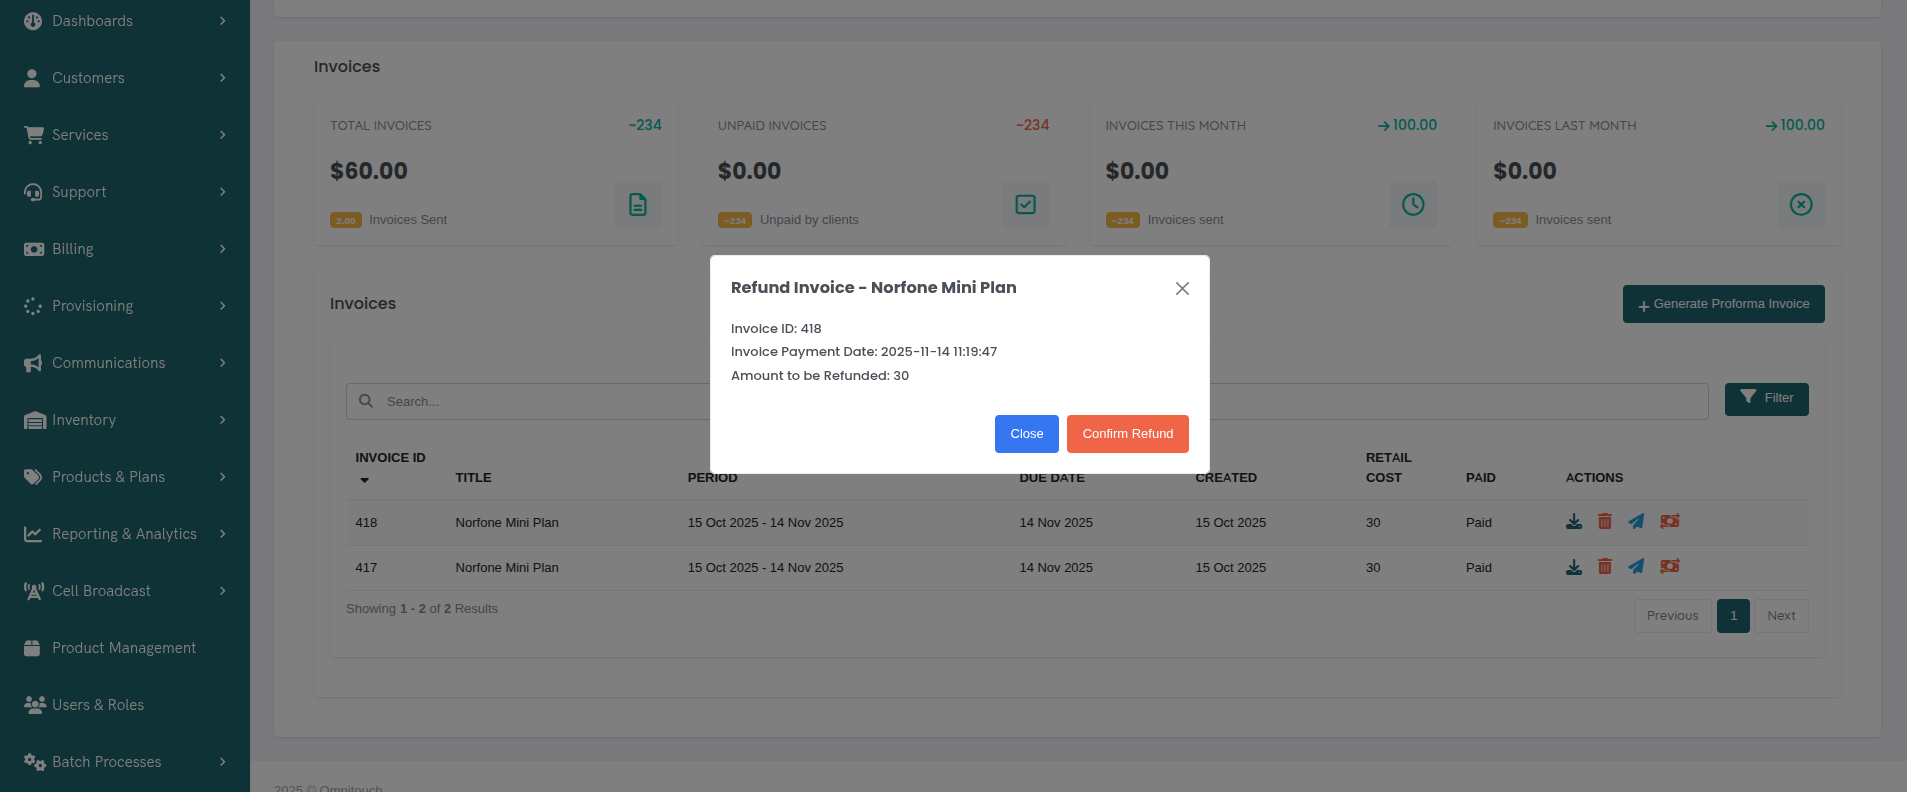
Refunding Invoices
Click the refund icon (💸) to refund a paid invoice.
Requirements:
- Invoice must be Paid
- Invoice must be paid via Stripe
- Invoice must have a valid
payment_reference(Stripe payment intent ID) - Only available to staff users (not Self-Care)
How to Refund:
- Locate paid Stripe invoice
- Click refund icon (💸)
- Refund confirmation modal opens:
 {.align-center
width="800px"}
{.align-center
width="800px"}
- Click "Confirm Refund"
- System processes Stripe refund:
- Calls Stripe API to refund payment
- Creates refund transaction in Stripe
- Updates invoice with
refund_reference
- Invoice status changes to "Refunded"
- Success notification displayed
What Happens After Refund:
- Invoice remains in system (not voided)
- Status shows "Refunded"
- Transactions remain linked to invoice
- Customer receives refund to original payment method (3-7 business days)
- Stripe dashboard shows refund transaction
Refund Restrictions:
- Cannot refund invoices paid via cash, POS, or bank transfer (manual reversal required)
- Cannot partial refund (full invoice amount only)
- Cannot refund twice
Searching and Filtering Invoices
Search
Use the search bar to find invoices. Searches across:
- Invoice ID
- Invoice title
- Customer name (system-wide view only)
Filters
Apply filters to narrow invoice list:
Available Filters:
- Void Status - All, Void, Not Void
- Paid Status - All, Paid, Not yet Paid
Filter Actions:
- Apply Filters - Apply selected filters to list
- Reset Filters - Clear all filters and show all invoices
Sorting
Click any column header to sort:
- ID - Sort by invoice ID (newest/oldest)
- Title - Sort alphabetically
- Due Date - Sort by due date
- Created - Sort by creation date
- Amount - Sort by retail cost (highest/lowest)
- Status - Sort by paid status (paid first or unpaid first)
Click again to reverse sort direction (ascending ↔ descending).
Pagination
Navigate through large invoice lists with page controls showing current page, total pages, and items per page selector (10, 25, 50, or 100 items).
Common Invoice Workflows
Workflow 1: Monthly Billing with Transaction Preview
- End of month arrives (e.g., January 31)
- Navigate to Billing → Invoices
- Click "+ Generate Proforma Invoice"
- Select customer (or do per-customer if billing many customers)
- Set dates:
- Start Date: 2025-01-01
- End Date: 2025-01-31
- Due Date: 2025-02-15 (15 days from now)
- Title: "January 2025 Services" (optional)
- Transaction Preview section appears showing all uninvoiced transactions from January
- Review the preview:
- All transactions are included by default
- Check totals: Subtotal, Tax, and Invoice Total
- Verify all charges are correct
- Click "Generate Invoice" (button shows transaction count, e.g., "Generate Invoice (15)")
- Invoice created with all selected transactions
- Click invoice row to view details and verify
- Click "Send Email" button in details modal or email icon in table
- Customer receives invoice email with PDF and pay link
Workflow 2: Selective Transaction Invoicing
- Customer has multiple services (Mobile + Internet) and misc charges
- Wants separate invoices for each service
- Generate first invoice (Mobile Services):
- Click "+ Generate Proforma Invoice"
- Title: "Mobile Services - January 2025"
- Start/End: Jan 1-31
- Due Date: Feb 15
- In transaction preview, exclude all non-mobile transactions:
- Click X button next to Internet transactions
- Click X button next to miscellaneous charges
- Only Mobile service transactions remain selected
- Verify totals reflect only mobile services
- Click "Generate Invoice" (shows count of mobile transactions)
- Generate second invoice (Internet Services):
- Click "+ Generate Proforma Invoice" again
- Title: "Internet Services - January 2025"
- Start/End: Jan 1-31 (same period)
- In transaction preview:
- Mobile transactions already invoiced (don't appear)
- Exclude miscellaneous charges using X button
- Only Internet service transactions remain
- Click "Generate Invoice"
- Generate third invoice (Additional Charges):
- Click "+ Generate Proforma Invoice" again
- Title: "Additional Charges - January 2025"
- Only uninvoiced misc charges appear in preview
- Click "Select All" to include all
- Click "Generate Invoice"
- Email all three invoices to customer
Workflow 3: Excluding Disputed or Pending Transactions
- End of billing period arrives
- Navigate to customer Billing tab
- Click "+ Generate Proforma Invoice"
- Set billing period dates
- Transaction preview shows 20 transactions
- Customer has disputed one charge and another is pending investigation
- In transaction preview:
- Locate disputed transaction (e.g., "Data overage charge")
- Click X button to exclude it
- Locate pending transaction (e.g., "Installation fee")
- Click X button to exclude it
- Transaction count updates: "18 Transactions selected"
- Totals recalculate automatically
- Review updated totals (excludes disputed amounts)
- Click "Generate Invoice (18)"
- Invoice generated with only approved transactions
- Disputed/pending transactions remain uninvoiced for next billing cycle
Workflow 4: Quick Invoice Review and Adjustment
- Staff generates monthly invoice
- Transaction preview shows unexpected high total
- Review each transaction in the preview:
- Notice duplicate charge for same service
- Click X to exclude the duplicate
- Notice test transaction that shouldn't be billed
- Click X to exclude test transaction
- Totals update in real-time
- Verify new total matches expected amount
- Click "Generate Invoice" with corrected transactions
- Go back and void/delete the excluded transactions if needed
- Email invoice to customer with confidence
Workflow 5: One-Time Installation Invoice
- Field tech completes installation
- Staff adds installation transaction manually
- Navigate to customer Billing tab
- Click "+ Generate Proforma Invoice"
- Set dates:
- Start Date: today
- End Date: today
- Due Date: today + 7 days
- Title: "Installation Services"
- Transaction preview shows only today's transactions
- Verify installation charge appears
- Exclude any recurring charges using X button (if present)
- Click "Generate Invoice"
- Email to customer immediately
- Customer pays online via Stripe
Workflow 6: Reviewing Invoice Before Customer Contact
- Customer calls with billing question
- Staff navigates to customer's invoice list
- Click on invoice row to open Invoice Details modal
- Review invoice information:
- Invoice ID, dates, status
- All transactions included with descriptions
- Tax breakdown per transaction
- Subtotal, Tax, and Total amounts
- Answer customer's questions with exact details
- If customer requests PDF, click "Download PDF" button in modal
- If customer requests email resend, click "Send Email" button
- Close modal when done
Workflow 7: Correcting Billing Error
- Customer reports incorrect charge
- Staff clicks on invoice row to view details
- Reviews transaction list in Invoice Details modal
- Identifies incorrect transaction
- Invoice is unpaid, so can be voided
- Click "Delete" button in modal footer
- Confirm void
- Transactions become uninvoiced again
- Staff modifies or removes incorrect transaction from transaction list
- Generate new invoice with corrected transactions:
- Use transaction preview to exclude corrected transaction if needed
- Include only valid charges
- Email corrected invoice to customer
Workflow 8: Processing Multiple Payments
- Customer brings cash to pay multiple invoices
- Navigate to customer Billing tab
- View unpaid invoices
- Click on first invoice row to view details
- Verify amount and transactions
- Click "Pay Invoice" button in modal footer
- Select "Cash" payment method
- Enter reference: "Cash paid 2025-01-15"
- Click "Pay Invoice"
- Modal closes, invoice marked as "Paid"
- Repeat for remaining invoices
- All invoices now marked as "Paid"
Workflow 9: Handling Refund Request
- Customer requests refund for overpayment
- Staff verifies invoice was paid via Stripe
- Navigate to invoice in list
- Click on invoice row to view details
- Verify payment information and amount
- Click "Refund" button in modal footer (only appears for Stripe invoices)
- Confirm refund
- System processes Stripe refund
- Invoice status changes to "Refunded"
- Customer receives refund in 3-7 business days
- Staff follows up with customer to confirm receipt
Troubleshooting
Cannot generate invoice - No transactions found
- Cause: No uninvoiced transactions in specified date range
- Fix: Check transaction list, verify transactions exist and are not already invoiced. Adjust date range or remove filter.
Invoice PDF generation fails
- Cause: Template syntax error, WeasyPrint crash, or missing customer data
- Fix: Check invoice template HTML for errors, verify customer address fields populated, review API logs.
Payment fails with Stripe error
- Cause: Card declined, insufficient funds, expired card, or Stripe API issue
- Fix: Try different payment method, verify card valid, check Stripe dashboard for decline reason.
Cannot void invoice
- Cause: Invoice already paid
- Fix: Paid invoices cannot be voided. If refund needed, use refund function for Stripe invoices or create credit transaction manually.
Invoice email not sending
- Cause: Mailjet API credentials invalid, customer has no billing contact, or email template missing
- Fix: Verify Mailjet configuration in
crm_config.yaml, check customer contacts, verify invoice email template exists.
Refund button not appearing
- Cause: Invoice paid via cash/POS/bank transfer (not Stripe), or invoice not paid
- Fix: Refund button only appears for Stripe payments. For other payment methods, create manual credit transaction.
Download PDF shows old template design
- Cause: PDF cached before template update
- Fix: Clear invoice PDF cache:
DELETE FROM Invoice_PDF_Cache WHERE invoice_id = X;
Customer cannot pay invoice (no payment methods)
- Cause: No saved payment methods in Self-Care portal
- Fix: Customer must add credit card at Payment Methods page before paying invoices.
Multiple invoices generated for same period
- Cause: Staff generated invoice twice, or date ranges overlap
- Fix: Void duplicate invoice. Adjust date ranges to prevent overlap. Use transaction preview to ensure unique transaction sets.
Transaction preview shows no transactions
- Cause: All transactions in date range are already invoiced or no transactions exist
- Fix: Verify date range is correct. Check transaction list to confirm transactions exist. Filter invoices to see which invoice contains the transactions.
Cannot exclude transaction from invoice generation
- Cause: Transaction already invoiced or browser issue
- Fix: Verify transaction shows in preview with checkmark. Refresh page and try again. Clear browser cache if issue persists.
Invoice total doesn't match expected amount
- Cause: Unexpected transactions included, tax not calculated, or excluded transactions still counted
- Fix: Review transaction preview carefully. Check each transaction's retail cost and tax. Verify excluded transactions are grayed out. Check transaction count badge on Generate Invoice button.
Generate Invoice button is disabled
- Cause: No transactions selected or invalid date range
- Fix: Ensure at least one transaction is included (not excluded). Verify Start Date is before End Date. Check that Due Date is set.
Invoice Details modal not opening
- Cause: JavaScript error or page not fully loaded
- Fix: Refresh page. Check browser console for errors. Try different browser. Verify internet connection.
Transaction tax not displaying in Invoice Details
- Cause: Transaction has 0% tax or tax_amount is null
- Fix: Verify transaction has tax_percentage set. Check that tax_amount was calculated when transaction was created. Update transaction if needed.
Action buttons missing in Invoice Details modal
- Cause: Invoice is voided or user lacks permissions
- Fix: Voided invoices only show Download PDF button. Verify invoice status. Check user role and permissions.
Related Documentation
integrations_mailjet- Email invoice delivery and templatesadministration_configuration- Invoice template configurationpayments_transaction- Creating transactions that appear on invoicespayments_process- Processing invoice paymentsbasics_payment- Payment methods and Stripe integration