Rule Based Access Control
Roles, Permissions & Users in OmniCRM
OmniCRM uses role-based access control (RBAC): people (Users) are
assigned one or more Roles, and each Role is a bundle of Permissions.
Permissions are the smallest unit of access (e.g.,
view_customer, create_inventory). A user's
effective access is the union of permissions from all assigned
roles.
Purpose
RBAC enables:
- Data Protection --- Users only see and do what they're allowed to.
- Operational Fit --- Roles mirror job functions (Admin, Support, Finance, Customer Admin).
- Simple Admin --- Grant access by assigning roles; avoid per-user micromanagement.
- Tenant Isolation --- "view own ..." permissions limit visibility to a user's own customer/tenant data.
How Users, Roles, and Permissions Fit Together
- Users --- Real people who sign in to OmniCRM.
- Permissions --- Atomic capabilities (e.g.,
view_customer,delete_product). - Roles --- Named sets of permissions (e.g., Admin, Support, Finance).
- Assignment --- Users receive one or more roles; permissions aggregate.
Authentication proves who you are (JWT, API key, or whitelisted IP). Authorization (roles/permissions) decides what you can do.
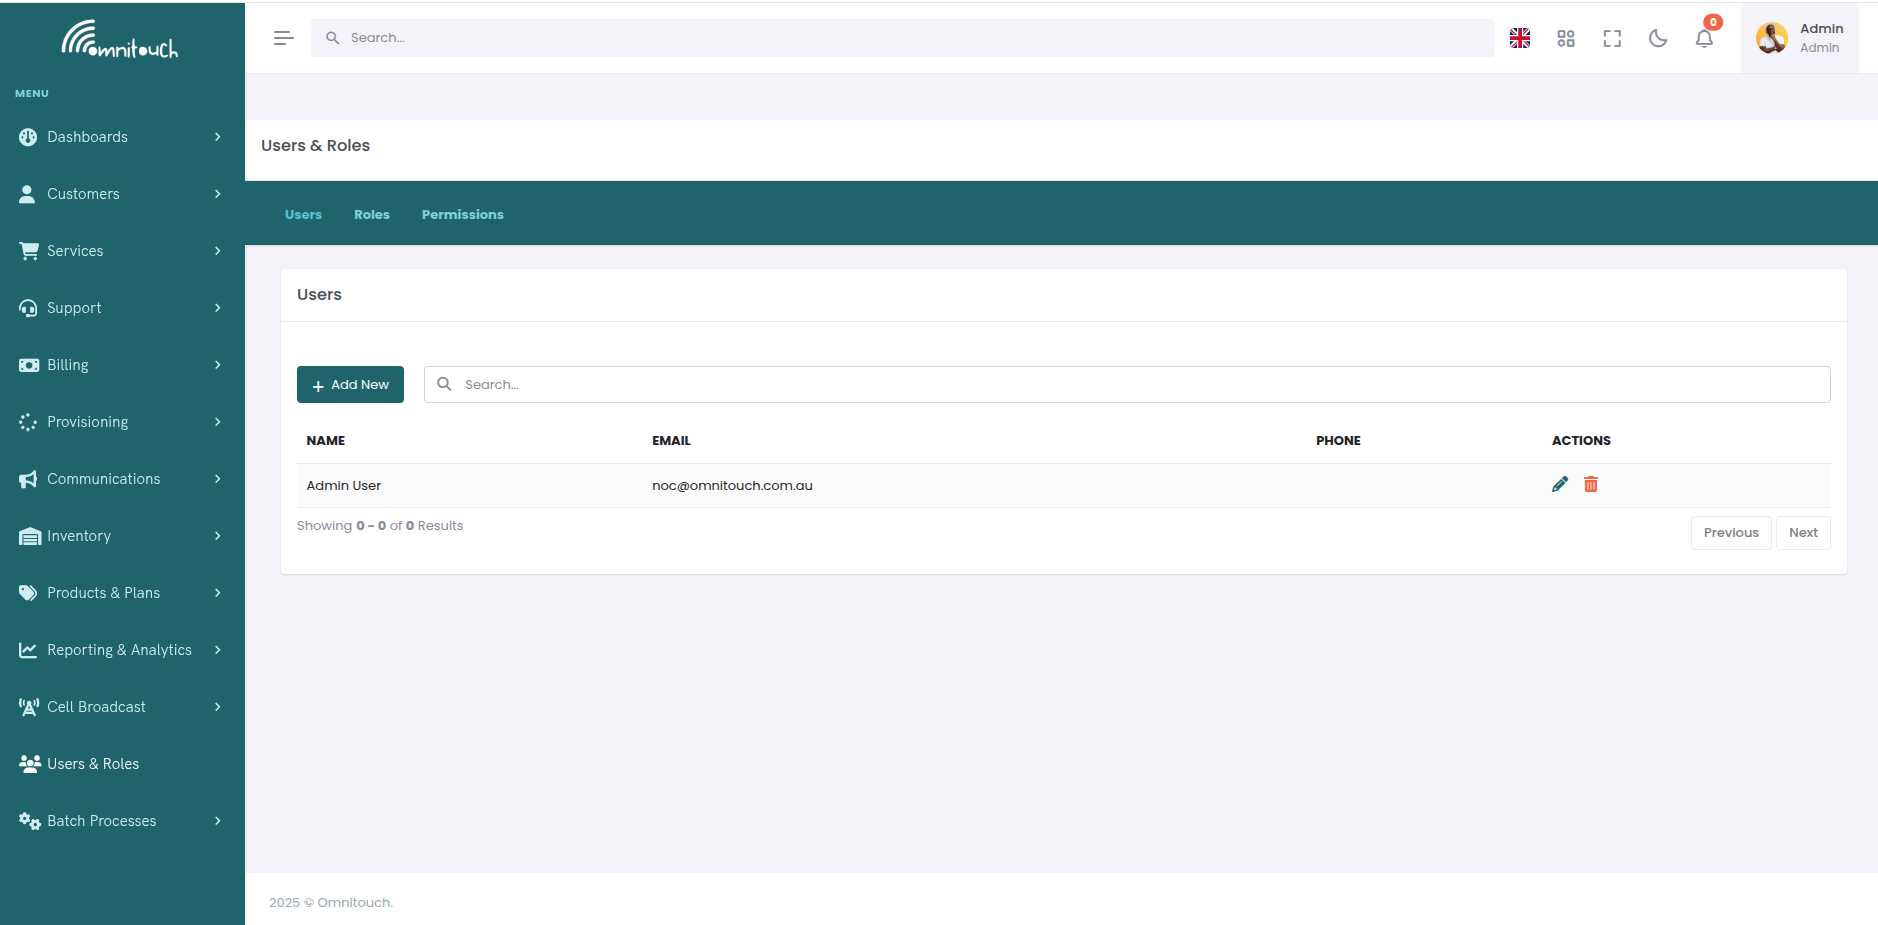
Managing Users
The OmniCRM user management system allows administrators to create and manage staff users (administrators, customer service agents), view and modify user roles, reset passwords, manage two-factor authentication, and control user access.
User Types
Customer Users - Created via self-signup or by administrators. Automatically assigned the "Customer" role. These users access the self-care portal to manage their services, view usage, pay invoices, etc.
Staff Users - Created by administrators with appropriate permissions. Can be assigned roles like Admin, Support, Finance, etc. These users access the CRM interface to manage customers, provision services, handle billing, etc.
Administrative Users - Users with the admin permission. Have full
access to the system including user management, role management, and all
protected endpoints.
The initial administrative user is created by the Omnitouch team when the system is deployed.
Adding New Users (Administrators and CSAs)
Administrators can create new staff users through the Web UI or API.
Via Web UI
- Navigate to Users & Roles - Access the user management interface from the administration menu
- Click "Add User" - Opens the user creation form
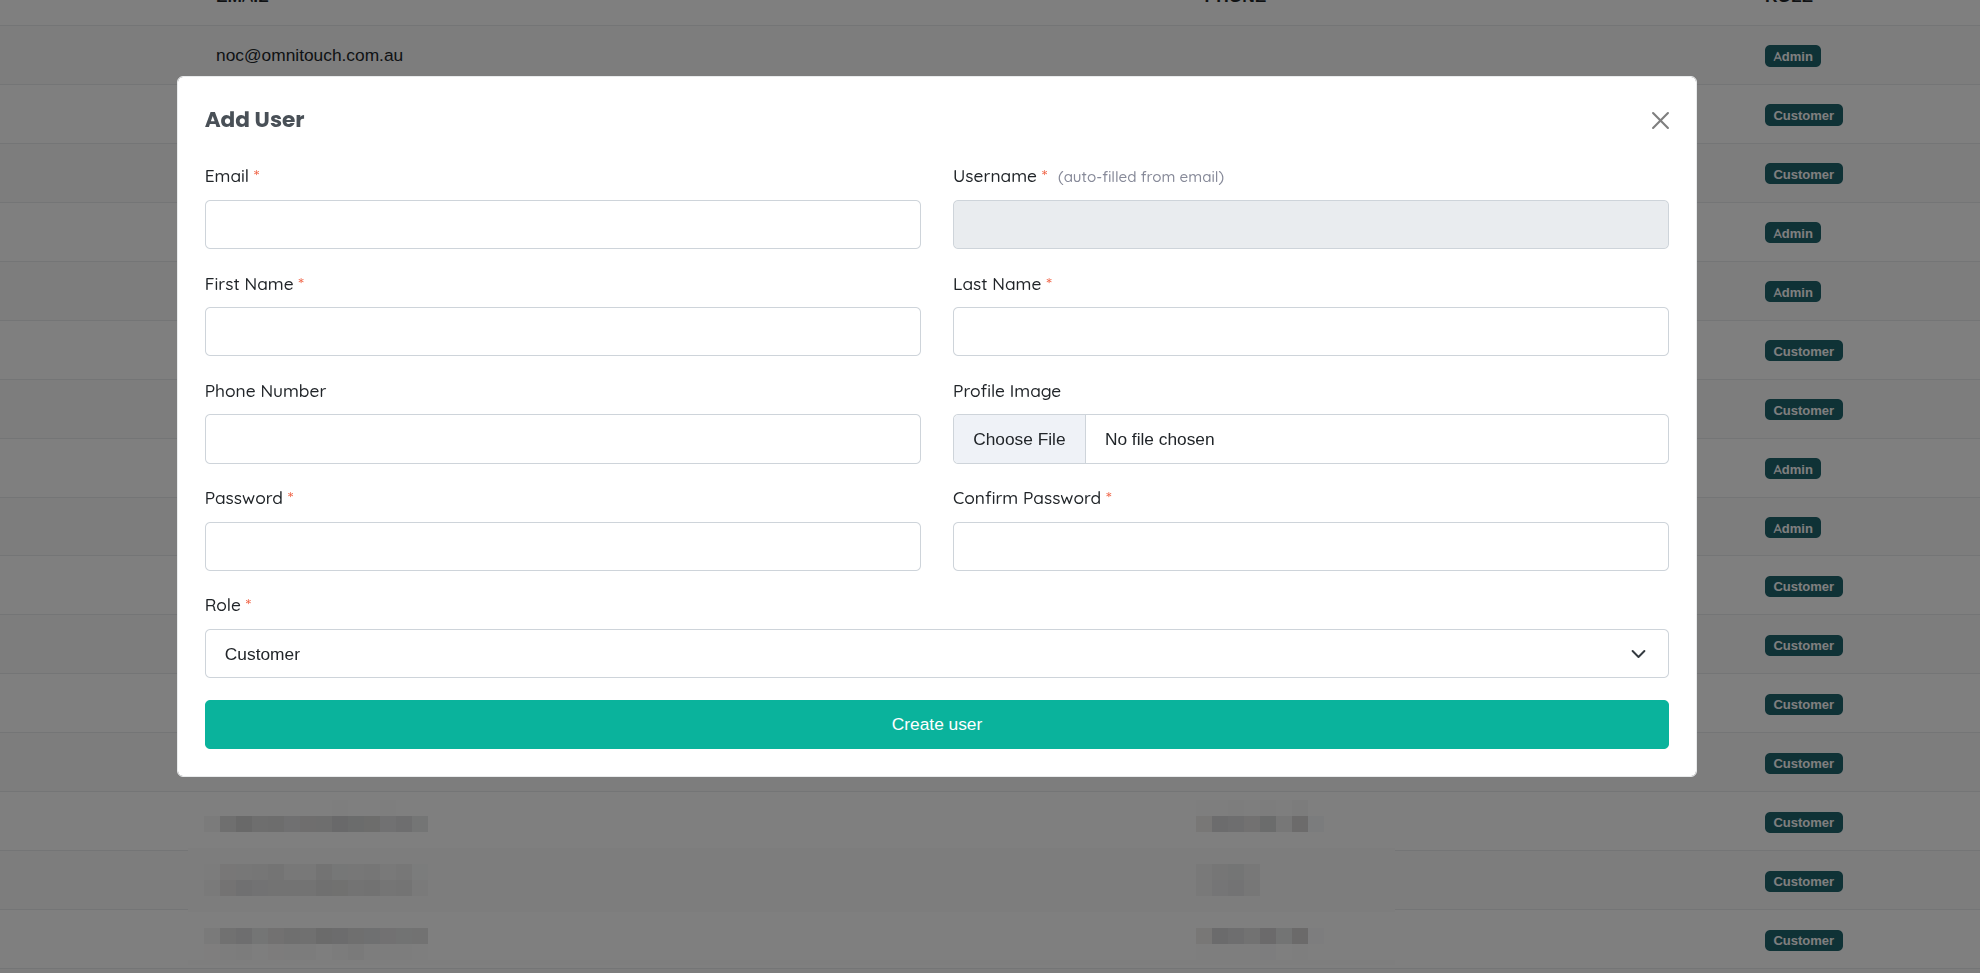
- Fill in User Details:
- Username - Unique username for login (required)
- Email - User's email address (required, must be unique)
- Password - Temporary password (required, user should change on first login)
- First Name - User's first name (required)
- Middle Name - User's middle name (optional)
- Last Name - User's last name (required)
- Phone Number - Contact phone number (optional)
- Role - Select one or more roles to assign (required)
- Customer Contact - Optionally link user to a customer contact record (for customer users)
- Click "Create User" - User is created and can immediately log in with the provided credentials
- User receives notification - Optionally send welcome email with login instructions
Best Practices:
- Use a temporary password like
TempP@ssw0rd!and require user to change it on first login - Assign appropriate roles based on job function (see Typical Role Designs below)
- Enable 2FA for all administrative and support staff
- Link customer users to their customer contact record for proper data scoping
Via API
Create a user programmatically:
Endpoint: POST /auth/users
Required Permission: admin
Request Body:
{
  "username": "john.smith",
  "email": "john.smith@company.com",
  "password": "TempP@ssw0rd!",
  "first_name": "John",
  "middle_name": "D",
  "last_name": "Smith",
  "phone_number": "+61412345678",
  "role": "Support"
}
Response:
{
  "id": 123,
  "username": "john.smith",
  "email": "john.smith@company.com",
  "first_name": "John",
  "last_name": "Smith",
  "roles": ["Support"],
  "created": "2025-01-04T10:30:00Z"
}
Assigning Multiple Roles:
Users can have multiple roles. Permissions are additive (union of all assigned role permissions).
To assign multiple roles, include them in the request:
{
  "username": "jane.doe",
  "email": "jane.doe@company.com",
  "password": "TempP@ssw0rd!",
  "first_name": "Jane",
  "last_name": "Doe",
  "role": "Support,Finance"
}
Or use the role assignment endpoint after user creation:
POST /auth/roles/{role_id}/users/{user_id}
Viewing and Searching Users
List All Users (Admin):
GET /auth/users
Returns paginated list of all users with their roles and basic information.
Search Users:
GET /auth/users/search?search={query}&filters={"role":["Support"]}&page=1&per_page=50
Filter by:
- Role name
- Email domain
- Active/deleted status
- 2FA enabled status
- Last login date
Get Specific User:
GET /auth/users/{user_id}
Returns full user details including:
- Personal information
- Assigned roles and effective permissions
- 2FA status
- Last login and session information
- Linked customer contact (if applicable)
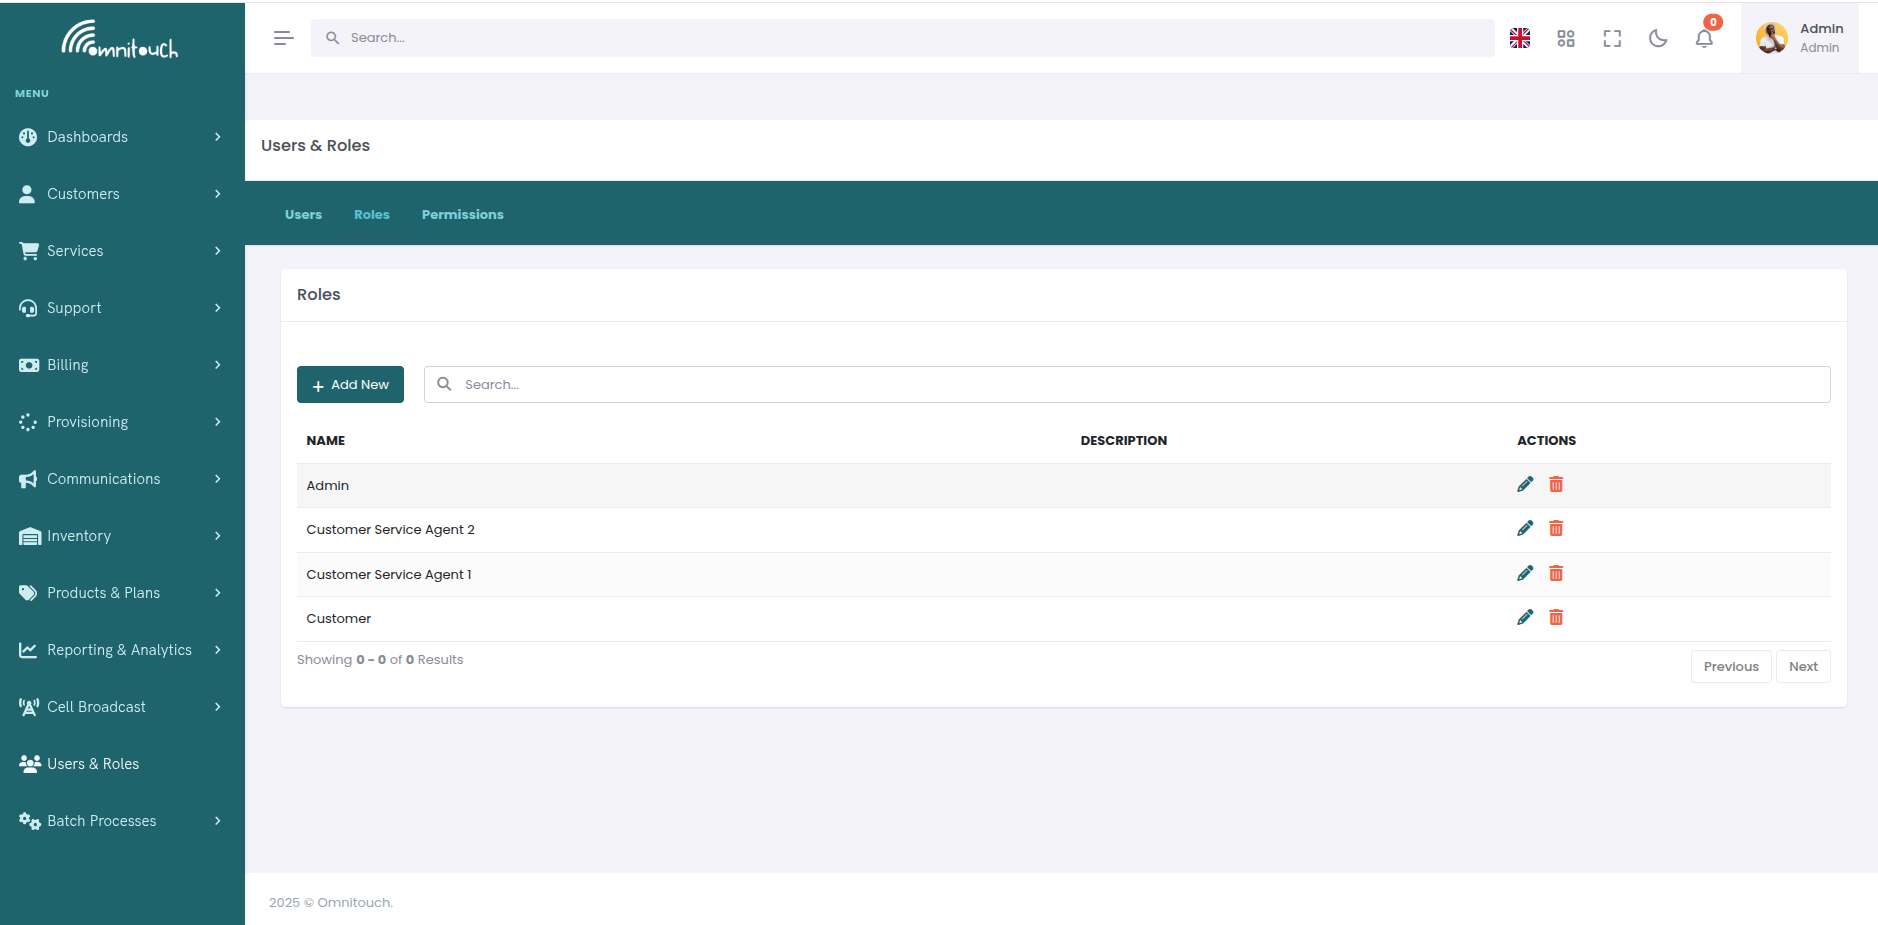
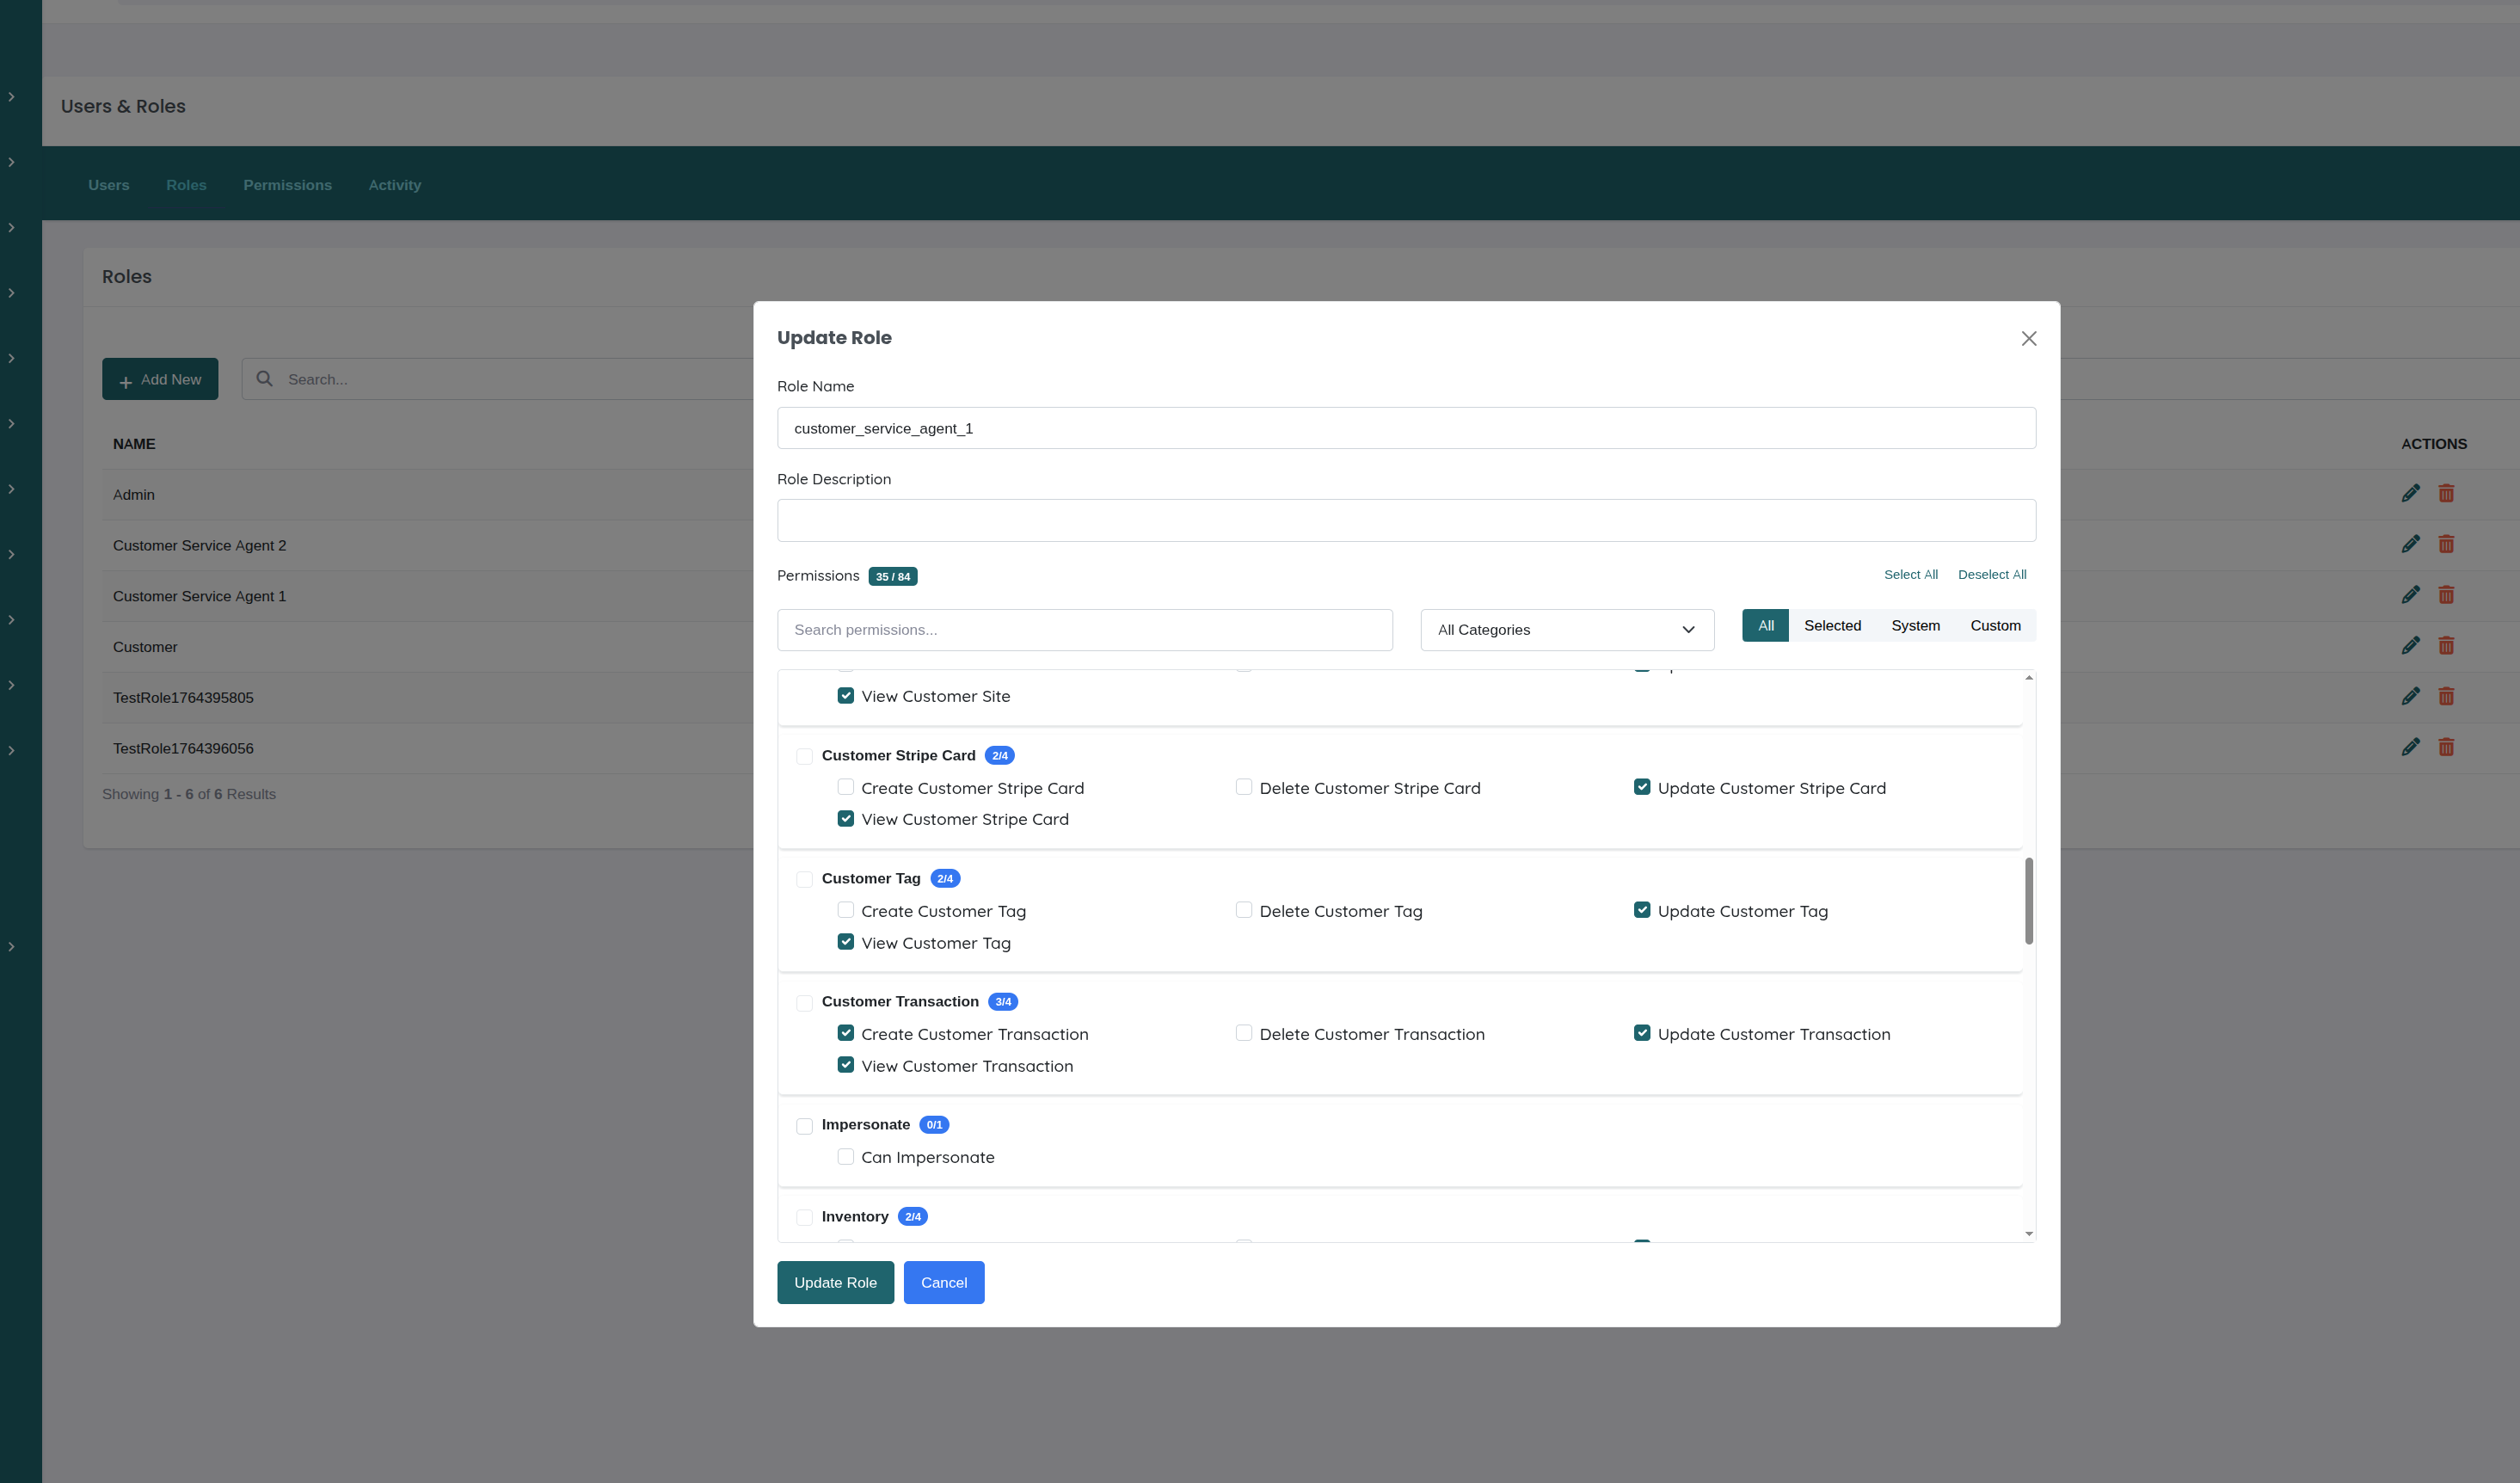
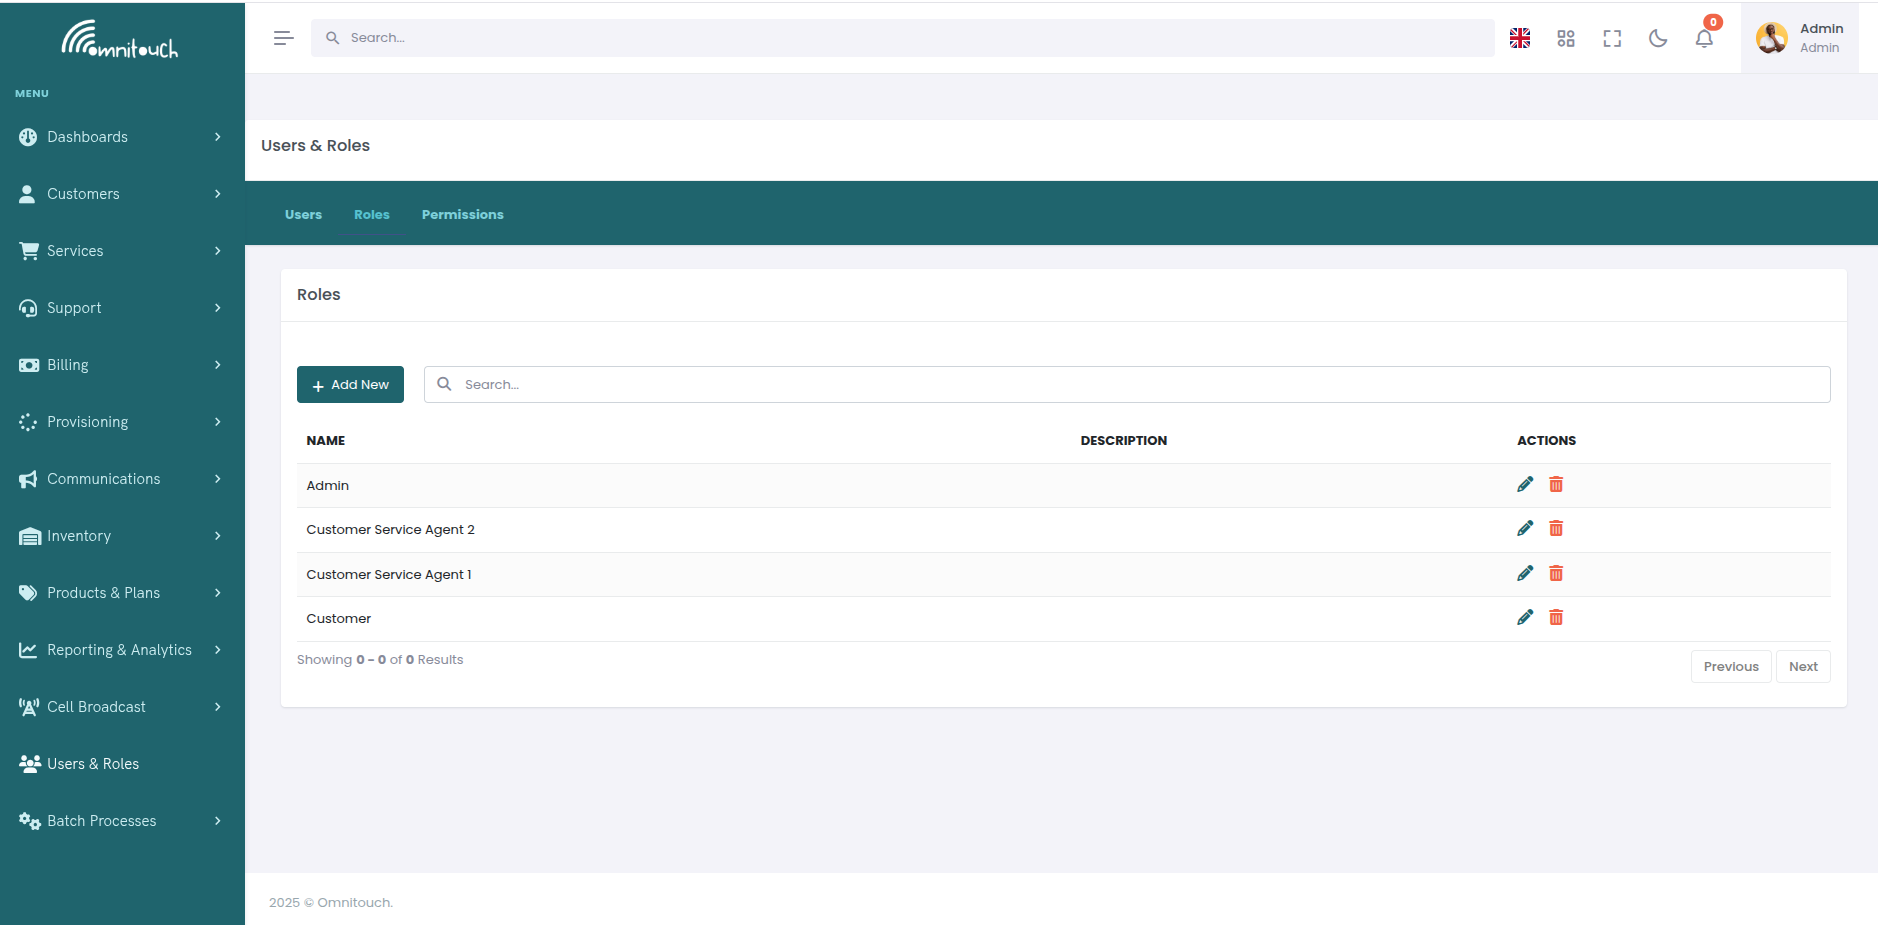
Creating and Managing Roles
Roles are collections of permissions that can be assigned to users. Instead of assigning permissions individually to each user, you create roles that bundle related permissions and assign those roles to users.
Creating a New Role
Via Web UI:
- Navigate to Users & Roles → Roles tab
- Click "Create Role"
- Enter role details:
- Name - Short, descriptive name (e.g., "Tier2_Support")
- Description - Explain the role's purpose and responsibilities
- Click "Create"
- Role is created with no permissions; add permissions in the next step
Via API:
Endpoint: POST /auth/roles
Required Permission: admin
Request:
{
  "name": "Tier2_Support",
  "description": "Level 2 support team with elevated provisioning access"
}
Response:
{
  "id": 45,
  "name": "Tier2_Support",
  "description": "Level 2 support team with elevated provisioning access",
  "permissions": [],
  "users": []
}
Adding Permissions to a Role
Once a role is created, assign permissions to define what users with that role can do.
Via Web UI:
- Navigate to Users & Roles → Roles tab
- Click on the role name to view details
- In the Permissions section, click "Add Permission"
- Select one or more permissions from the list
- Click "Add" - Permissions are immediately assigned
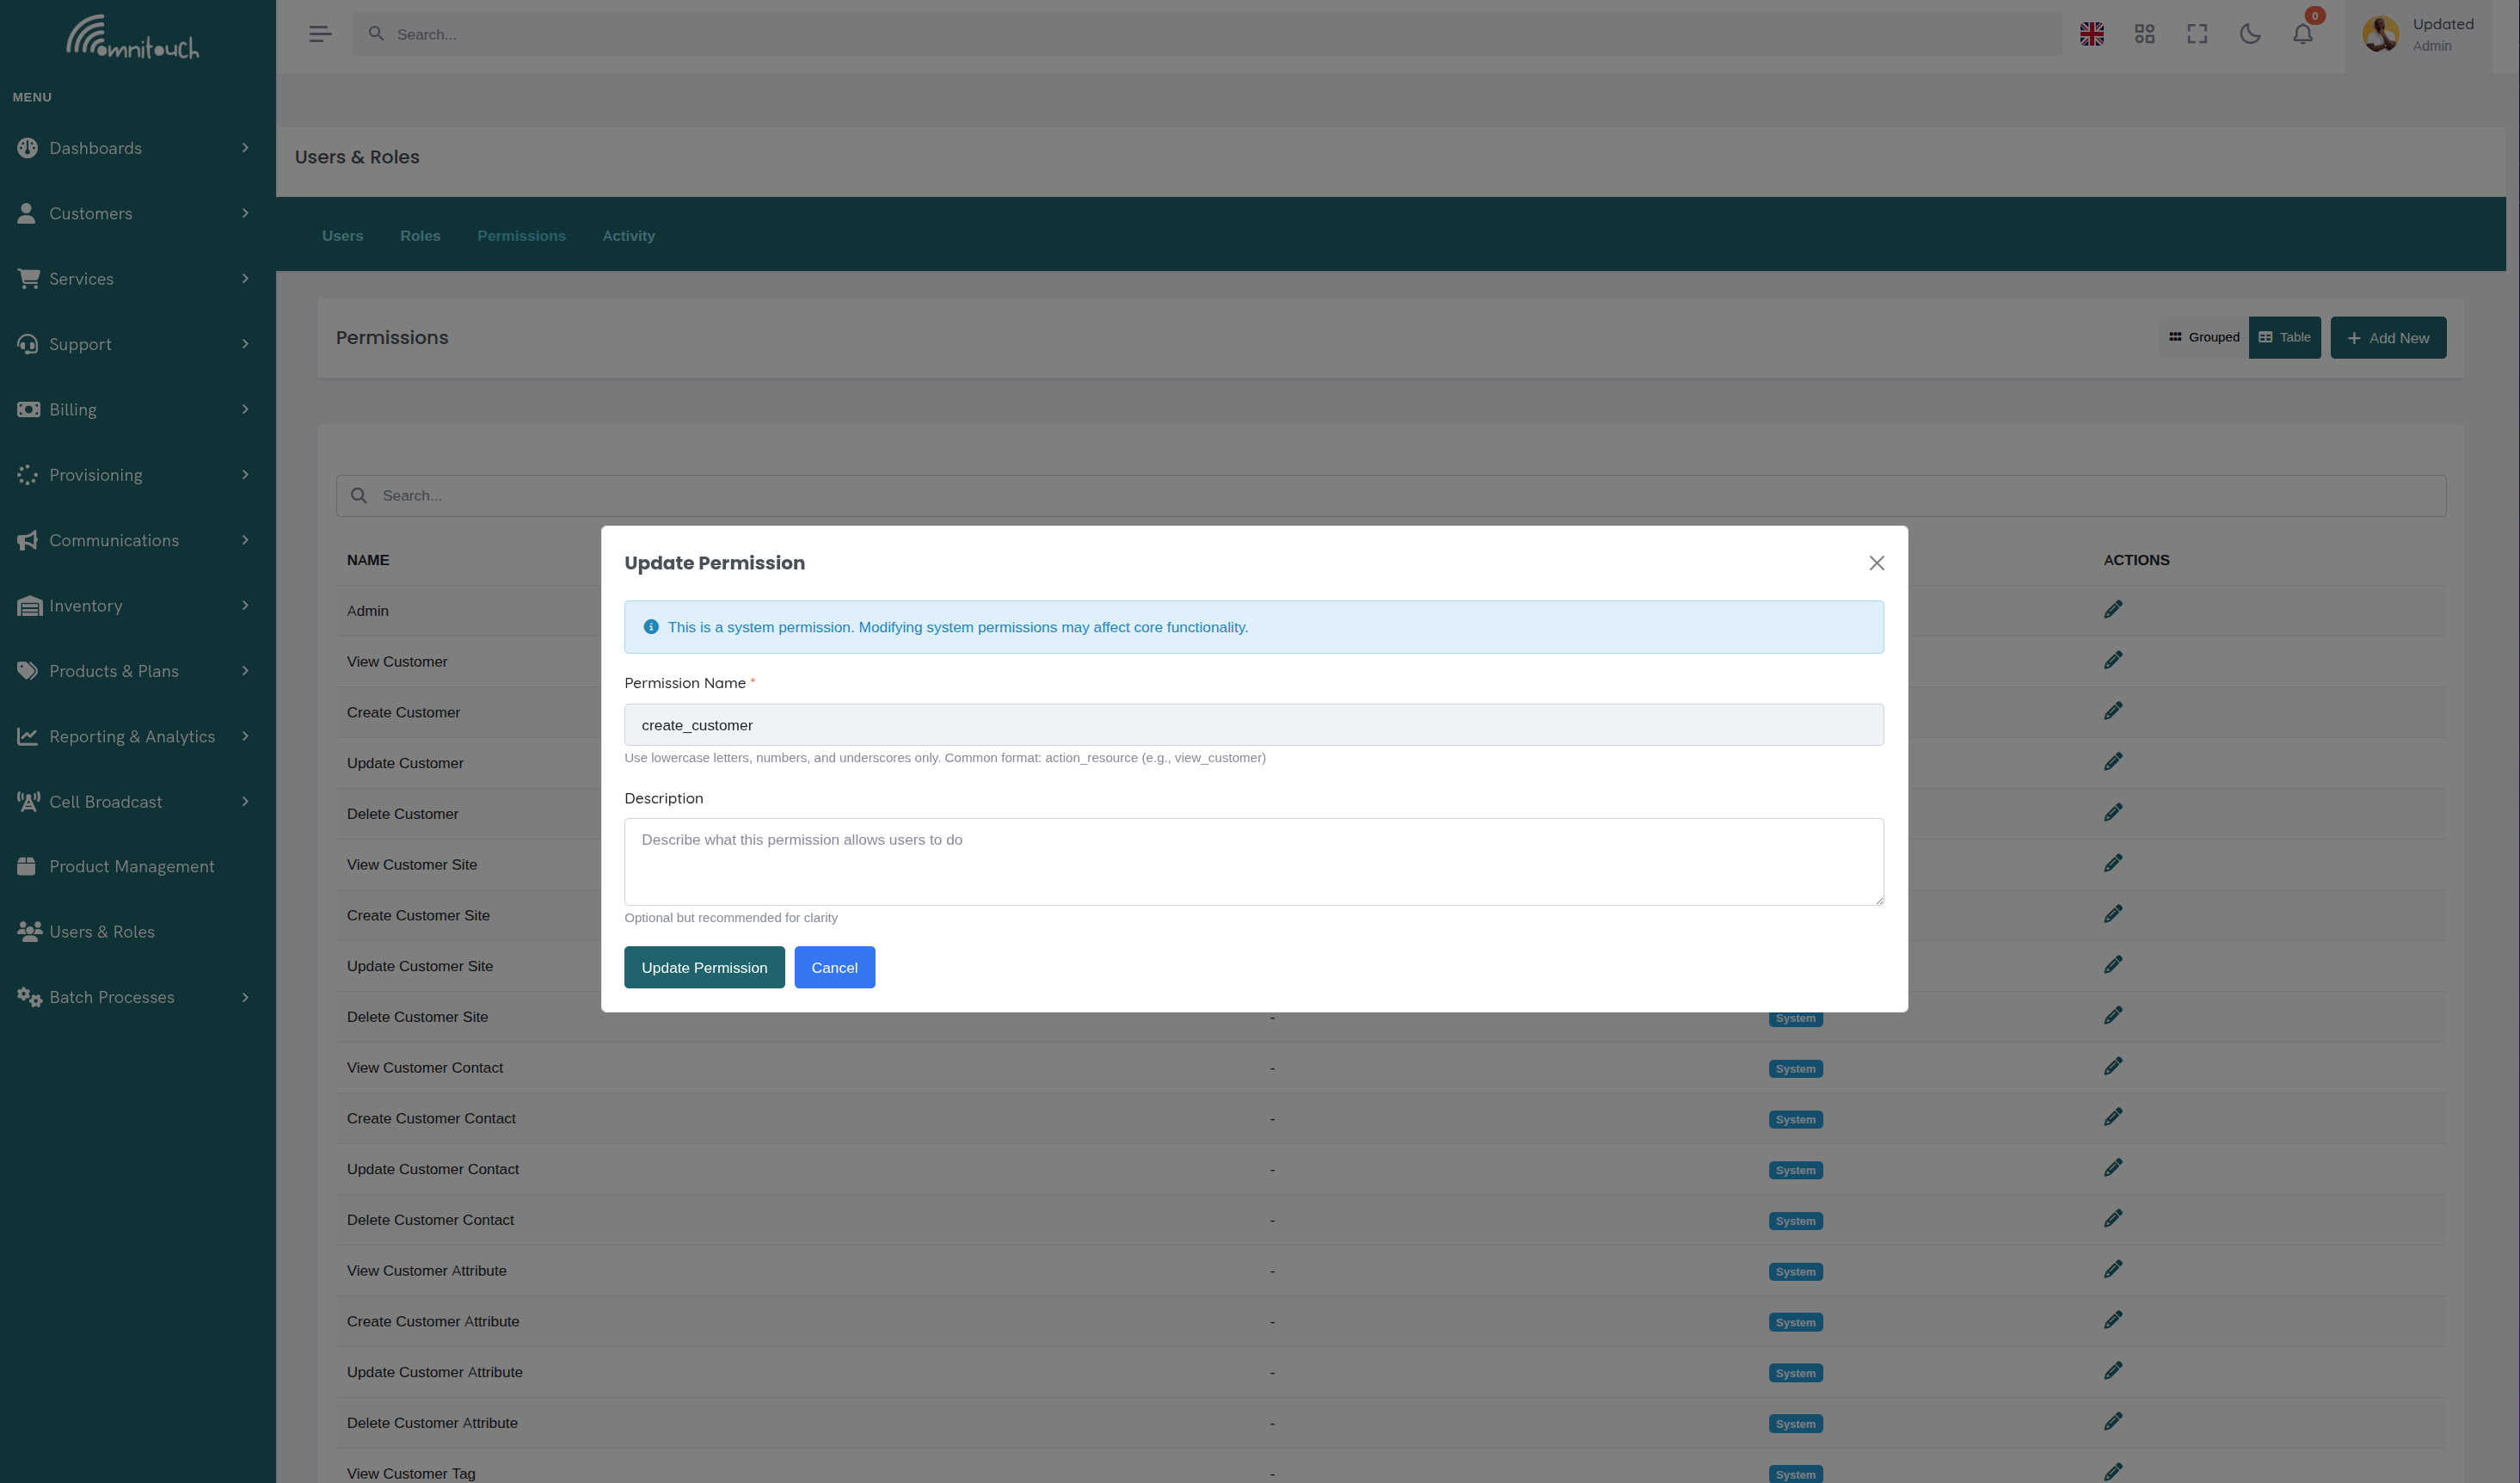
Via API:
Endpoint: POST /auth/roles/{role_id}/permissions
Request:
{
  "permission_id": 123
}
Or add multiple permissions:
{
  "permission_ids": [123, 124, 125]
}
Example: Creating a "Provisioning Specialist" Role
This role can view customers, manage services, and provision:
-
Create the role:
POST /auth/roles
{
  "name": "Provisioning_Specialist",
  "description": "Can provision services and manage customer services"
} -
Add permissions:
POST /auth/roles/45/permissions
{
  "permission_ids": [
    1,   # view_customer
    20,  # view_customer_service
    21,  # create_customer_service
    22,  # update_customer_service
    30,  # view_provision
    31,  # create_provision
    40,  # view_inventory
    50,  # view_product
  ]
}
Removing Permissions from a Role
Via Web UI:
- Navigate to role details
- In Permissions list, click the "X" or "Remove" button next to the permission
- Confirm removal
Via API:
Endpoint: DELETE /auth/roles/{role_id}/permissions/{permission_id}
Example:
DELETE /auth/roles/45/permissions/31
This removes create_provision permission from the role.
Editing Role Details
Update role name or description:
Via Web UI:
- Navigate to Users & Roles → Roles tab
- Click on the role to edit
- Modify the role name or description
- Click "Save"
Via API:
Endpoint: PUT /auth/roles/{role_id}
{
  "name": "Senior_Support",
  "description": "Senior support team with full customer access"
}
Deleting a Role
Warning: Deleting a role removes it from all assigned users. Ensure users have alternative roles or they will lose access.
Via API:
DELETE /auth/roles/{role_id}
Best Practice: Instead of deleting, consider archiving or renaming roles that are no longer needed.
Assigning Roles to Users
During User Creation:
Include role in the user creation request (see "Adding New Users" above).
For Existing Users:
Via Web UI:
- Navigate to Users & Roles → Users tab
- Click on the user to edit
- In the Roles section, select/deselect roles
- Click "Save"
Via API:
Update user's roles:
Endpoint: PUT /auth/users/{user_id}
{
  "role": "Support,Finance"
}
Or assign a single role to a user via role endpoint:
Endpoint: POST /auth/roles/{role_id}/users/{user_id}
Viewing Role Assignments
All users in a role:
GET /auth/roles/{role_id}/users
Returns list of all users assigned to that role.
All roles for a user:
GET /auth/users/{user_id}
The response includes roles array with all assigned roles.
Managing User Passwords
OmniCRM provides multiple methods for password management depending on the context.
User Self-Service Password Reset
Users who forgot their password can reset it themselves via the login page:
- Click "Forgot Password" on the login page
- Enter email address - System sends a password reset email
- Check email - Email contains a secure reset link with token (valid for 1 hour)
- Click link - Opens password reset form
- Enter new password - Must meet password complexity requirements:
- Minimum 8 characters
- At least one uppercase letter
- At least one lowercase letter
- At least one number
- At least one special character
- Submit - Password is immediately updated; user can log in with new password
API Flow:
-
Request reset:
Endpoint:
POST /auth/forgot_password{
"email": "user@example.com"
}System generates reset token and sends email.
-
Reset with token:
Endpoint:
POST /auth/reset_password{
"token": "abc123...",
"new_password": "NewSecureP@ssw0rd!"
}
Administrator Password Reset
Administrators can reset a user's password without requiring email verification. This sets a temporary password that the user should change on next login.
Via Web UI:
- Navigate to Users & Roles → Users
- Find the user and click the "Reset Password" button
- Enter a temporary password
- Click "Reset"
- Notify the user of their temporary password (via secure channel)
- User should change password on next login
Via API:
Endpoint: POST /auth/users/{user_id}/admin_reset_password
Required Permission: admin
Request:
{
  "new_password": "TempP@ssw0rd!",
  "force_change": true
}
Parameters:
new_password- Temporary password to setforce_change(optional) - If true, user must change password on next login
User Change Own Password
Authenticated users can change their own password from their profile:
Endpoint: POST /auth/change_password
Request:
{
  "current_password": "OldP@ssw0rd!",
  "new_password": "NewSecureP@ssw0rd!"
}
System validates the current password before allowing the change.
Password Security
- Passwords are hashed using bcrypt (werkzeug security)
- Never stored in plaintext
- Reset tokens expire after 1 hour
- Failed login attempts can trigger account lockout (configurable)
- Password history tracking prevents reuse (configurable)
- Complexity requirements enforced
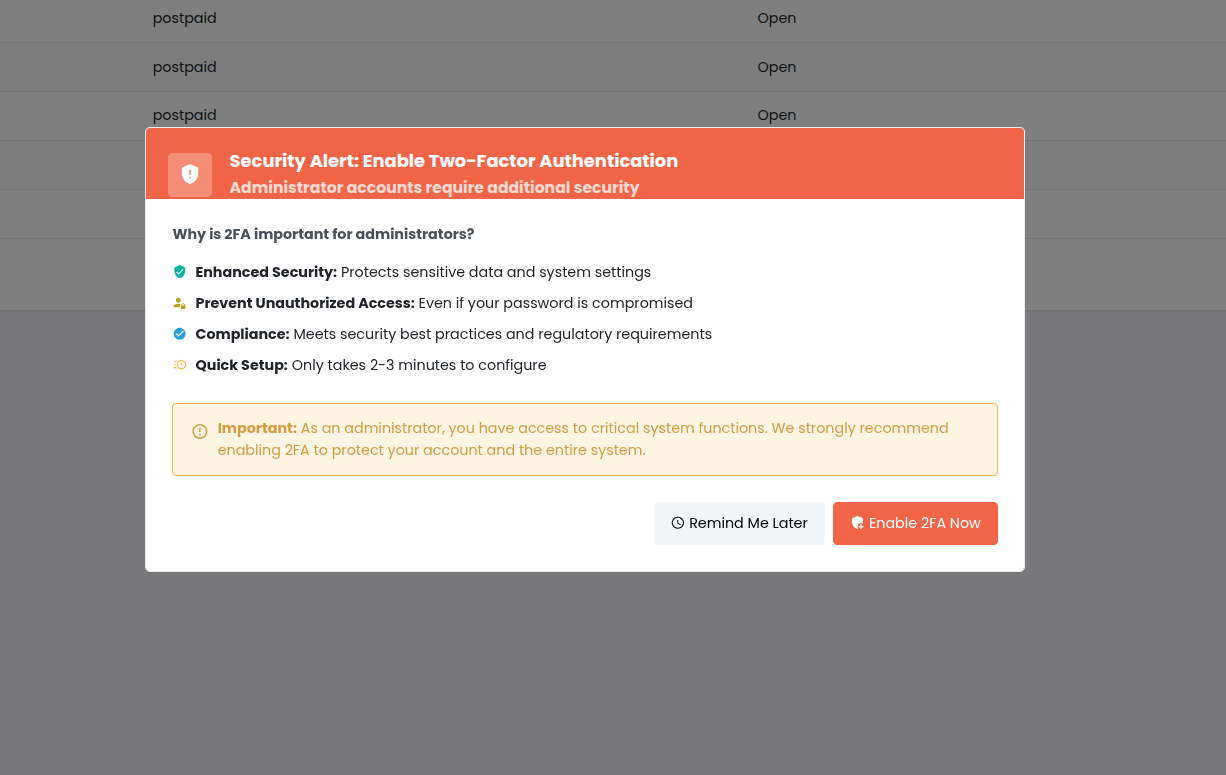
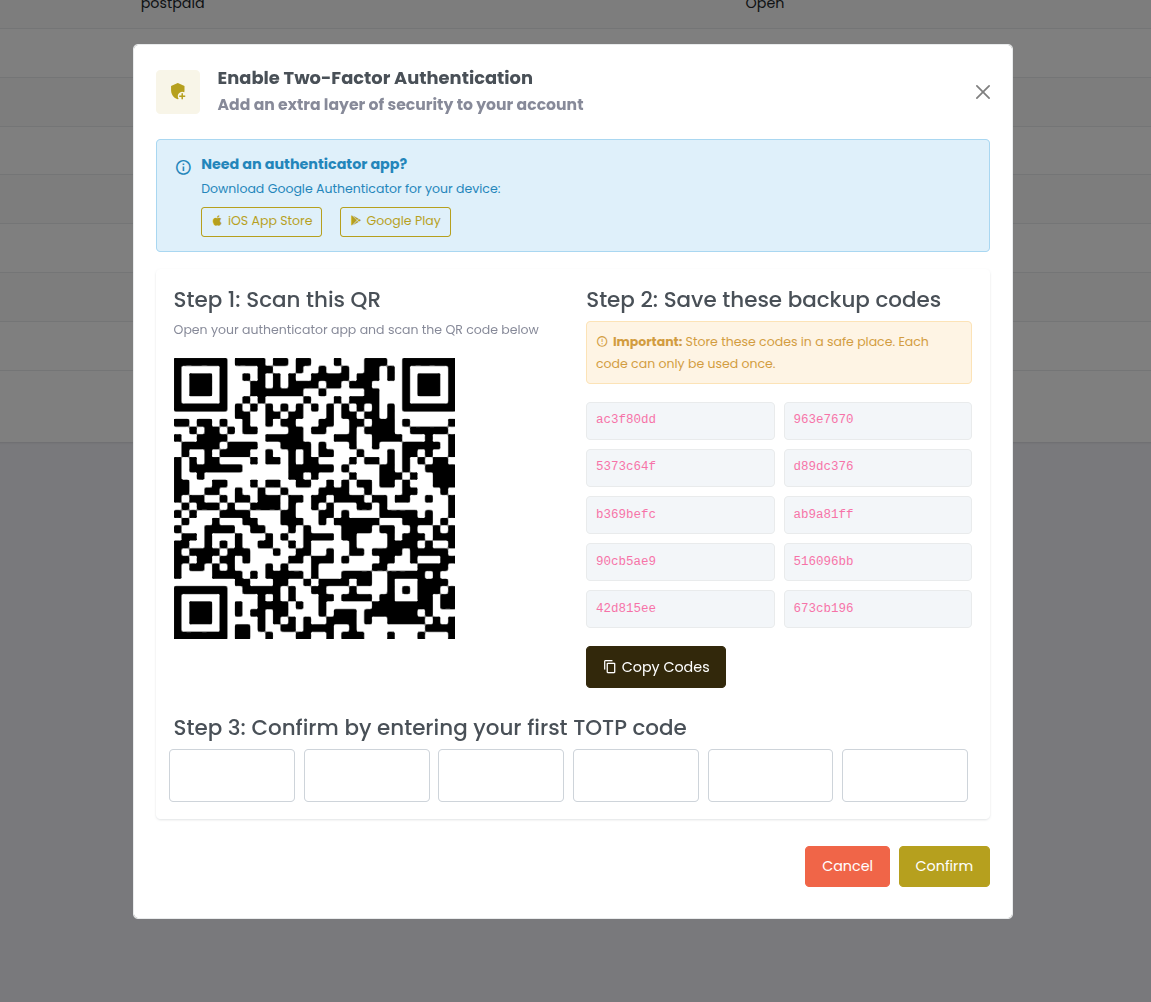
Managing Two-Factor Authentication (2FA)
OmniCRM supports TOTP-based two-factor authentication for enhanced security. Administrators can enable, disable, and reset 2FA for users.
Enabling 2FA for a User
Via Web UI:
- Navigate to Users & Roles → Users
- Click on the user to view details
- In the Security section, click "Enable 2FA"
- System generates:
- TOTP secret (QR code displayed)
- 10 backup codes (one-time use)
- User scans QR code with authenticator app (Google Authenticator, Authy, etc.)
- User enters verification code from app to confirm setup
- User saves backup codes in secure location
- 2FA is now enabled; required for all future logins
Via API:
-
Generate TOTP secret:
Endpoint:
POST /2fa/enable/user/{user_id}Response:
{
  "totp_secret": "JBSWY3DPEHPK3PXP",
  "qr_code_url": "otpauth://totp/OmniCRM:user@example.com?secret=JBSWY3DPEHPK3PXP&issuer=OmniCRM",
  "backup_codes": [
    "12345678",
    "23456789",
    "34567890",
    ...
  ]
} -
Verify setup:
Endpoint:
POST /2fa/verify-setup/user/{user_id}{
"code": "123456"
}Returns
{"verified": true}on success.
2FA Login Flow
Once 2FA is enabled, the login process changes:
- User enters username and password
- System validates credentials
- If valid, prompts for 2FA code
- User enters code from authenticator app OR backup code
- System verifies code
- On success, user is logged in
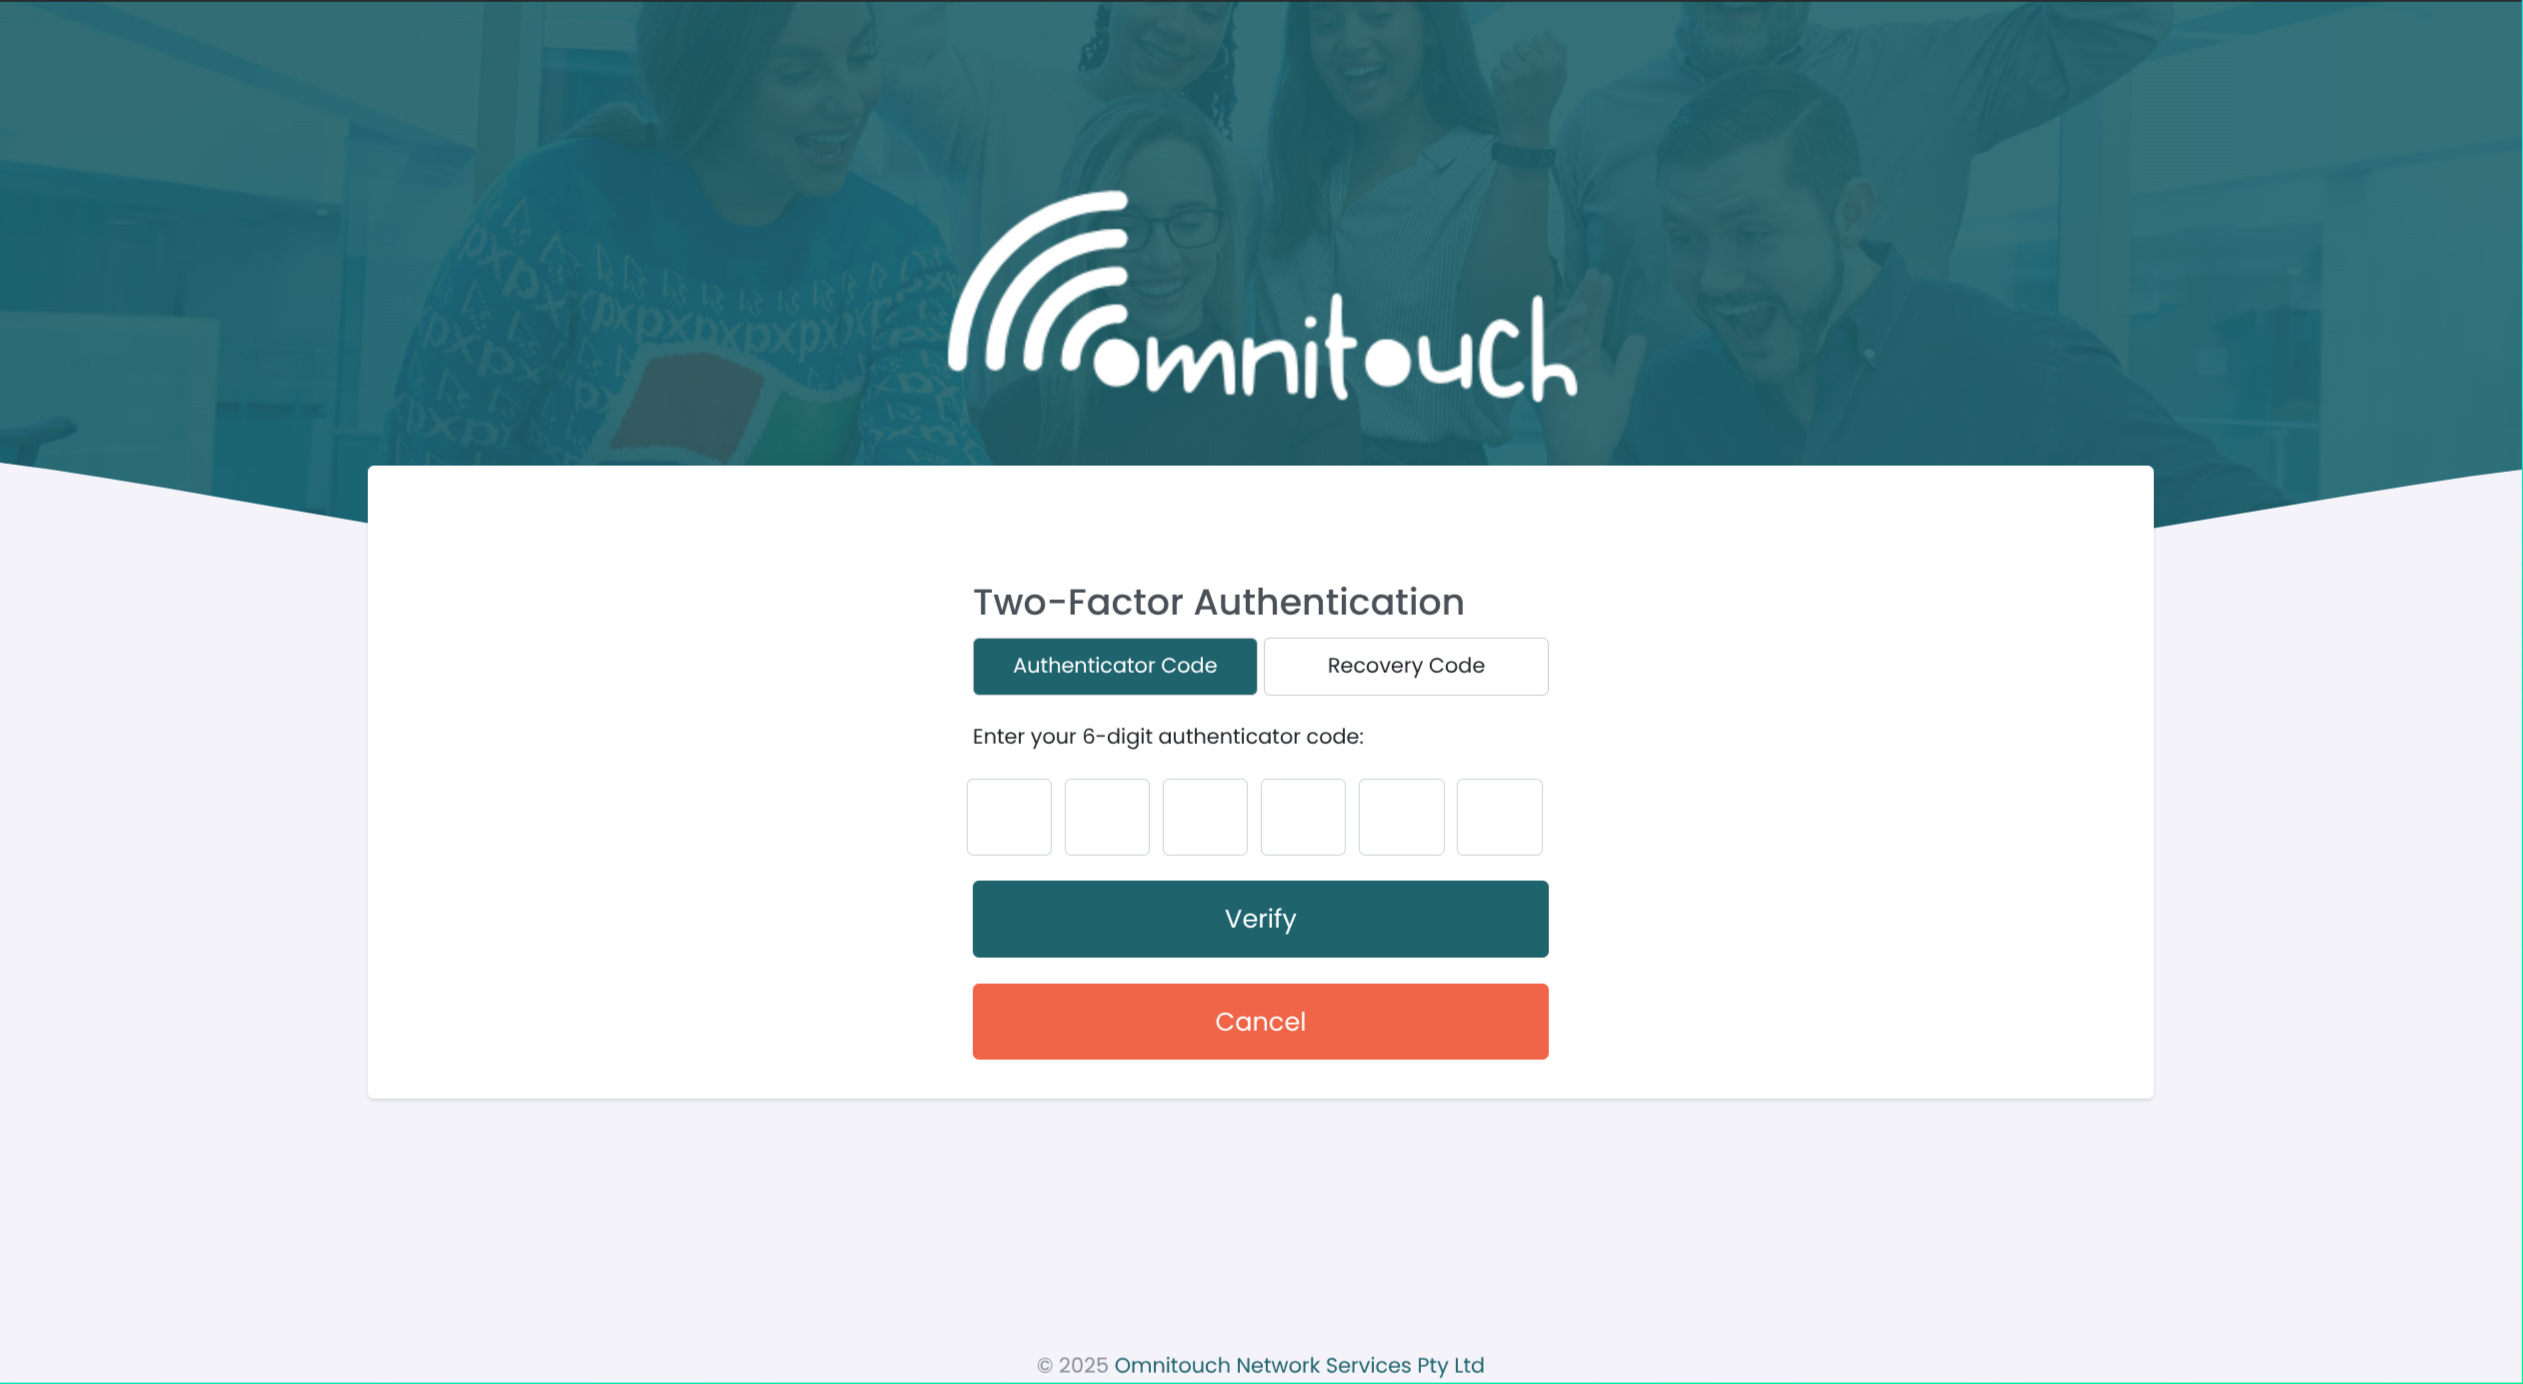
Backup Codes:
- 10 codes generated during 2FA setup
- Single-use only (consumed after use)
- Used if authenticator app is unavailable
- Can be regenerated by user or admin
Verifying 2FA Code
Endpoint: POST /2fa/verify/user/{user_id}
{
  "code": "123456"
}
Accepts both:
- TOTP code (6 digits from authenticator app)
- Backup code (8 digits from backup code list)
Regenerating Backup Codes
If a user exhausts backup codes or loses them, generate new ones:
Via Web UI:
- Navigate to user details
- Click "Regenerate Backup Codes"
- Display or send new codes to user
- Old codes are invalidated
Via API:
Endpoint: POST /2fa/backup-codes/regenerate/user/{user_id}
Response:
{
  "backup_codes": [
    "98765432",
    "87654321",
    "76543210",
    ...
  ]
}
Administrator 2FA Reset
If a user loses access to their authenticator app and all backup codes, an administrator can disable and re-enable 2FA.
Via Web UI:
- Navigate to Users & Roles → Users
- Click on the user
- Click "Reset 2FA" button
- Confirm the reset
- 2FA is disabled; user can log in with just password
- Guide user to set up 2FA again with new secret

Via API:
Endpoint: POST /2fa/admin/disable/user/{user_id}
Required Permission: admin
This completely disables 2FA for the user:
- TOTP secret cleared
- Backup codes cleared
is_2fa_enabledflag set to false
User can then re-enable 2FA to get new secret and backup codes.
User Self-Service 2FA Reset (New Device)
If a user gets a new device but still has access to backup codes:
Endpoint: POST /2fa/reset-for-new-device/user/{user_id}
{
  "backup_code": "12345678"
}
System validates the backup code, then generates new TOTP secret and backup codes. User can set up authenticator app on new device.
2FA Best Practices
- Require 2FA for all admin and support staff
- Store backup codes securely (password manager or secure note)
- Regenerate backup codes after using several
- Use reputable authenticator apps (Google Authenticator, Authy, Microsoft Authenticator)
- Document 2FA reset procedures for support staff
- Audit 2FA usage - monitor which users have 2FA enabled
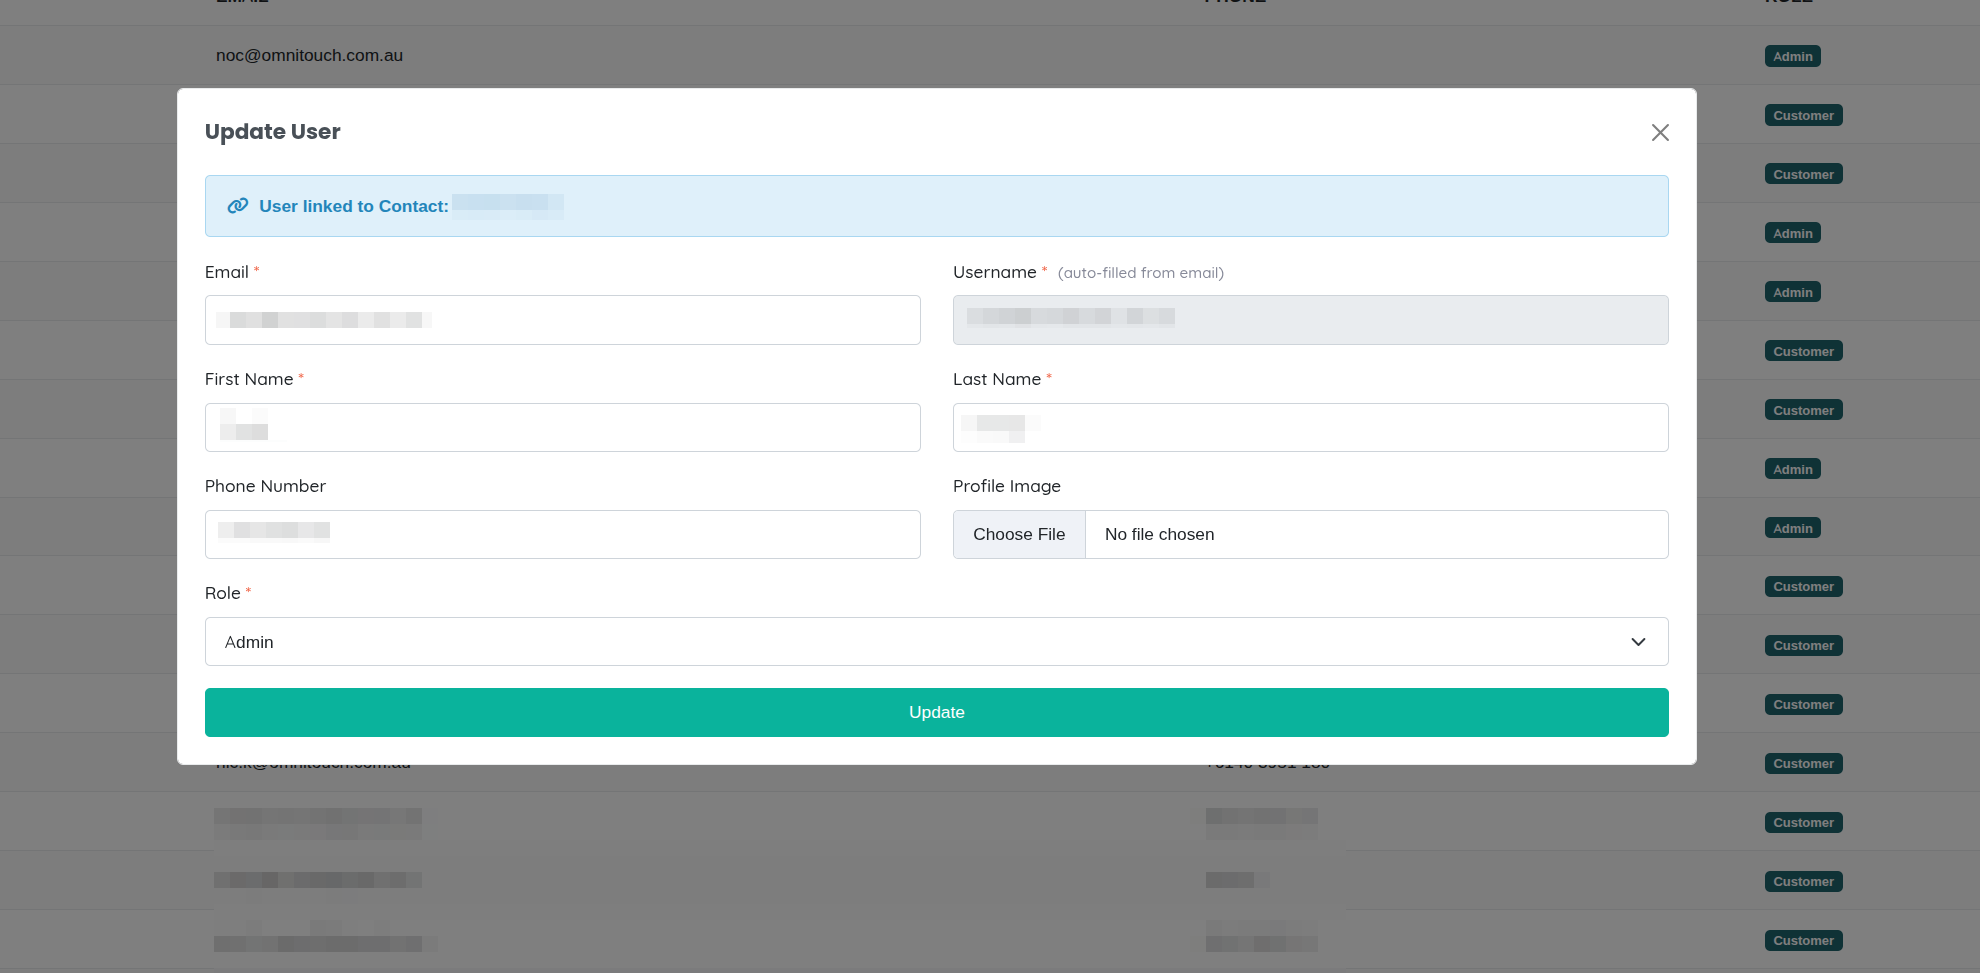
Updating User Information
Administrators can update user details at any time.
Via Web UI:
- Navigate to Users & Roles → Users
- Click on user to edit
- Modify any editable fields:
- First name, middle name, last name
- Email address (requires verification)
- Phone number
- Roles
- Customer contact linkage
- Click "Save"
Via API:
Endpoint: PUT /auth/users/{user_id}
{
  "first_name": "Jane",
  "last_name": "Doe-Smith",
  "email": "jane.doesmith@newcompany.com",
  "phone_number": "+61498765432",
  "role": "Support,Finance"
}
Email Changes:
When email is changed, the new email is marked as pending until verified:
pending_emailfield stores new email- Verification email sent to new address
- User clicks link to verify
emailfield updated to new valueemail_verifiedflag set to true
Deleting Users
OmniCRM uses soft deletes for users - they are marked as deleted but not removed from the database. This preserves audit trails and historical data.
Deleting a User
Via Web UI:
- Navigate to Users & Roles → Users
- Find the user to delete
- Click "Delete" button
- Confirm deletion
- User is immediately logged out and cannot log in again
Via API:
Endpoint: DELETE /auth/users/{user_id}
Required Permission: admin
What Happens:
deletedflag set toTruedeleted_attimestamp recorded- User cannot log in
- All active sessions invalidated
- User still appears in audit logs and historical records
- Linked data (customer contacts, activities) preserved
Viewing Deleted Users
Filter for deleted users:
GET /auth/users/search?filters={"deleted":[true]}
Restoring a Deleted User
If a user was deleted by mistake, administrators can restore them:
Endpoint: PUT /auth/users/{user_id}
{
  "deleted": false
}
This clears the deleted flag and allows the user to log in again.
Note: User's password remains unchanged, so they can use their previous password.
Permanently Deleting a User
Warning: This is irreversible and removes all user data from the database.
Not exposed via UI. Only available via direct database access for compliance reasons (e.g., GDPR data deletion requests).
Best Practices for User Deletion
- Soft delete by default - Preserves audit trails
- Document deletion reasons - Add note in activity log before deleting
- Transfer ownership - Reassign user's open tickets, tasks before deleting
- Review access - Ensure no critical processes depend on the user
- Archive data - Export user's work history if needed
- Notify relevant teams - Inform managers/colleagues of deletion
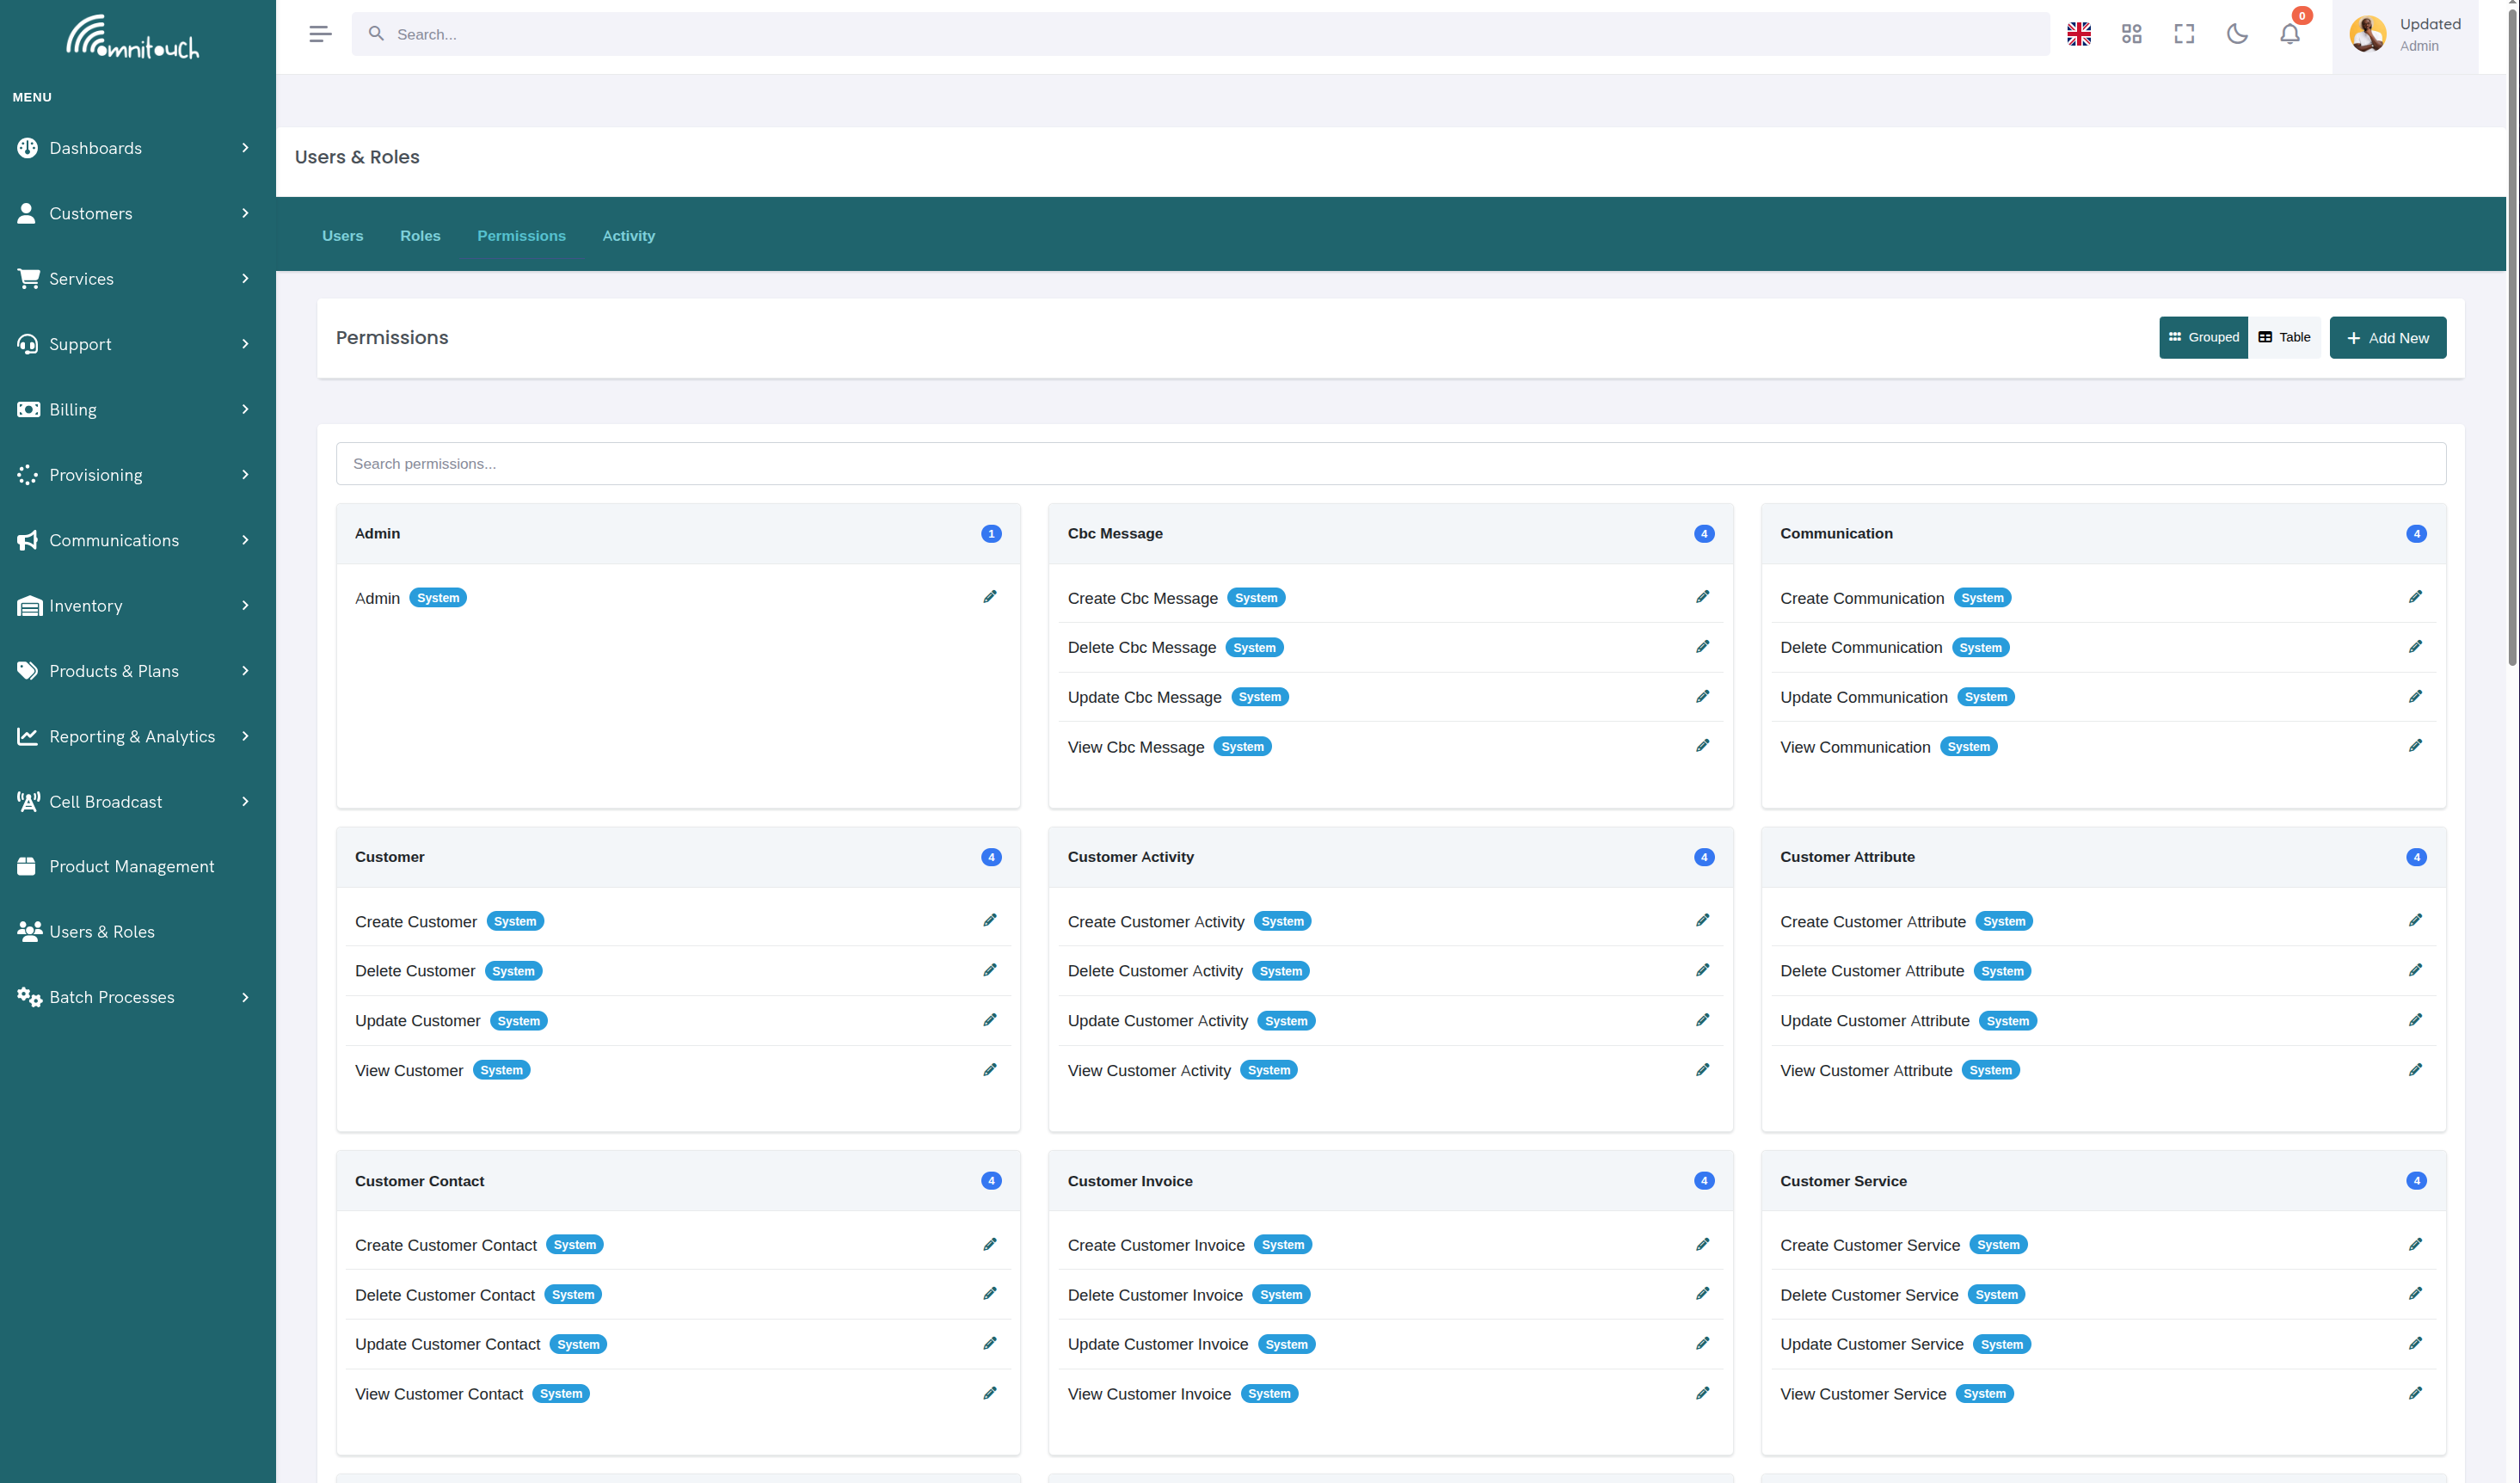
Permission Catalog
Permissions generally follow CRUD patterns:
view\_\*--- read/browsecreate\_\*--- create/addupdate\_\*--- edit/modifydelete\_\*--- delete/remove
Some entities also include "view own ..." variants that restrict visibility to the current user's customer/tenant.
Global / Administrative
admin--- Full administrative access (manage users, roles, and permissions; access all protected endpoints).can_impersonate--- Temporarily act as another user (audited; for support/troubleshooting).
Customers & Related Records
- Customer
view_customer,create_customer,update_customer,delete_customer- Own-scope: view own customer
- Customer Site
view_customer_site,create_customer_site,update_customer_site,delete_customer_site- Own-scope: view own customer site
- Customer Contact
view_customer_contact,create_customer_contact,update_customer_contact,delete_customer_contact- Own-scope: view own customer contact
- Customer Attribute (see
Customer Attributes )
view_customer_attribute,create_customer_attribute,update_customer_attribute,delete_customer_attribute- Own-scope: view own customer attribute
- Customer Tag (see
Customer Tags )
view_customer_tag,create_customer_tag,update_customer_tag,delete_customer_tag- Own-scope: view own customer tag
- Customer Service
view_customer_service,create_customer_service,update_customer_service,delete_customer_service- Own-scope: view own customer service
- Customer Activity
view_customer_activity,create_customer_activity,update_customer_activity,delete_customer_activity- Own-scope: view own customer activity
Billing
- Stripe Card
view_customer_stripe_card,create_customer_stripe_card,update_customer_stripe_card,delete_customer_stripe_card- Own-scope: view own customer stripe card
- Transactions
view_customer_transaction,create_customer_transaction,update_customer_transaction,delete_customer_transaction- Own-scope: view own customer transaction
- Invoices
view_customer_invoice,create_customer_invoice,update_customer_invoice,delete_customer_invoice- Own-scope: view own customer invoice
Communications
view_communication,create_communication,update_communication,delete_communication- Own-scope: view own communication
Inventory & Templates
- Inventory
view_inventory,create_inventory,update_inventory,delete_inventory- Own-scope: view own inventory
- Inventory Template
view_inventory_template,create_inventory_template,update_inventory_template,delete_inventory_template- Own-scope: view own inventory template
Products
view_product,create_product,update_product,delete_product
Cell Broadcast (CBC)
view_cbc_message,create_cbc_message,update_cbc_message,delete_cbc_message
Provisioning
- Provision
view_provision,create_provision,update_provision,delete_provision- Own-scope: view own provision
- Provision Event
view_provision_event,create_provision_event,update_provision_event,delete_provision_event
"View Own" Access
"View own ..." permissions scope reads (and optionally edits, where implemented) to data associated with the user's own customer/tenant. For example, a Customer Admin role can manage their tenant's contacts, sites, invoices, and services, but cannot see other tenants.
Typical Role Designs
Role Typical Permissions Notes
System Admin admin, optionally can_impersonate; plus broad CRUD as needed Full control over users/roles/permissions
Support view_customer, view_customer_service, view_communication, view_provision; optional updates Add can_impersonate if permitted
Finance view_customer_invoice, view_customer_transaction, view_product; optional create_customer_invoice Read-heavy; limited write
Customer Admin (tenant) "view own ..." across customer, sites, contacts, services, inventory, invoices, transactions, communications, provisioning Tenant-scoped management
Read-only Auditor Broad view_* only No create/update/delete
: Example Roles and Included Permissions (summary)
Managing Roles & Permissions via API
All endpoints require admin permission.
List permissions
Endpoint: GET /auth/permissions
Create a permission (rare)
Endpoint: POST /auth/permissions
Request Body:
{
    "name": "view_example",
    "description": "Read-only access to example objects"
}
List roles
Endpoint: GET /auth/roles
Create a role
Endpoint: POST /auth/roles
Request Body:
{
"name": "Support",
"description": "Tier-1 support team"
}
Add a permission to a role
Endpoint: POST /auth/roles/{role_id}/permissions
Request Body:
{
  "permission_id": 123
}
Remove a permission from a role
Endpoint: DELETE /auth/roles/{role_id}/permissions/{permission_id}
Assigning Roles to Users
Create a user with role
Endpoint: POST /auth/users
Request Body:
{
  "username": "sara",
  "email": "sara@example.com",
  "password": "TempP@ssw0rd!",
  "first_name": "Sara",
  "last_name": "Ng",
  "phone_number": "+61...",
  "role": "Support"
}
Update a user's role
Endpoint: PUT /auth/users/{user_id}
Request Body:
{
  "role": "Finance"
}
List users (Admin-only)
Endpoint: GET /auth/users
Impersonation (Controlled)
- Required:
can_impersonateoradmin
Start impersonation
Endpoint: POST /auth/impersonate
Request Body:
{ "user_id": 42 }
Stop impersonation
Endpoint: POST /auth/stop_impersonation
Best Practices
- Least privilege first. Start with minimal roles; add permissions as needed.
- Prefer "view own ...". Use tenant-scoped permissions for customer-facing roles.
- Keep roles stable. Update role permissions when features change---don't edit each user.
- Audit regularly. Review who has
adminorcan_impersonate.
FAQ
Can a user have multiple roles? Yes. Permissions are additive.
Do I need custom permissions? Usually not. The built-in catalog covers most needs.
How do "view own ..." rules know what's mine? They evaluate the linkage between your user/contact and your customer (tenant).