Service Management
The Service Management interface provides comprehensive tools for viewing, filtering, and managing customer services across your organization.
Related documentation: Adding Services , Service Usage , Modifying Services , Products & Services .
Accessing the Service List
Navigate to:
Or directly:
This displays all services with filtering, sorting, and bulk management capabilities.
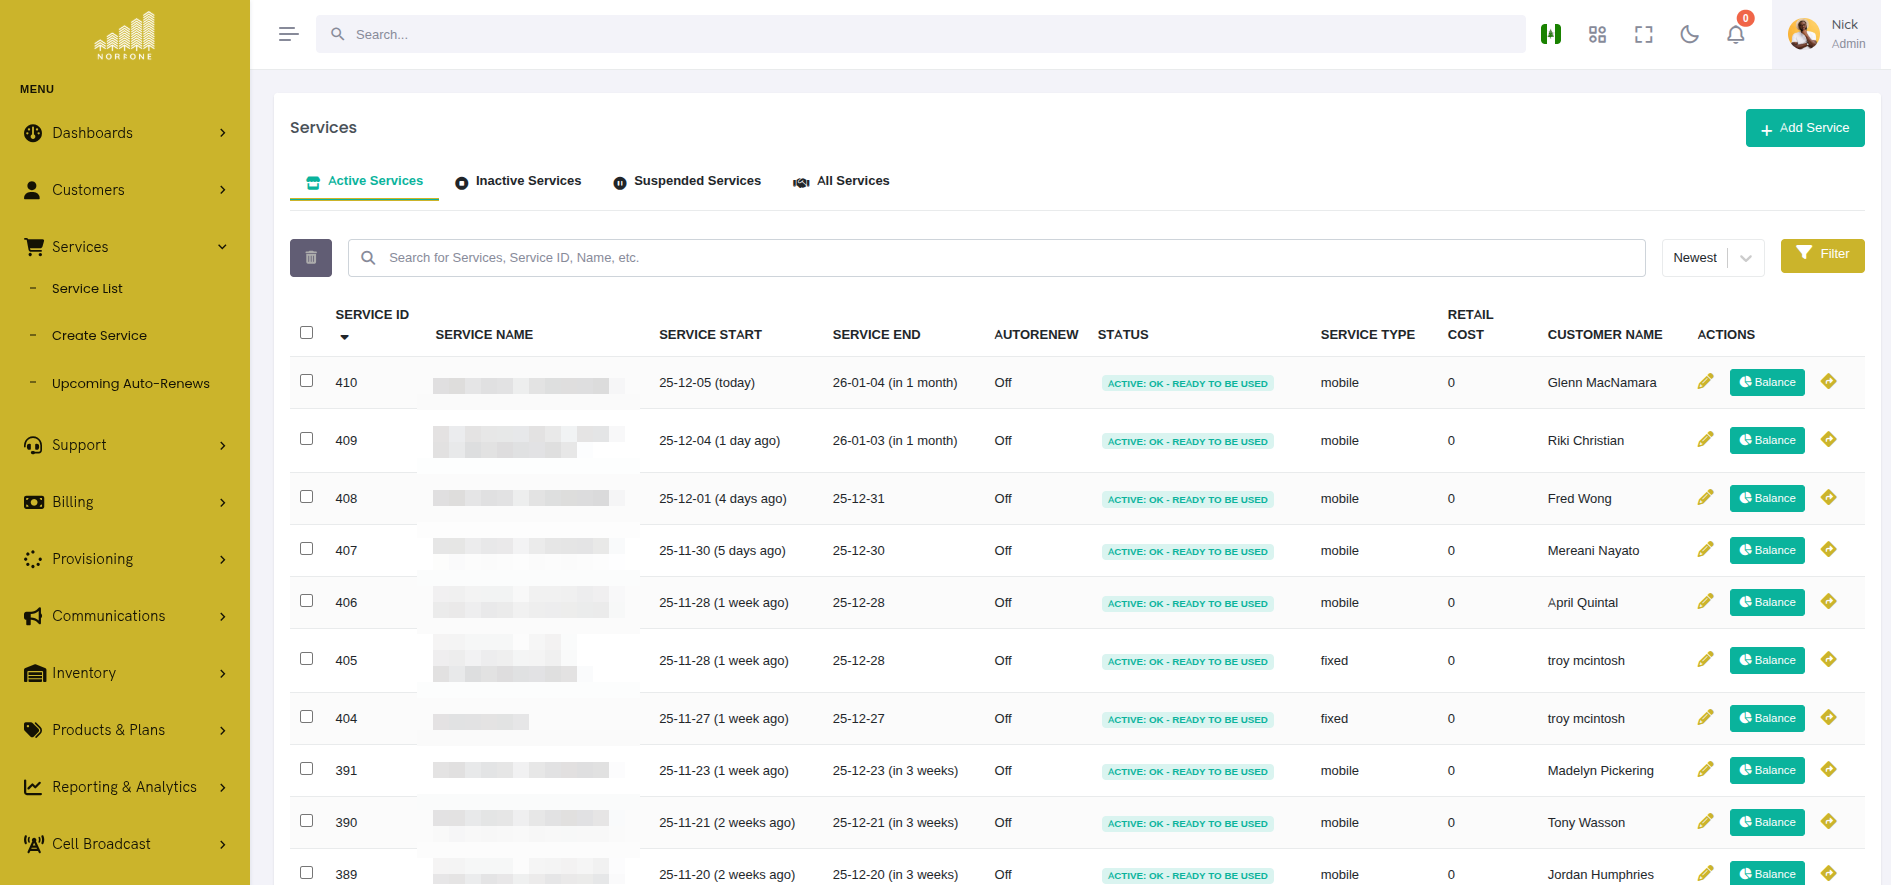
Service List Overview
The service list displays services in a table with:
 {.align-center
width="800px"}
{.align-center
width="800px"}
Columns:
- Service ID - Unique identifier
- Service Name - Descriptive name (e.g., "Mobile - +44 7700 900123")
- Customer Name - Associated customer (clickable link)
- Service Type - mobile, iptv, internet, voip
- Status - Active, Inactive, Suspended
- Start Date - When service began
- End Date - When service expires/ended
- Monthly Cost - Retail price
- Actions - View, Edit, Add-ons, Usage, Delete
Filtering Services
Status Tabs
Quick-filter services by status using the tab bar:
- All Results - Shows all services regardless of status
- Active - Currently active services (default view)
- Inactive - Cancelled or expired services
- Suspended - Temporarily disabled services (non-payment, fraud, etc.)
Clicking a tab updates the list instantly. The active tab is highlighted.
Service Type Filter
Filter by service type:
Select one or multiple types to show only matching services.
Use Cases:
- Mobile - View all mobile SIM services
- Internet - Show fiber, DSL, and fixed wireless
- IPTV - Display TV subscription services
- VoIP - List voice-over-IP services
Customer Filter
Search and filter by customer:
Start typing a customer name to see matching results:
Select a customer to show only their services.
Use Case: Quickly view all services for a specific customer.
Search
Global search across all service fields:
Searches:
- Service name
- Service ID
- Customer name
- Phone numbers (for mobile services)
- Service UUID
Example: Search "0770" to find all services with phone numbers containing "0770".
Sorting Services
Click any column header to sort by that field:
Sortable Columns:
- Service ID (default: newest first)
- Service Name (alphabetical)
- Customer Name (alphabetical)
- Service Type (alphabetical)
- Start Date (chronological)
- End Date (chronological)
- Monthly Cost (numerical)
Sort Direction:
- Click once: Ascending (A-Z, oldest-newest, lowest-highest)
- Click twice: Descending (Z-A, newest-oldest, highest-lowest)
- Active sort column shows ▲ or ▼ indicator
Sort Dropdown:
Top right dropdown provides quick sorting presets:
Viewing Service Details
Click on any service name to open the detailed service view.
Service Detail Tabs:
- Overview - Service summary, status, dates, pricing
- Inventory - Assigned equipment (SIM cards, modems, etc.)
- Transactions - Charges, credits, payments
- Usage - Data/voice/SMS usage statistics
- Add-ons - Active and available add-ons
- Activity Log - Change history
Quick Actions
From the service list, click the action menu (⋮) for quick operations:
- View - Opens service details
- Edit - Modify service parameters
- Add-ons - Browse and add service enhancements
- Usage - View current usage and balance
- Delete - Cancel/remove service
Bulk Operations
Select multiple services using checkboxes to perform bulk actions.
Selecting Services
Individual Selection:
Click the checkbox next to each service you want to select.
Select All:
Click the checkbox in the table header to select all visible services.
☑ Service 1 ☑ Service 2 ☑ Service 3
Selection Counter:
The interface shows how many services are selected:
Bulk Actions
Once services are selected, bulk action buttons appear:
Delete Multiple Services:
- Select services to delete
- Click "Delete Selected" button
- Confirm deletion in modal
::: warning ::: title Warning :::
Bulk deletion is permanent and will:
- Cancel all selected services
- Mark inventory as unassigned
- Stop all recurring charges
- Create activity log entries :::
Use Cases:
- Clean up test services
- Cancel services for closed customer accounts
- Remove duplicate or erroneous entries
Best Practice: Use filters to narrow the list before bulk operations to avoid accidental deletions.
Service Status Management
Status Types
Services can have three statuses:
Active
- Service is operational
- Charges apply
- Customer can use service
- Displayed with green badge
Inactive
- Service has been cancelled or expired
- No charges applied
- Customer cannot use service
- Displayed with gray badge
- Inventory marked for return/refurbishment
Suspended
- Service temporarily disabled
- May or may not charge (configurable)
- Customer cannot use service
- Displayed with orange/yellow badge
- Common reasons: Non-payment, fraud investigation, customer request
Changing Service Status
To change a service's status:
- Open service details
- Click "Edit" button
- Change "Service Status" dropdown
- Click "Save"
What Happens:
- Active → Inactive: Triggers deprovisioning playbook (if configured)
- Active → Suspended: Disables service in OCS/network but keeps record
- Suspended → Active: Re-enables service, resumes billing
- Inactive → Active: May trigger re-provisioning (use caution)
Service Usage View
Click "Usage" in the actions menu to open the usage modal.
 {.align-center
width="800px"}
{.align-center
width="800px"}
Information Shown:
- Balance - Remaining credit or prepaid value
- Data Usage - Used vs. allocated (progress bar)
- Voice Usage - Minutes used vs. plan allowance
- SMS Usage - Messages sent vs. allowance
- Expiry Date - When current balance/plan expires
Actions:
- Top Up - Add credit or data (for prepaid services)
- View Details - See detailed usage breakdown
- Export - Download usage report (if available)
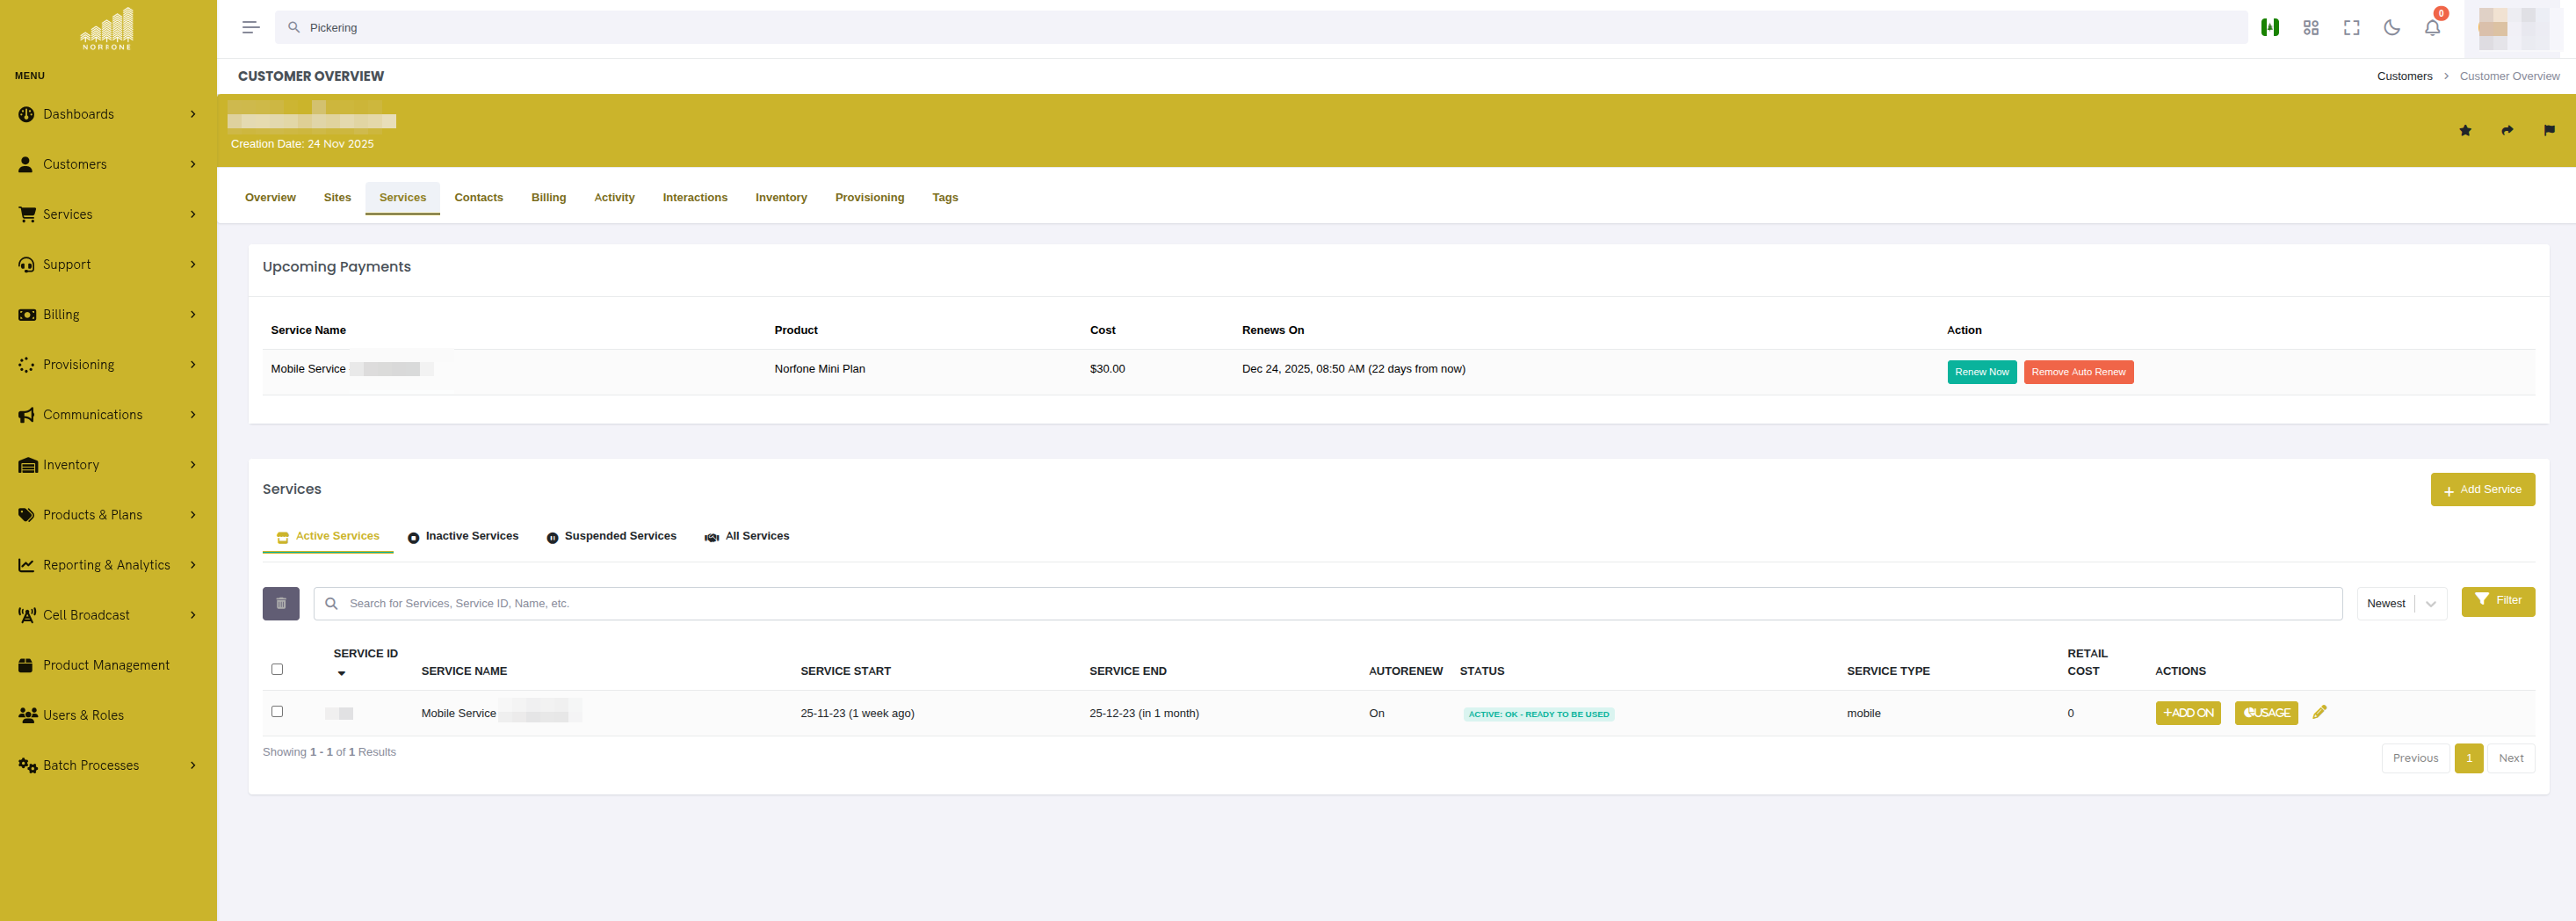
Upcoming Auto-Renews
The Upcoming Auto-Renews view provides a centralized interface for monitoring and managing all scheduled service renewals across your organization.
Accessing Auto-Renews
Navigate to:
Or directly:
This displays all services with scheduled auto-renewal, sorted by next renewal date.
Auto-Renews Overview
The auto-renews list displays scheduled renewals in a table with:
Columns:
- Customer - Customer name (clickable link to customer overview)
- Service - Service name (clickable link to customer overview)
- Product - Product/plan name being renewed
- Cost - Renewal cost (from product retail price)
- Renews On - Date and time of next renewal with human-readable format
- Status - Service status (Active, Suspended, etc.)
- Actions - Renew now or remove auto-renewal
Example Display:
How Auto-Renewal Works
Auto-renewal is scheduled in CGRateS (the billing system) when a service is created or modified. The system:
- Schedules Action - Creates an ActionPlan in CGRateS with the renewal date
- Monitors Balance - Checks if customer has sufficient balance before renewal
- Executes Renewal - On the scheduled date, automatically renews the service
- Updates Records - Creates transactions, updates service dates, and logs activity
Data Source:
The Upcoming Auto-Renews view queries CGRateS directly using the
ApierV1.GetScheduledActions API and enriches the data with customer
and service information from the CRM database.
Renew Now
To manually trigger a renewal before the scheduled date:
-
Click the 🔄 (Renew Now) button for the service
-
Review the renewal details in the confirmation modal:
Customer: Acme Corp Service: FixedWireless_75628fa5 Product: Home Internet Mega Cost: $89.99
Next scheduled renewal: Nov 11, 2025 10:45 AM
[Cancel] [Confirm Renewal]
-
Click "Confirm Renewal" to process immediately
-
A provisioning job is created and executed
-
Monitor progress in the provisioning status modal
What Happens:
- Service is topped up with the product allowances
- Balance is updated in CGRateS
- Transaction record is created
- Service end date is extended
- Activity log entry is created
Use Cases:
- Customer requests early renewal
- Resolve service issues by resetting allowances
- Testing renewal processes
- Customer wants to use service before scheduled renewal
Remove Auto-Renewal
To cancel automatic renewal for a service:
-
Click the 🗑️ (Remove Auto-Renew) button for the service
-
Confirm deletion in the modal:
This will remove the scheduled auto-renewal for:
Customer: Acme Corp Service: FixedWireless_75628fa5 Next Renewal: Nov 11, 2025 10:45 AM
The service will not automatically renew. You will need to manually renew or the service will expire on the end date.
[Cancel] [Remove Auto-Renewal]
-
Click "Remove Auto-Renewal" to confirm
-
The ActionPlan is removed from CGRateS
-
Service will expire naturally unless manually renewed
What Happens:
- ActionPlan is deleted from CGRateS
- Service status remains unchanged
- Service will expire on its current end date
- Customer must manually renew or the service will stop
Use Cases:
- Customer is cancelling service
- Switching to manual renewal process
- Service plan is changing
- Customer requested to stop automatic charges
::: warning ::: title Warning :::
Removing auto-renewal means the service will expire unless manually renewed. Customers will not receive automatic service continuation. :::
Understanding the Display
Customer Column:
- Shows customer name as a clickable link
- Links to customer overview page
- Shows "N/A" if service is not linked to a customer (orphaned service)
Service Column:
- Shows service name/UUID
- Links to customer overview page
- Shows service UUID if name is not set
- Shows "N/A" if service cannot be found in database
Product Column:
- Product name from CGRateS ActionPlan
- Extracted from the scheduled action metadata
- Always shows product name even if service is not found
Cost Column:
- Retail cost from the Product table in CRM
- Amount that will be charged on renewal
- Shows "N/A" if product is not found in database
Renews On Column:
- Exact date and time of next renewal
- Human-readable relative time (e.g., "3 hours from now", "2 days from now")
- Time zone aware (uses CGRateS server timezone)
Status Column:
- Current service status from CRM database
- Active (Green) - Service is operational
- Suspended (Orange) - Service is temporarily disabled
- Unknown (Gray) - Service not found in database or status not set
Troubleshooting
Services showing "N/A" for Customer/Service
- Cause: Service UUID in CGRateS doesn't match service_uuid in CRM database
- Fix:
- Verify service exists in database
- Check that service_uuid format matches:
ServiceType_UUID(e.g.,FixedWireless_75628fa5) - Service may have been deleted from CRM but still scheduled in CGRateS
Cost showing "N/A"
- Cause: Product ID in CGRateS doesn't exist in CRM Product table
- Fix:
- Verify product exists in database
- Check product_id in the ActionPlan matches a product in CRM
- Product may have been deleted
"Renews On" not showing date
- Cause: NextRunTime not present in CGRateS response
- Fix:
- Check CGRateS ActionPlan configuration
- Verify ActionTiming is correctly configured
- Check CGRateS logs for errors
"Renew Now" fails
- Cause: Various provisioning errors
- Troubleshooting:
- Check provisioning status modal for error details
- Verify Ansible playbooks are configured correctly
- Check OCS connectivity
- Review provisioning logs
Auto-renewal removed but still showing
- Cause: Cache delay or CGRateS sync issue
- Fix:
- Click "Refresh" button to reload data
- Verify ActionPlan was actually removed in CGRateS
- Check CGRateS API connectivity
Pagination
Services are displayed in pages for performance:
◄ Previous 1 [2] 3 4 5 Next ►
Items per page: [10 ▼]
: - 10
- 25
- 50
- 100
Controls:
- Previous/Next - Navigate pages
- Page Numbers - Jump to specific page
- Items per Page - Adjust how many services show per page
Performance Tip: Use filters to reduce total results rather than increasing items per page.
Service Badges and Indicators
Visual indicators help identify service states quickly:
Status Badges:
Auto-Renewal Indicator:
Services with auto-renewal enabled show:
Expiring Soon:
Services expiring within 7 days show:
Overdue:
Services with outstanding balance show:
CGRateS Integration (Advanced)
For services integrated with CGRateS (the billing and rating engine), administrators can manage advanced configurations directly from the service view. This includes attributes, filters, and viewing active sessions.
::: note ::: title Note :::
CGRateS integration features require the cgrates_api_access
permission. Only administrators have access to these features by
default. See rbac for permission
configuration.
:::
Automatic Provisioning vs. Manual Management
In normal operation, CGRateS attributes and filters are automatically provisioned by Ansible during the initial service provisioning workflow. When a new service is created, the provisioning playbooks:
- Create the service account in CGRateS
- Configure attributes (IMSI, MSISDN, account identifiers, speed profiles, etc.)
- Set up filters to ensure correct rating
- Apply the appropriate rating plans
However, there are cases where you may need to modify these configurations after the service has been provisioned:
- Speed Profile Changes - Customer upgrades/downgrades bandwidth (MaxBitrateDL/UL)
- Policy Adjustments - Change QoS policies or traffic shaping rules (PcefPolicyName)
- Phone Number Changes - Update MSISDN or other identifiers
- Troubleshooting - Fix misconfigurations or test different settings
- Special Configurations - Apply custom attributes not part of standard provisioning
The manual management interface allows administrators to make these changes directly without re-running the entire provisioning workflow. This is particularly useful for:
- Quick Changes - Modify a single attribute without waiting for provisioning
- Testing - Experiment with different configurations
- Customer Support - Resolve issues on the fly during support calls
- Custom Configurations - Apply service-specific settings not covered by templates
::: warning ::: title Warning :::
Manual changes to CGRateS configuration bypass the standard provisioning workflow. Ensure you understand the impact of your changes, as incorrect configurations can affect billing and service functionality. All changes are logged to the customer activity feed for audit purposes. :::
Accessing CGRateS Features
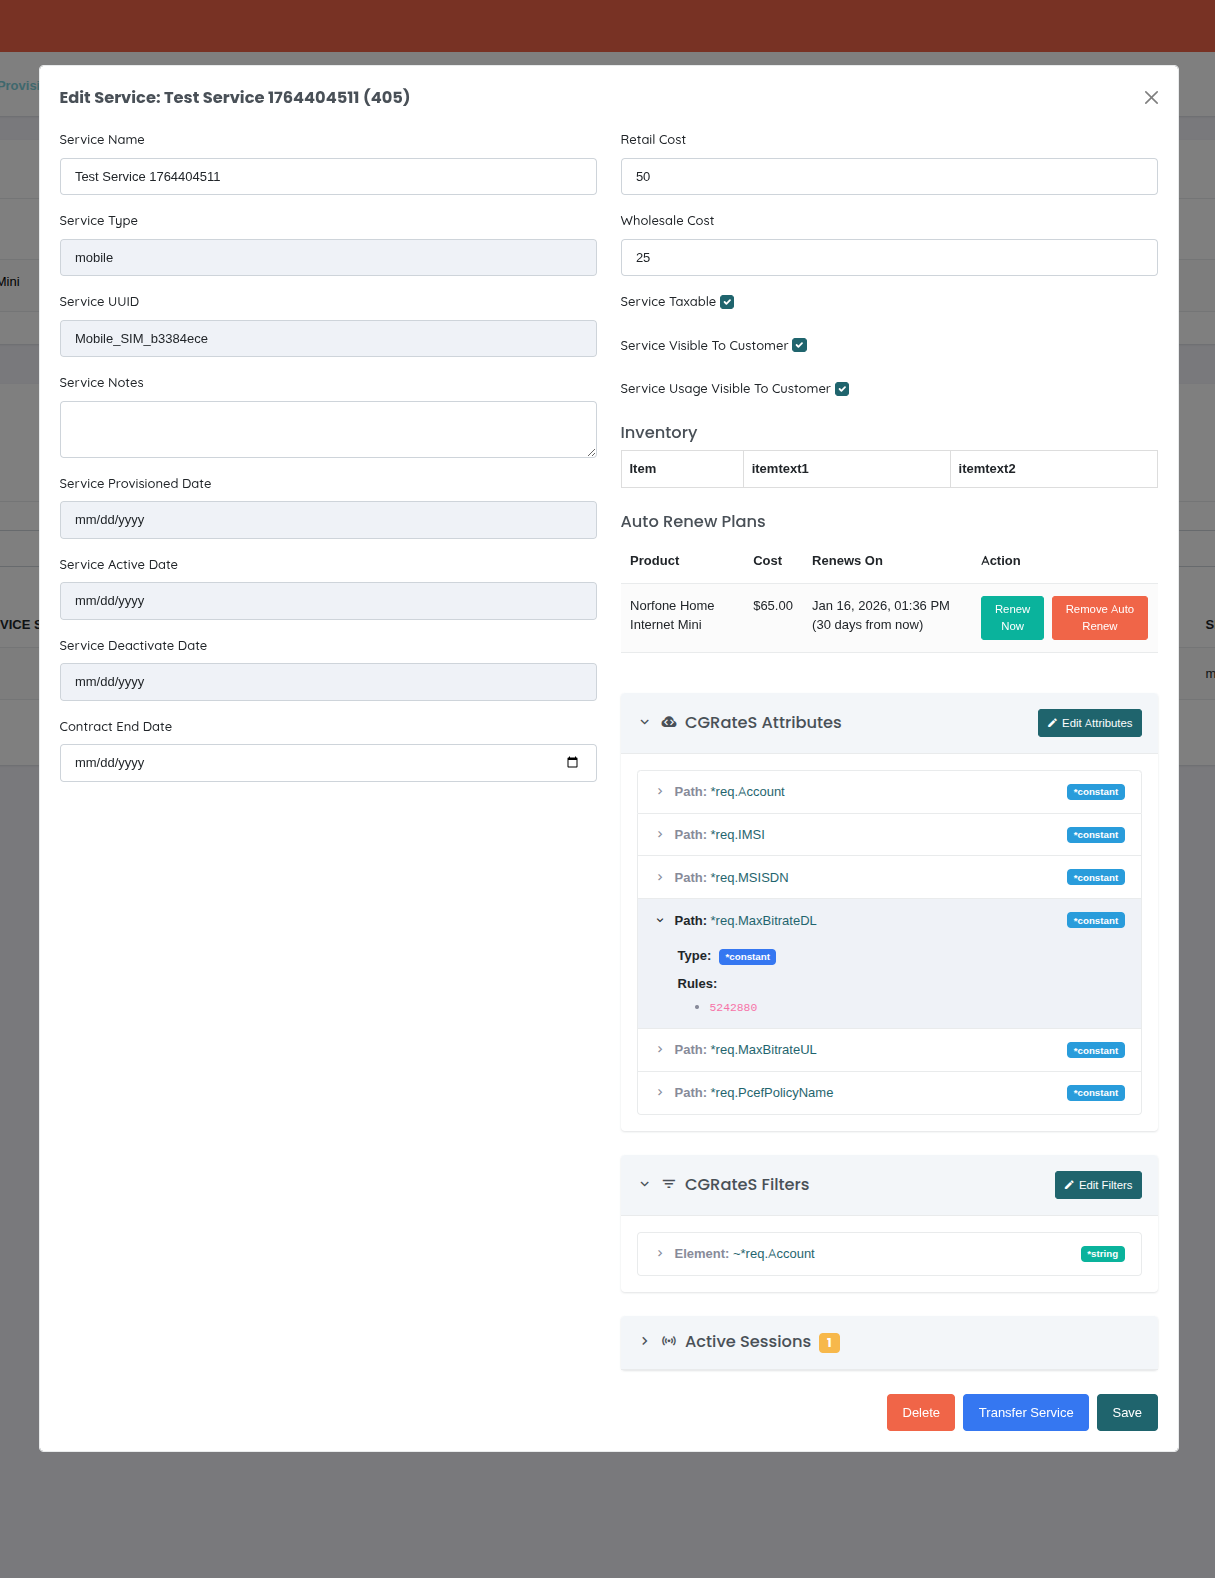
When viewing or editing a service that's provisioned in CGRateS, three collapsible sections appear at the bottom of the service form:
- CGRateS Attributes - Configure service-specific attributes
- CGRateS Filters - Define filtering rules for the service
- Active Sessions - View real-time active sessions
Each section is collapsed by default to keep the interface clean. Click the section header to expand and view/edit the configuration.
 {.align-center
width="800px"}
{.align-center
width="800px"}
The collapsed sections show count badges indicating how many attributes, filters, or active sessions exist for the service.
CGRateS Attributes
Attributes allow you to define custom fields and transformations that are applied to rating events for this specific service.
Attribute ID Format: ATTR_ACCOUNT_{service_uuid}
Example: For service with UUID Mobile_SIM_c2880638, the attribute
profile ID is ATTR_ACCOUNT_Mobile_SIM_c2880638
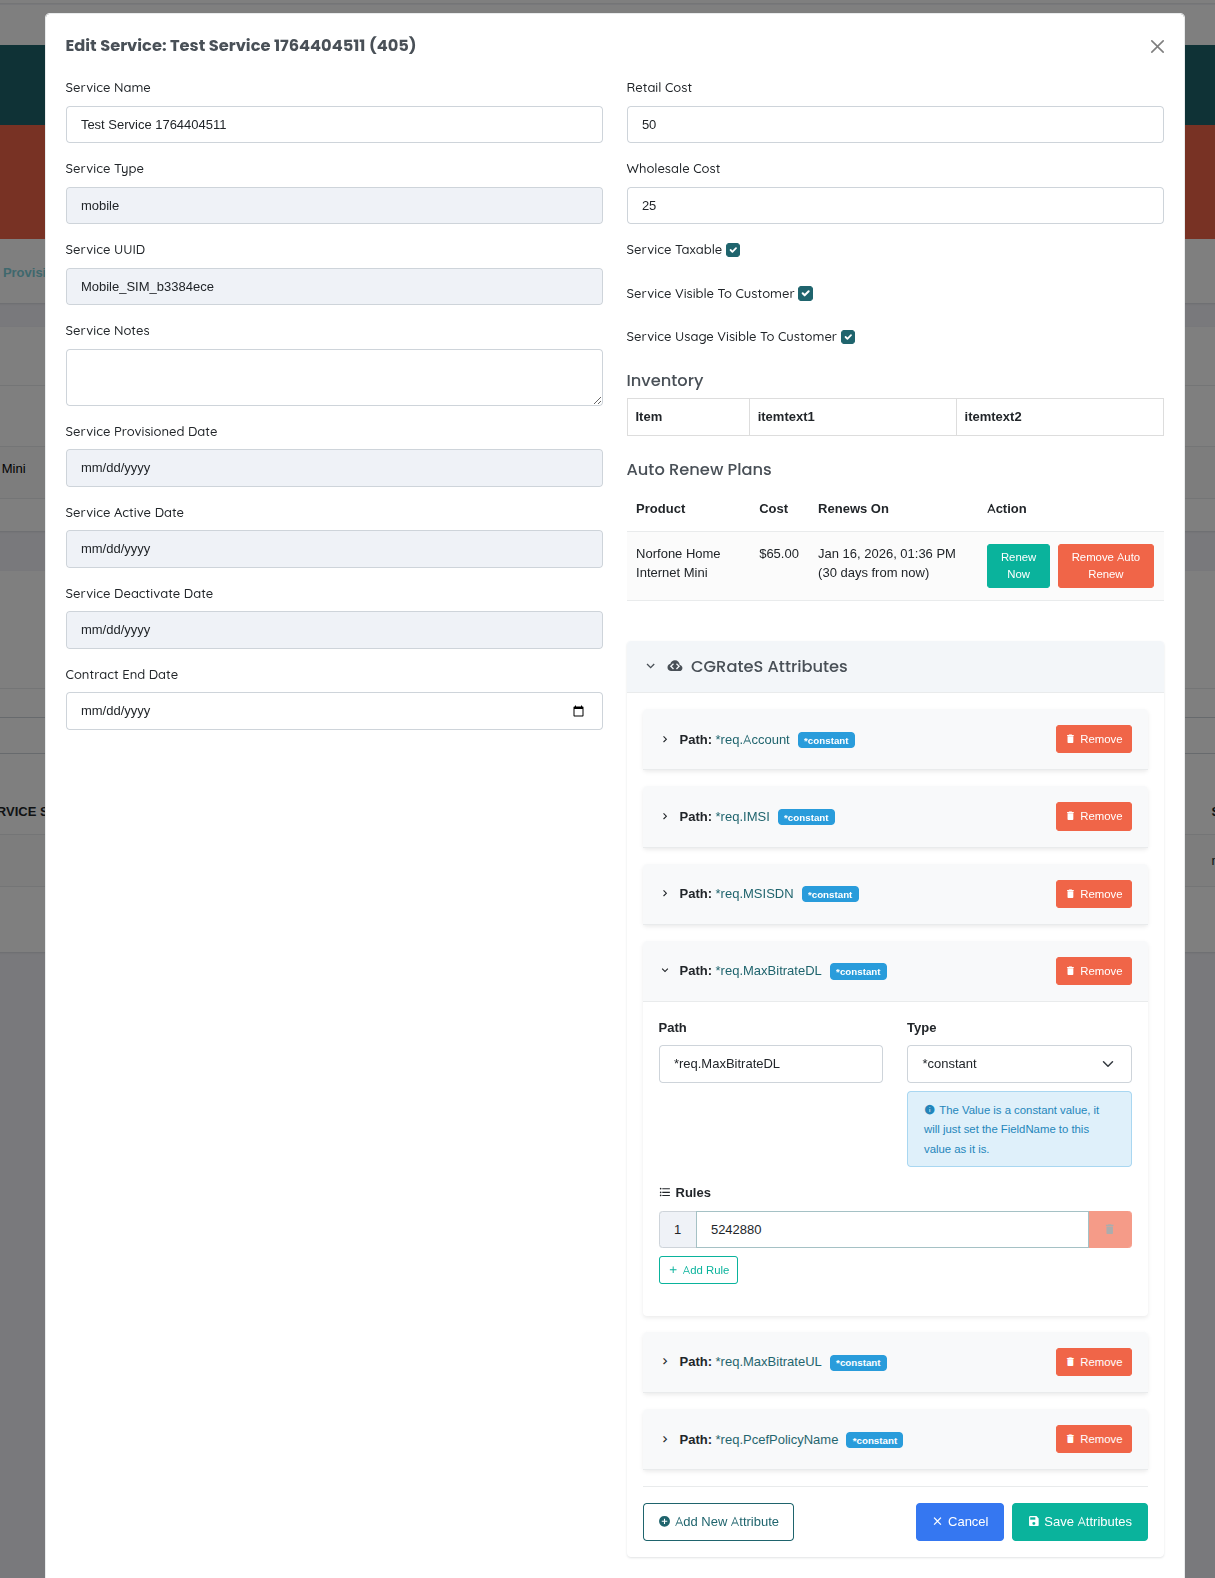
Managing Attributes:
- Open service edit view
- Expand "CGRateS Attributes" section
- Click "Edit Attributes" button
- Add/modify/remove attributes as needed
- Click "Save Attributes"
 {.align-center
width="800px"}
{.align-center
width="800px"}
Attribute Fields:
- Path - The field to modify (e.g.,
*req.Account,*req.IMSI) - Type - How the value is set:
*constant- Sets a fixed value*variable- Captures value from event fields using RSRParser*composed- Appends value instead of overwriting*usage_difference- Calculates duration between two fields*sum- Sums multiple values*value_exponent- Computes exponent of a field
- Rules - The value(s) to apply (can have multiple rules per attribute)
Example Attribute Configuration:
{
  "Path": "*req.Account",
  "Type": "*constant",
  "Value": [{"Rules": "Mobile_SIM_474a380a"}]
}
Common Use Cases:
- Set account identifier for rating
- Map IMSI/MSISDN to service
- Configure bandwidth limits (MaxBitrateDL/UL)
- Set policy names (PcefPolicyName)
- Transform or enrich rating events
Activity Logging:
All attribute modifications are logged to the customer's activity feed with full details of the changes made.
CGRateS Filters
Filters define matching rules that determine when this service's configuration should be applied during rating.
Filter ID Format: FLTR_ACCOUNT_{service_uuid}
Example: For service with UUID Mobile_SIM_c2880638, the filter ID
is FLTR_ACCOUNT_Mobile_SIM_c2880638
Managing Filters:
- Open service edit view
- Expand "CGRateS Filters" section
- Click "Edit Filters" button
- Add/modify/remove filter rules
- Click "Save Filters"
Filter Rule Fields:
- Element - The field to match against (e.g.,
~*req.Account,~*req.Destination) - Type - Match type:
*string- Exact string match*prefix- Starts with specified value*suffix- Ends with specified value*empty- Field is empty*exists- Field exists*notexists- Field does not exist*timings- Match time/date patterns*destinations- Match destination patterns*rsr- RSR field matching*gt/*gte/*lt/*lte- Numeric comparisons
- Values - The value(s) to match (can have multiple values per rule)
Example Filter Configuration:
{
  "Element": "~*req.Account",
  "Type": "*string",
  "Values": ["Mobile_SIM_474a380a"]
}
Common Use Cases:
- Ensure attributes only apply to specific account
- Filter by destination (national vs. international)
- Time-based filtering (peak vs. off-peak)
- Filter by service type or category
Activity Logging:
All filter modifications are logged to the customer's activity feed.
Active Sessions
View real-time active sessions for this service. This shows ongoing calls, data sessions, or other billable events currently in progress.
Viewing Active Sessions:
- Open service edit view
- Expand "Active Sessions" section
- View list of active sessions
- Click "View Details" on any session to see full session data
- Click "Refresh" to reload session list
 {.align-center
width="800px"}
{.align-center
width="800px"}
Session Information Displayed:
- Setup Time - When the session started
- Usage - Current session duration (in seconds)
- Destination - Called number or destination
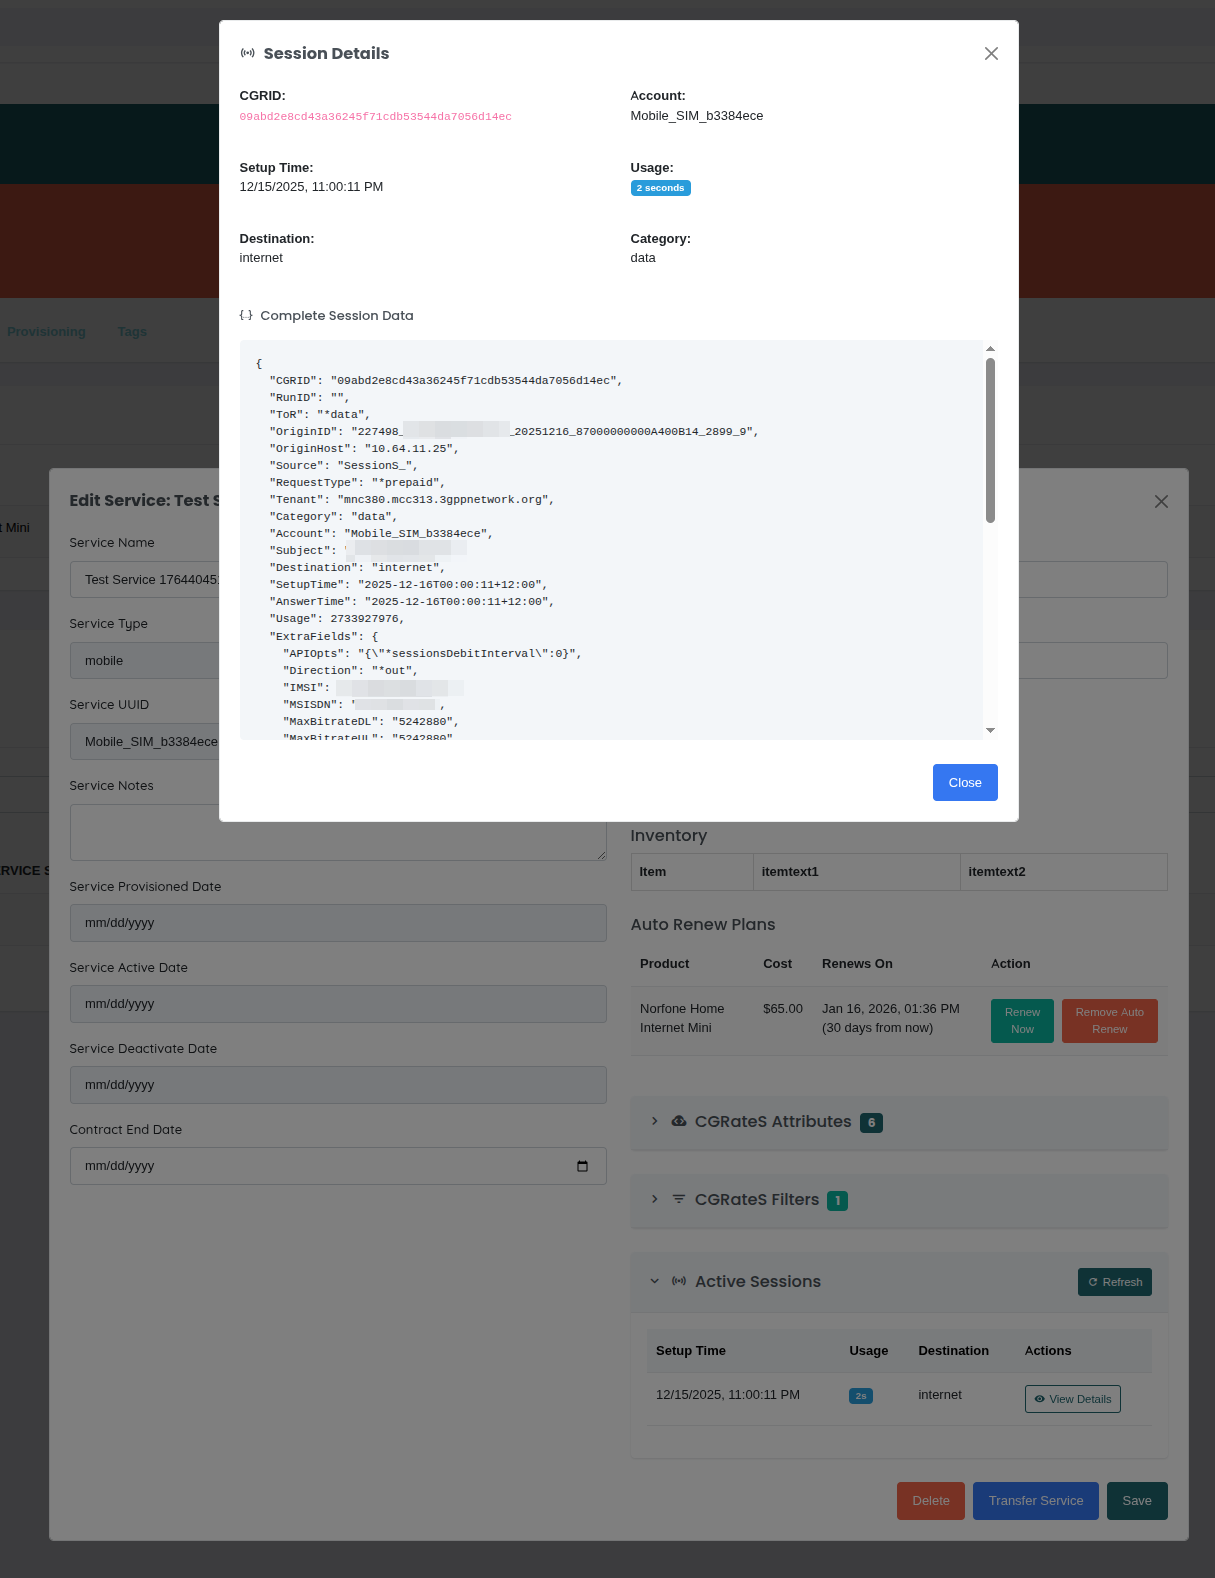
Session Details Modal:
Clicking "View Details" opens a modal showing:
- Basic Information:
- CGRID (session ID)
- Account (service UUID)
- Setup time
- Current usage/duration
- Destination
- Category
- Complete Session Data:
- Full JSON representation of the session
- All CGRateS session fields
- Real-time session state
- Scrollable JSON viewer for inspection
 {.align-center
width="800px"}
{.align-center
width="800px"}
Use Cases:
- Monitor active calls or data sessions
- Troubleshoot billing issues
- Verify session is being rated correctly
- Check session attributes and values
- Audit active service usage
Refresh Rate:
Sessions are fetched on-demand when you expand the section. Click "Refresh" to get the latest session data.
::: note ::: title Note :::
Only sessions matching this service's account (service UUID) are
displayed. The filter *string:~*req.Account:{service_uuid} is
automatically applied.
:::
CGRateS API Proxy
All CGRateS operations (attributes, filters, sessions) use the OmniCRM API proxy endpoint:
Endpoint: POST /crm/ocs/proxy
Required Fields:
method- CGRateS API method (e.g.,APIerSv1.GetAttributeProfile)params- Array of parameters for the methodcustomer_id- Customer ID (for activity logging)service_id- Service ID (for activity logging)
Optional Fields:
tenant- CGRateS tenant (defaults to config value)
Example Request:
{
  "method": "APIerSv1.GetAttributeProfile",
  "params": [{"ID": "ATTR_ACCOUNT_Mobile_SIM_c2880638"}],
  "customer_id": 123,
  "service_id": 456
}
Tenant Configuration:
The tenant is automatically set from the OmniCRM configuration file
(crm_config.yaml) under ocs.ocsTenant. This ensures all CGRateS
operations use the correct tenant without hardcoding values in the
frontend.
Permission Requirement:
The cgrates_api_access permission is required. This permission is
granted to the admin role by default.
Activity Logging:
All non-GET CGRateS API operations are automatically logged to the customer's activity feed, including:
- API method called
- Tenant used
- Full parameters sent
- Service ID the operation was performed on
- User who performed the operation
- Timestamp
This creates a complete audit trail of all CGRateS configuration changes.
Troubleshooting CGRateS Integration
"Permission Denied" when accessing CGRateS features
- Cause: User lacks
cgrates_api_accesspermission - Fix: Grant permission to user's role (typically admin-only feature)
Attributes or Filters not loading
- Cause: CGRateS connectivity issue or profile doesn't exist
- Fix:
- Check CGRateS server connectivity in config
- Verify tenant configuration is correct
- Check browser console for API errors
- Profile may not exist yet (will show empty form)
Changes not saving
- Cause: Validation error or CGRateS API error
- Fix:
- Check for required fields (Path, Type, Element)
- Verify JSON format is correct
- Check activity log for error details
- Review CGRateS logs
No active sessions showing
- Cause: No sessions currently active for this service
- Fix:
- This is normal if service is not in use
- Try refreshing after initiating a session (call, data, etc.)
- Verify service UUID matches the account in CGRateS
Session details not updating in real-time
- Cause: Session data is fetched on-demand, not live
- Fix: Click "Refresh" button to get latest session data
Activity log not showing CGRateS changes
- Cause: Only non-GET operations are logged (reads are not logged)
- Fix: This is by design - only writes/modifications create activity entries
Common Workflows
Workflow 1: Find Customer's Services
- Click Service Type filter (optional)
- Click Customer filter
- Type customer name
- Select customer from dropdown
- Review customer's services
Workflow 2: Identify Expiring Services
- Click "Active" tab
- Sort by "End Date" (ascending)
- Services expiring soonest appear first
- Contact customers for renewal
Workflow 3: Clean Up Test Services
- Search for "test" in search box
- Review results to confirm they're test data
- Select all test services
- Click "Delete Selected"
- Confirm deletion
Workflow 4: Suspend Non-Paying Customer
- Navigate to customer account
- View services tab
- Select all active services
- Change status to "Suspended"
- Save changes
Workflow 5: View Mobile Service Usage
- Filter by Service Type: Mobile
- Click service name to open details
- Click "Usage" tab
- Review data/voice/SMS consumption
- Identify heavy users or overages
Troubleshooting
Services not appearing in list
- Cause: Status filter hiding results
- Fix: Click "All Results" tab to show all statuses
Cannot find service by search
- Cause: Search term doesn't match stored data
- Fix:
- Try partial search (e.g., "0770" instead of full number)
- Use customer filter instead
- Check for typos
Bulk delete button disabled
- Cause: No services selected
- Fix: Check boxes next to services you want to delete
Sort not working
- Cause: Column not sortable
- Fix: Only columns with ▲▼ icons are sortable
Page loads slowly
- Cause: Too many services to display
- Fix:
- Apply filters to reduce result set
- Reduce items per page
- Use search to narrow results
Related Documentation
csa_add_service- Adding new servicescsa_modify- Modifying services and adding add-onsconcepts_products_and_services- Product and service conceptsbasics_customers- Customer management