Assign Plans Workflow
The Assign Plan feature allows staff to provision services for customers by selecting products from the catalog and initiating the provisioning process. This is the primary method for creating new services when customers don't self-provision.
Overview
Assigning a plan involves:
- Selecting a customer
- Choosing a product from the catalog
- Configuring inventory requirements (SIM cards, equipment, etc.)
- Setting service parameters (auto-renewal, custom fields)
- Initiating provisioning
- Monitoring provisioning progress
This workflow is used for all service types: mobile, internet, IPTV, and VoIP.
Accessing Assign Plan
From Product Catalog:
From Customer Page:
From Add-ons Page:
The assign plan interface opens in a modal or dedicated page.
Step-by-Step Workflow
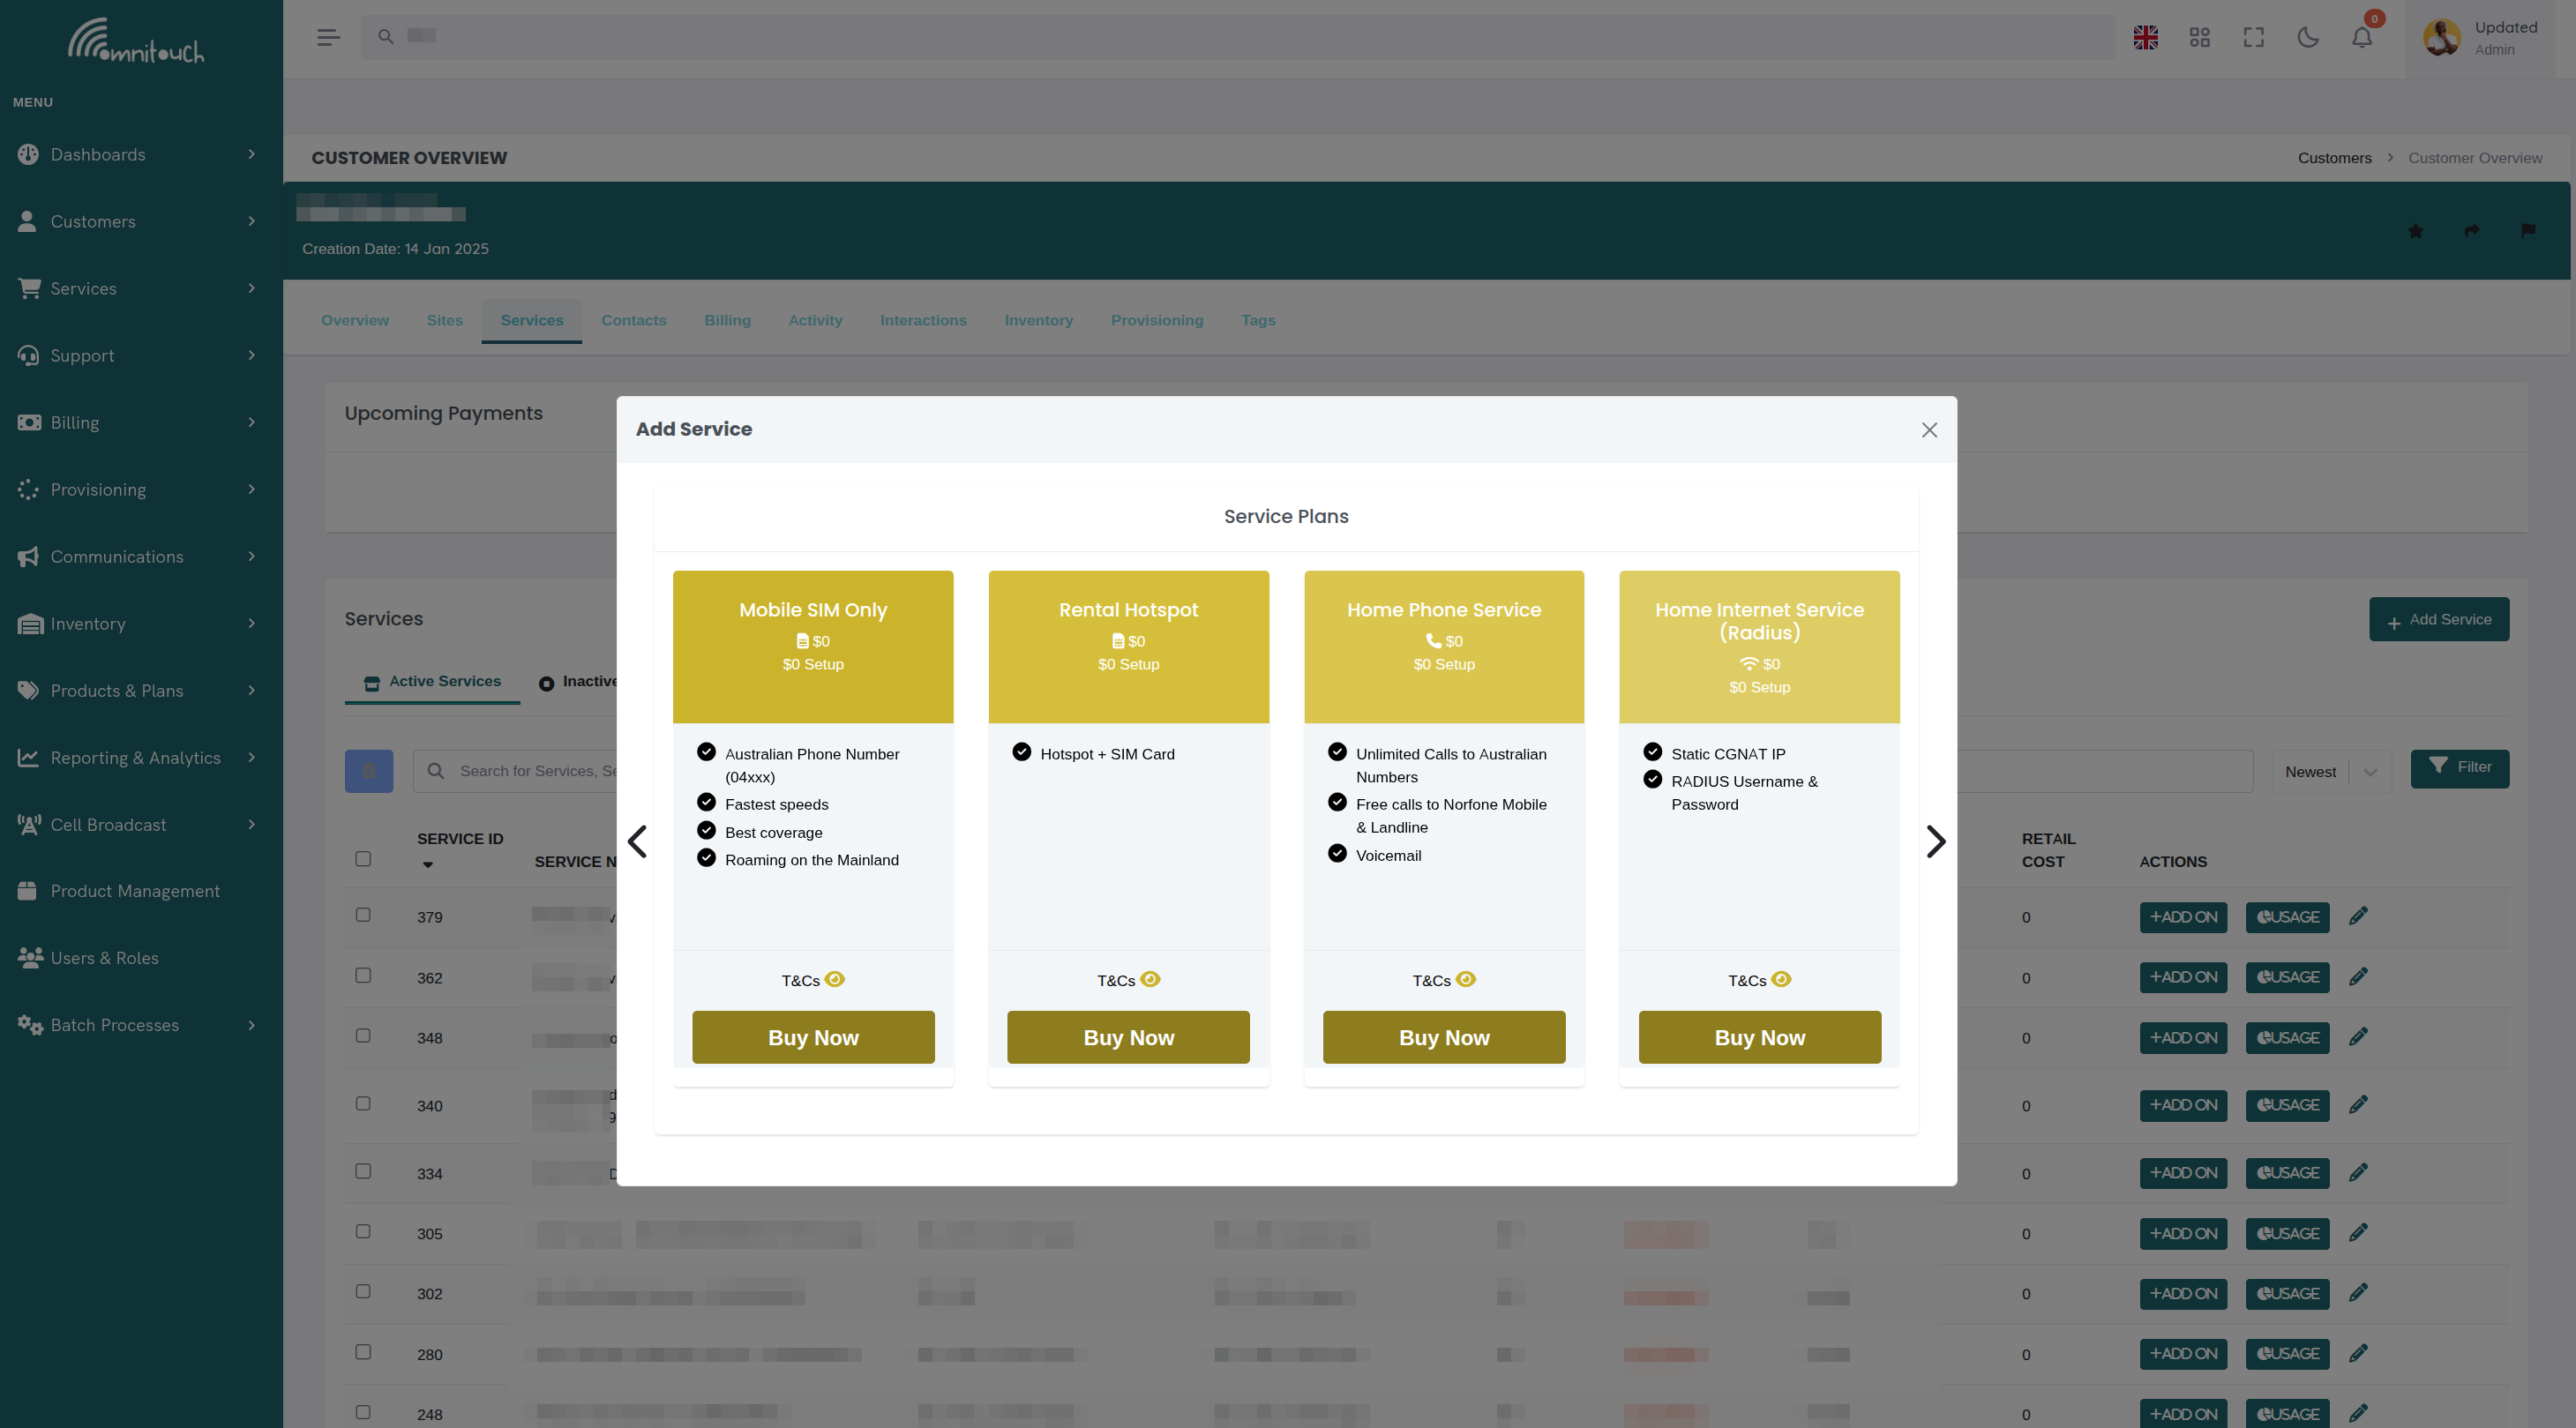
Step 1: Browse Product Catalog
The product catalog displays available products grouped by category and customer type.
 {.align-center
width="800px"}
{.align-center
width="800px"}
View Toggles:
Categories: • Service Plans • Add-ons
Toggling between Individual and Business filters products to show only those available to the selected customer type.
Product Cards:
Products are displayed in a carousel or grid:
Click "Assign to Customer" to proceed.
Step 2: Select Customer
If not already on a customer page, you'll be prompted to select a customer.
Customer Search:
Search Customers: [John ▼]
Matching customers: • John Smith (ID: 123) • John Doe (ID: 456) • Johnson Enterprises (ID: 789)
Type to search by:
- Customer name
- Customer ID
- Email address
- Phone number
Select the customer from the dropdown.
::: warning ::: title Warning :::
Ensure you've selected the correct customer before proceeding. Assigning a plan to the wrong customer requires manual intervention to correct. :::
Step 3: Configure Inventory (if required)
If the product requires inventory items (defined in
inventory_items_list), inventory pickers appear.
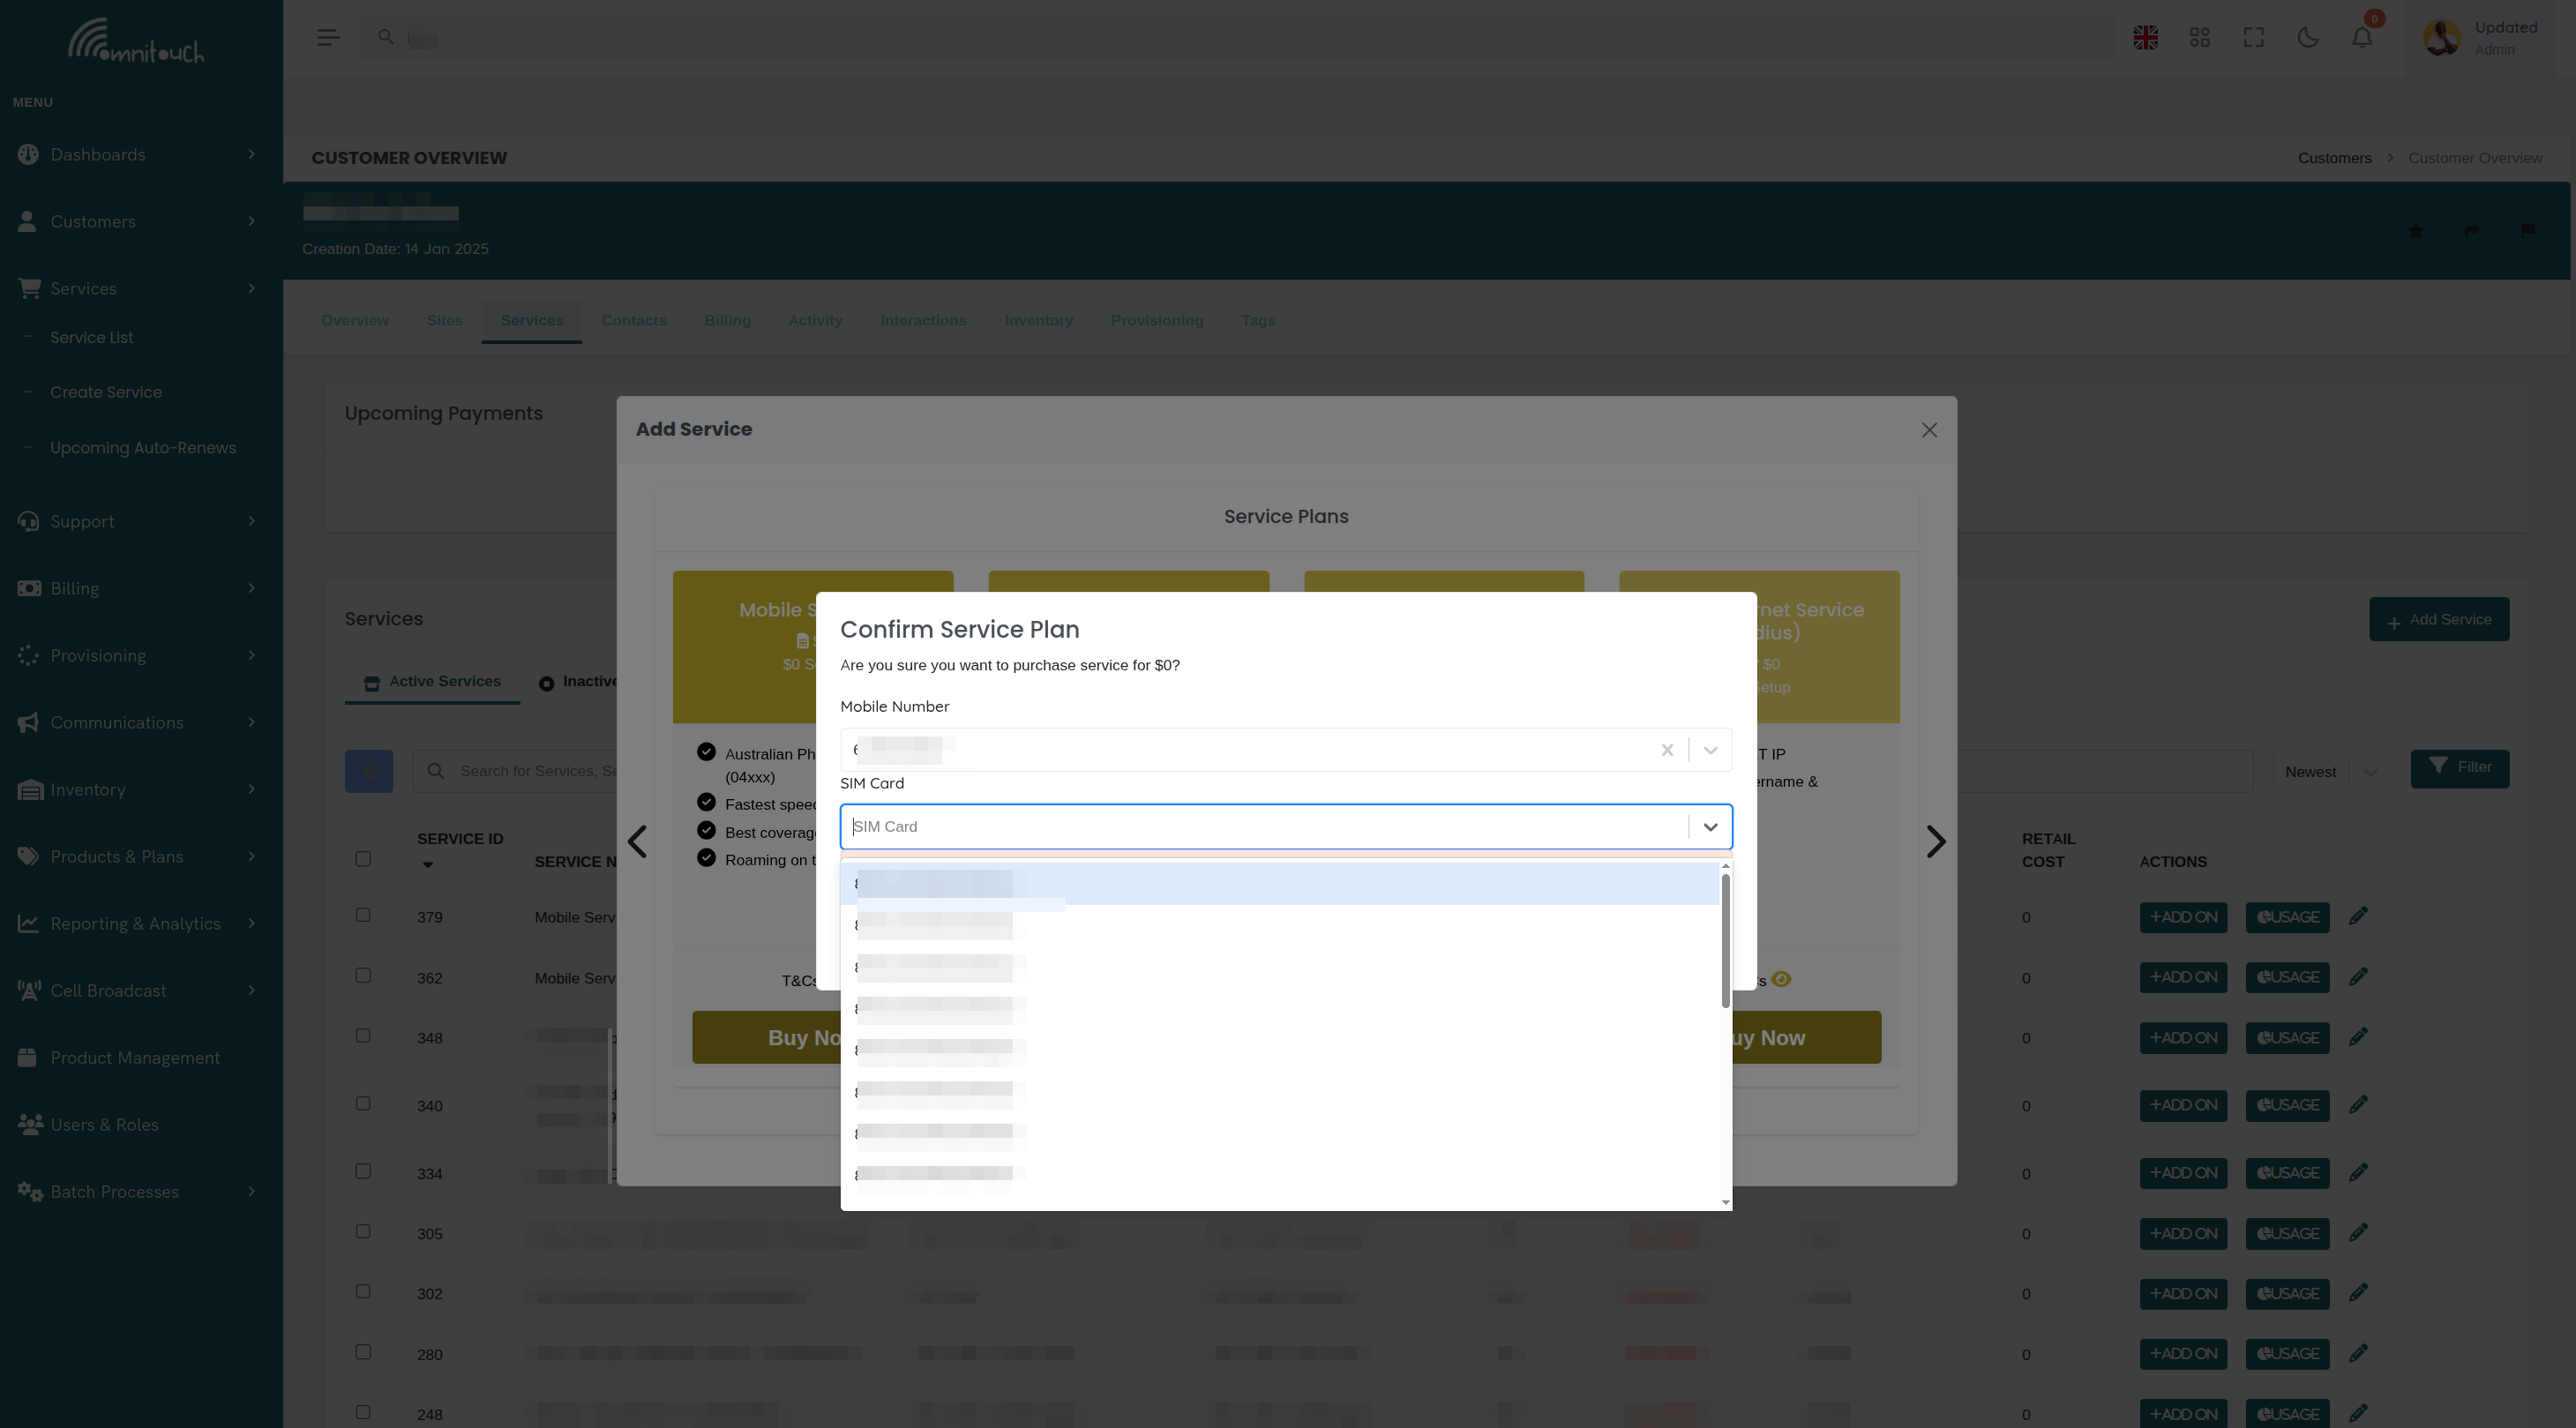
Inventory Picker Example:
Required Inventory Items:
SIM Card *
Available SIM Cards: • SIM-00123 - ICCID: 8944...0001 (New) • SIM-00124 - ICCID: 8944...0002 (New) • SIM-00125 - ICCID: 8944...0003 (New)
Mobile Number *
Available Numbers: • +44 7700 900123 (Reserved) • +44 7700 900124 (Available) • +44 7700 900125 (Available)
Inventory Selection Rules:
- Asterisk (*) indicates required field
- Only available inventory items shown (status: "In Stock" or "New")
- Dropdowns dynamically load based on inventory template names
- Once selected, items are temporarily reserved
What Happens:
- Selected inventory items are passed as variables to the provisioning playbook
- During provisioning, items are assigned to the service and customer
- Item status changes from "In Stock" to "Assigned"
Step 4: Configure Auto-Renewal (optional)
For recurring services, you may be prompted to set auto-renewal:
Would you like to enable auto-renewal for this service?
When enabled, this service will automatically renew at the end of each billing period and charge the customer's default payment method.
[ No ] [ Yes ]
Auto-Renewal Behavior:
- Yes: Service renews automatically, customer charged monthly
- No: Service expires at end of contract period, manual renewal required
Best Practice: Default to "Yes" for consumer services, "No" for one-time services or when customer requests manual control.
Step 5: Review and Confirm
Review screen shows all selections before provisioning:
Customer: John Smith (ID: 123) Product: Mobile - 20GB Plan
Inventory: • SIM Card: SIM-00123 (ICCID: 8944...0001) • Mobile Number: +44 7700 900123
Pricing: • Setup Fee: £0.00 • Monthly Cost: £15.00
Auto-Renew: Yes
[Cancel] [Confirm & Provision]
Click "Confirm & Provision" to initiate the provisioning process.
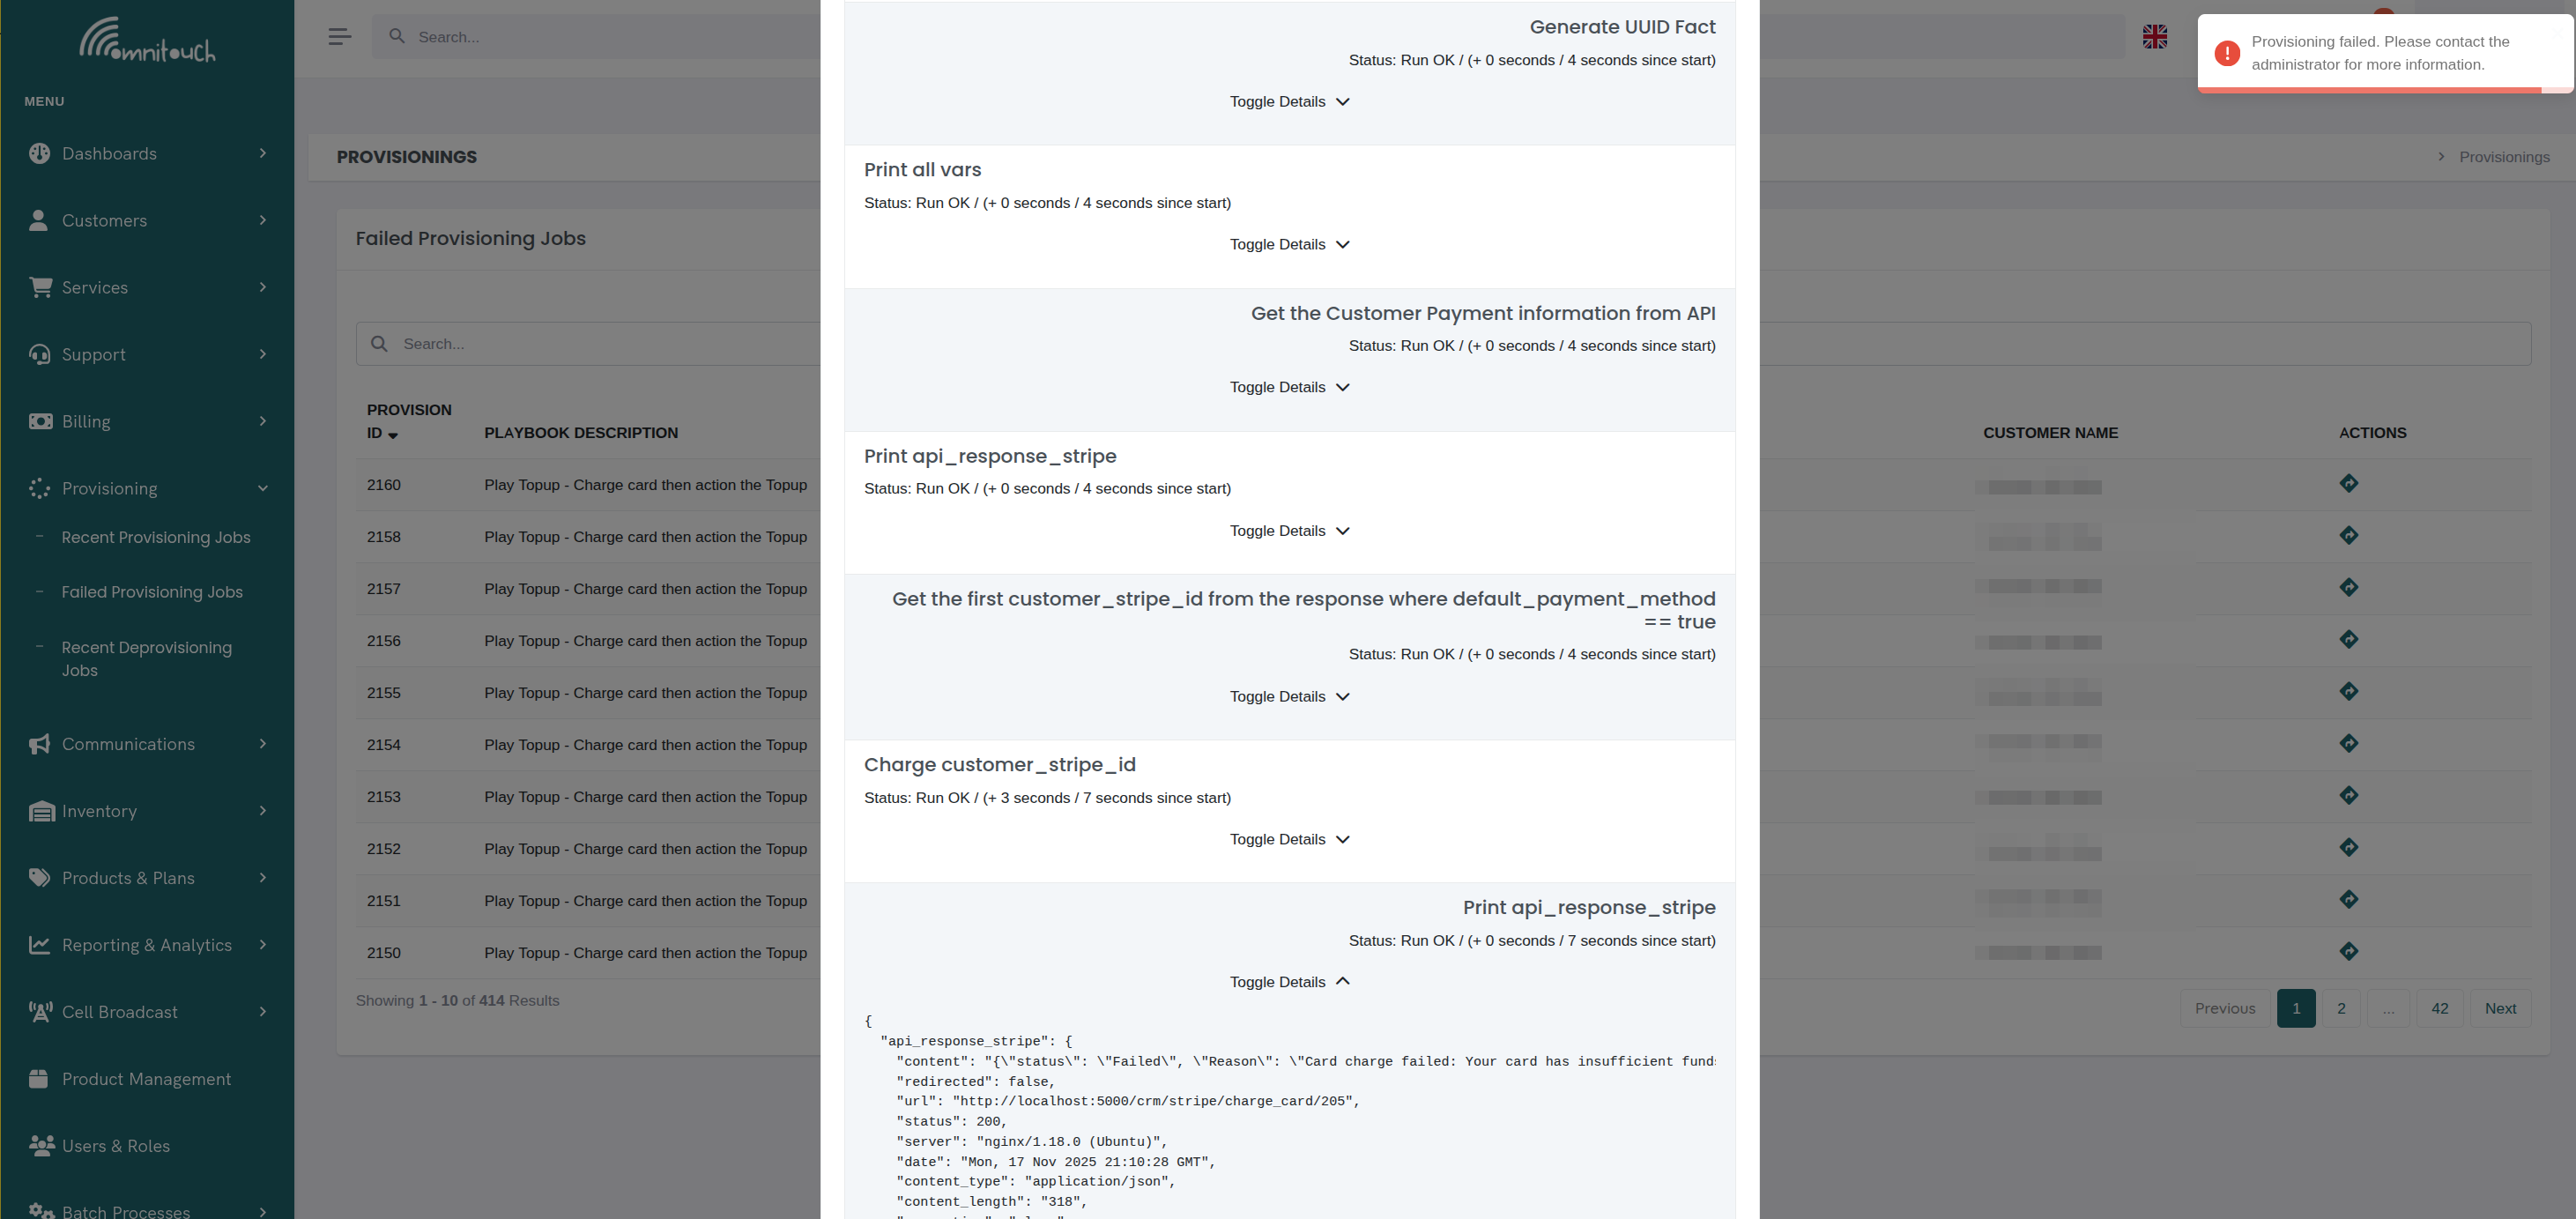
Step 6: Provisioning Progress
The provisioning modal displays real-time progress:
✓ Validating customer account ✓ Assigning SIM Card (ICCID: 8944...0001) ✓ Assigning Mobile Number (+44 7700 900123) ⟳ Configuring OCS account (in progress...) ⏺ Creating service record ⏺ Sending welcome email
Progress: 3 of 6 tasks completed
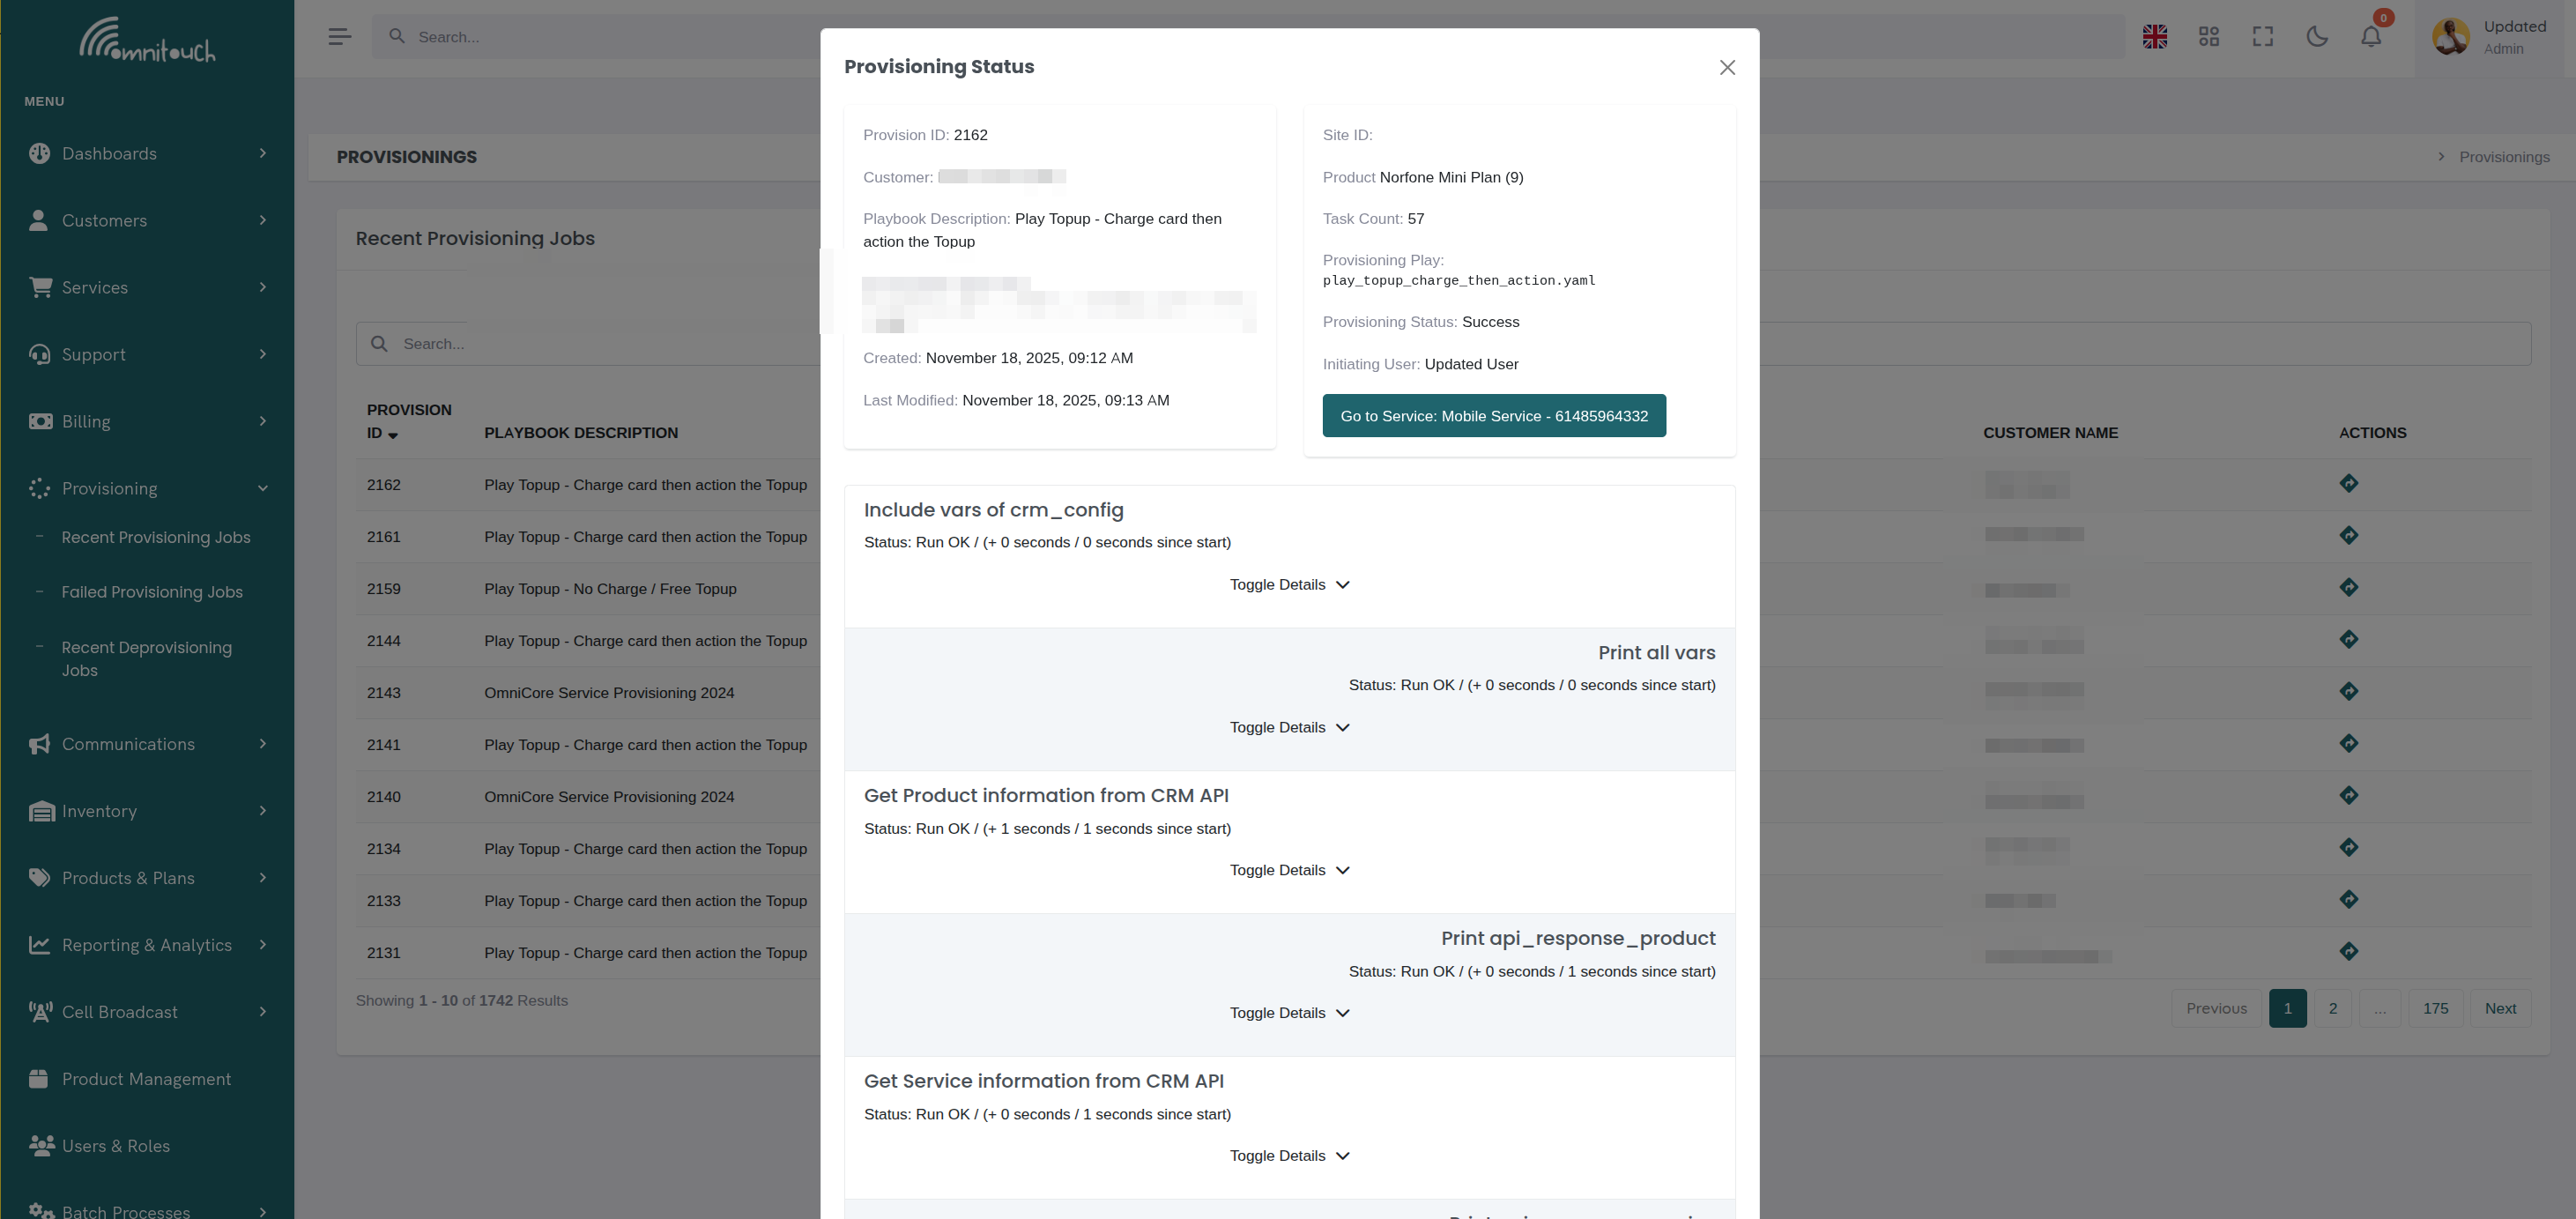
The modal polls the provisioning API every 0.2 seconds for status updates.
Progress Indicators:
- Completed successfully
- ⟳ Currently running
- ⏺ Pending (not started)
- ✗ Failed (if errors occur)
Step 7: Completion
Success:
Service successfully provisioned for John Smith
Service ID: 789 Service Name: Mobile - +44 7700 900123 Status: Active
[View Service] [Close]
Click "View Service" to open the service details page.
Failure:
If provisioning fails:
Error: Unable to connect to OCS
The service record has been created but provisioning did not complete. Please review the error and retry.
Provision ID: 456
[View Logs] [Retry] [Close]
- View Logs: Opens provisioning details with error messages
- Retry: Attempts provisioning again
- Close: Exits modal (service record remains but not activated)
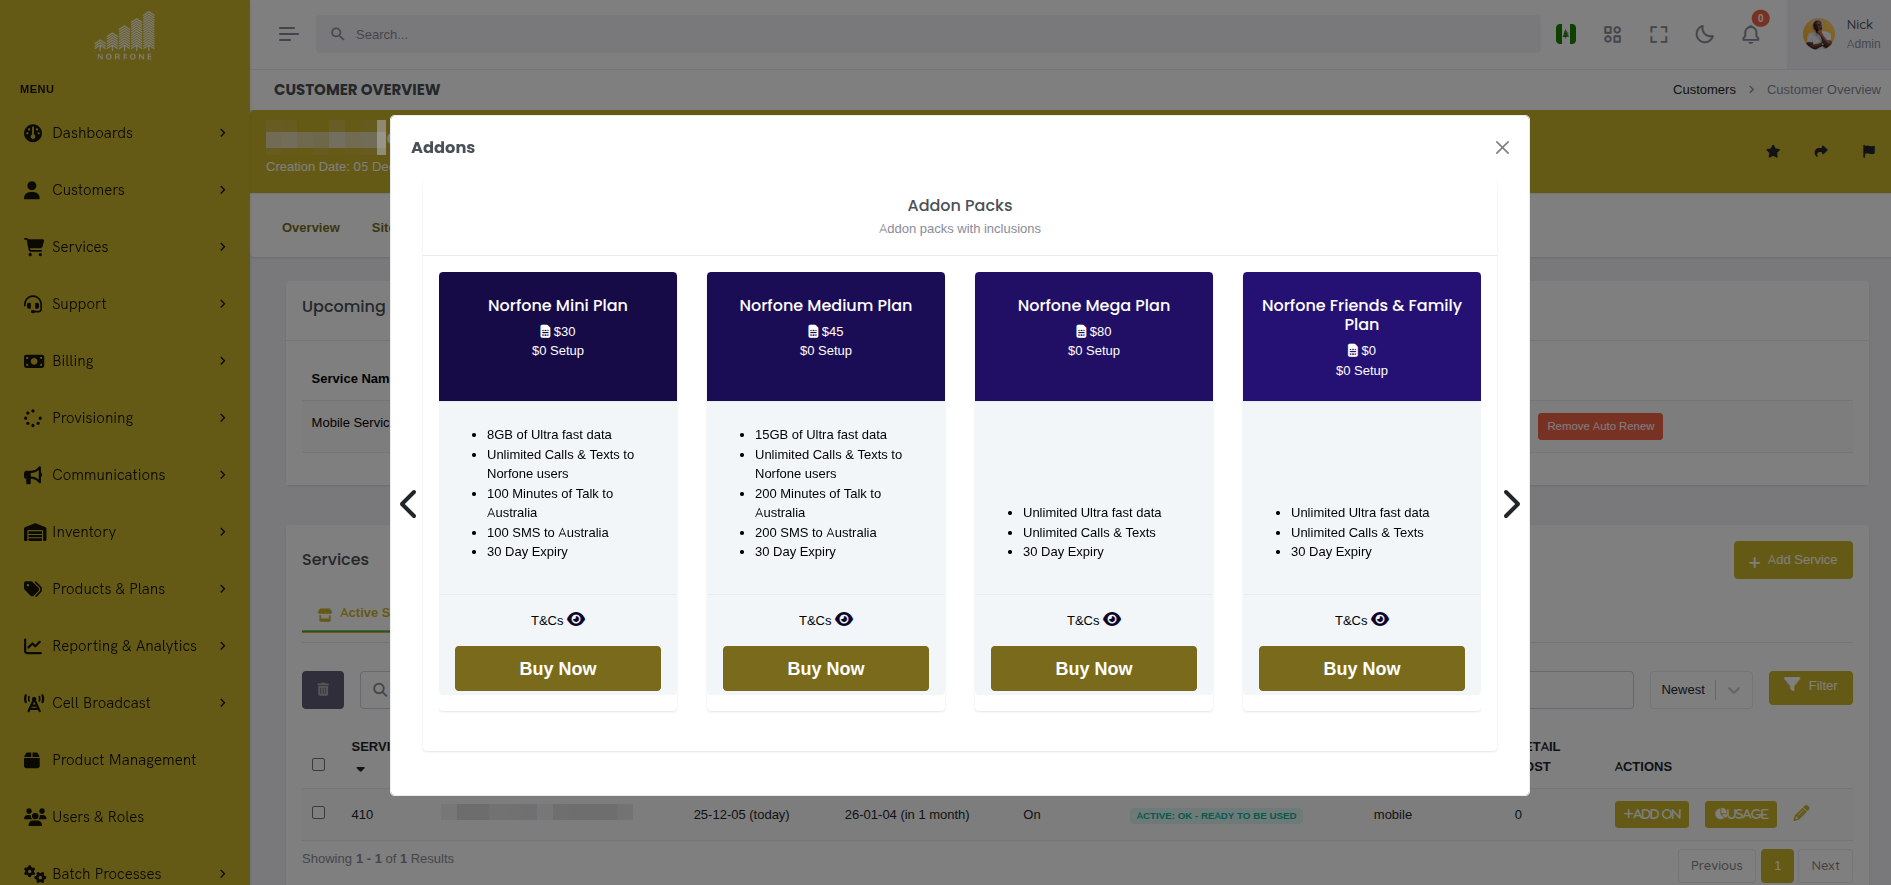
Special Cases
Adding Add-ons to Existing Service
When assigning an add-on (category: "addon") to a customer who already has a service:
- Automatic Service Detection:
- System finds customer's existing services
- Filters by service_type (mobile add-on only shows for mobile services)
- If customer has multiple matching services, prompts to select which one
- No New Service Created:
- Add-on provisions against existing service_id
- Uses existing service's OCS account
- Inventory (if any) assigned to existing service
- Provisioning Playbook:
- Different playbook than standalone services
- Typically adds balance, features, or equipment to existing account
Example:
Existing Mobile Services: • Mobile - +44 7700 900123 (ID: 789) • Mobile - +44 7700 900456 (ID: 790)
Which service should receive this add-on? [Mobile - +44 7700 900123 ▼]
[Cancel] [Continue]
Provisioning for Business Customers
Business customers may have additional requirements:
- Site Selection - Choose which business location receives service
- Contact Assignment - Designate billing/technical contacts
- Custom Fields - Account numbers, cost centers, PO numbers
Example Business Flow:
Select Installation Site: [London Office - 123 Main St ▼]
Billing Contact: [Jane Doe - <jane@acme.com> ▼]
Technical Contact: [Bob Smith - <bob@acme.com> ▼]
Purchase Order Number: [PO-2025-001234________]
[Cancel] [Continue]
Bulk Service Assignment
For assigning the same plan to multiple customers (e.g., mass migrations):
- Use CSV import (if available)
- Or assign individually with template settings
- Inventory must be available in bulk
- Monitor provisioning queue to avoid overload
Common Workflows
Workflow 1: New Mobile Service
- Customer walks into store wanting mobile service
- Staff opens Products → Plans
- Toggles to Individual customer type
- Selects "Mobile - 20GB Plan"
- Clicks "Assign to Customer"
- Searches for customer by phone: "+1234567890"
- Selects John Smith from results
- Chooses SIM Card from inventory picker
- Chooses available mobile number
- Enables auto-renewal
- Confirms and provisions
- Watches progress until complete
- Hands SIM to customer with welcome packet
Workflow 2: Adding Internet to Existing Customer
- Navigate to customer page: Customers → John Smith
- Click Services tab
- Click "Add Service" button
- Browse internet plans
- Select "Fiber - 100Mbps"
- Select installation site (if business/multiple sites)
- Choose CPE modem from inventory
- Set installation date (if required)
- Provision service
- Create installation ticket
Workflow 3: Assigning Data Top-Up Add-on
- Customer calls: "I need more data"
- Staff searches customer in global search
- Opens customer services tab
- Clicks "Add-ons" next to mobile service
- Selects "5GB Data Boost"
- Payment authorized
- Add-on provisions immediately
- Customer receives instant data boost
Troubleshooting
"No products available"
- Cause: Filters exclude all products
- Fix:
- Toggle customer type (Individual vs Business)
- Check product catalog has enabled products
- Verify products match customer eligibility
"No inventory available"
- Cause: Inventory items out of stock or all assigned
- Fix:
- Add more inventory items to system
- Check item status (should be "New" or "In Stock")
- Verify inventory template names match product requirements
"Customer not found"
- Cause: Customer doesn't exist or search term incorrect
- Fix:
- Create customer first
- Try different search terms (ID, email, phone)
- Check for typos
Provisioning gets stuck
- Cause: Playbook error or external system unreachable
- Fix:
- Wait for timeout (typically 5 minutes)
- Check provisioning logs for specific error
- Verify OCS, network systems are online
- Retry provisioning after fixing issue
Provisioning succeeds but service doesn't work
- Cause: OCS account created but network not updated
- Fix:
- Check OCS has account
- Verify SIM activated in HLR/HSS
- Check network provisioning (RADIUS, DPI, etc.)
- Review playbook tasks for missed steps
Best Practices
Before Assigning:
- Verify customer has valid payment method on file
- Confirm customer eligibility for product (residential vs business)
- Ensure required inventory is available
- Review product terms and pricing with customer
During Assignment:
- Double-check customer selection before confirming
- Select correct inventory items (check serial numbers)
- Enable auto-renewal for convenience (unless customer objects)
- Monitor provisioning progress until completion
After Assignment:
- Verify service appears in customer's service list
- Check service status is "Active"
- Confirm inventory assigned correctly
- Send welcome email or instructions to customer
- Test service if possible (make test call, check data)
For Add-ons:
- Confirm add-on is compatible with existing service
- Explain billing (one-time vs recurring)
- Verify payment before provisioning
- Check balance updated immediately after add-on provision
Related Documentation
csa_add_service- Overview of servicesconcepts_products_and_services- Product catalog conceptsadministration_inventory- Managing inventory itemsconcepts_provisioning- Provisioning system detailsguide_product_lifecycle- Complete product lifecycle including provisioning