Cell Broadcast System
The Cell Broadcast System in OmniCRM enables mobile network operators to send emergency alerts and public warnings to mobile devices within specific geographic areas. Cell Broadcast is a critical public safety feature used for AMBER alerts, weather warnings, tsunami alerts, and other emergency notifications.
Key Advantage: Unlike standard SMS messaging, Cell Broadcast messages will audibly alert on phones that are on silent, out of credit or roaming. As this is a broadcast message, it is possible to send an alert to every member of the population carrying a mobile phone in a matter of seconds.
Omnitouch Warning Link (OWL)
The Omnitouch Warning Link (OWL) platform provides a comprehensive solution for disaster management professionals and mobile network operators:
- Cell Broadcast Entity (CBE) - Secure web-based application for authorized users to create and broadcast emergency warning messages
- Cell Broadcast Center (CBC) - Standards-compliant network integration component that connects to cellular networks (2G/3G/4G/5G) to distribute messages
OWL is designed for use on any device with a web browser (Chrome/Firefox/Safari/Edge), such as computers, laptops, tablets or mobile phones.
Overview
Cell Broadcast (also known as Public Warning System or PWS) allows operators to:
- Send Emergency Alerts - Distribute critical safety information to all devices in an area
- Target Geographic Regions - Broadcast to specific tracking areas or network cells by controlling which cell towers broadcast messages
- Support Multiple Languages - Provide alert messages in multiple languages simultaneously (up to 500 characters per language)
- Manage Alert Lifecycle - Create, update, approve, monitor and delete broadcast messages
- Integrate with External Systems - Connect with CBC (Cell Broadcast Center) infrastructure via multiple cellular network interfaces
- Two-Factor Authentication - Secure approval process using Time-based One-Time Passwords (TOTP)
- Two-Person Rule - Optional requirement for approval from a second person before message transmission
Unlike SMS, Cell Broadcast does not require subscriber lists and can reach all capable devices in a geographic area instantly, making it ideal for time-critical public safety alerts. In most networks, a broadcast to all devices takes under 10 seconds.
Use Cases
Cell Broadcast is used for:
- Emergency Warnings - Natural disasters (earthquakes, tsunamis, floods, fires)
- AMBER Alerts - Child abduction notifications
- Weather Alerts - Severe weather warnings, tornado alerts
- Public Safety - Terrorist threats, chemical spills, evacuations
- Test Messages - System testing and public awareness campaigns (Monthly Test Messages do not alert users but will be received)
Geographic targeting is often of paramount importance in emergency situations. For example, Tsunami alerts advising those near coastal areas to seek higher ground should not be sent to people in inland areas far from the hazard. By controlling which cell towers broadcast emergency warning messages, the scope of transmission can be limited to the appropriate geographical area.
Emergency Warning Message Lifecycle
Transmitting an Emergency Warning message requires quick action while providing accurate information and authentication to ensure message validity.
The message lifecycle consists of four stages:
- Message Definition - Type of message, message content, expiry settings
- Message Targeting - Geographic areas and cell towers to broadcast to
- Message Approval - Authorization/verification of operator identity and second person approval (if required)
- Message Review - Final confirmation before transmission
After broadcast, messages can be monitored, updated as situations evolve, and stopped when immediate danger subsides.
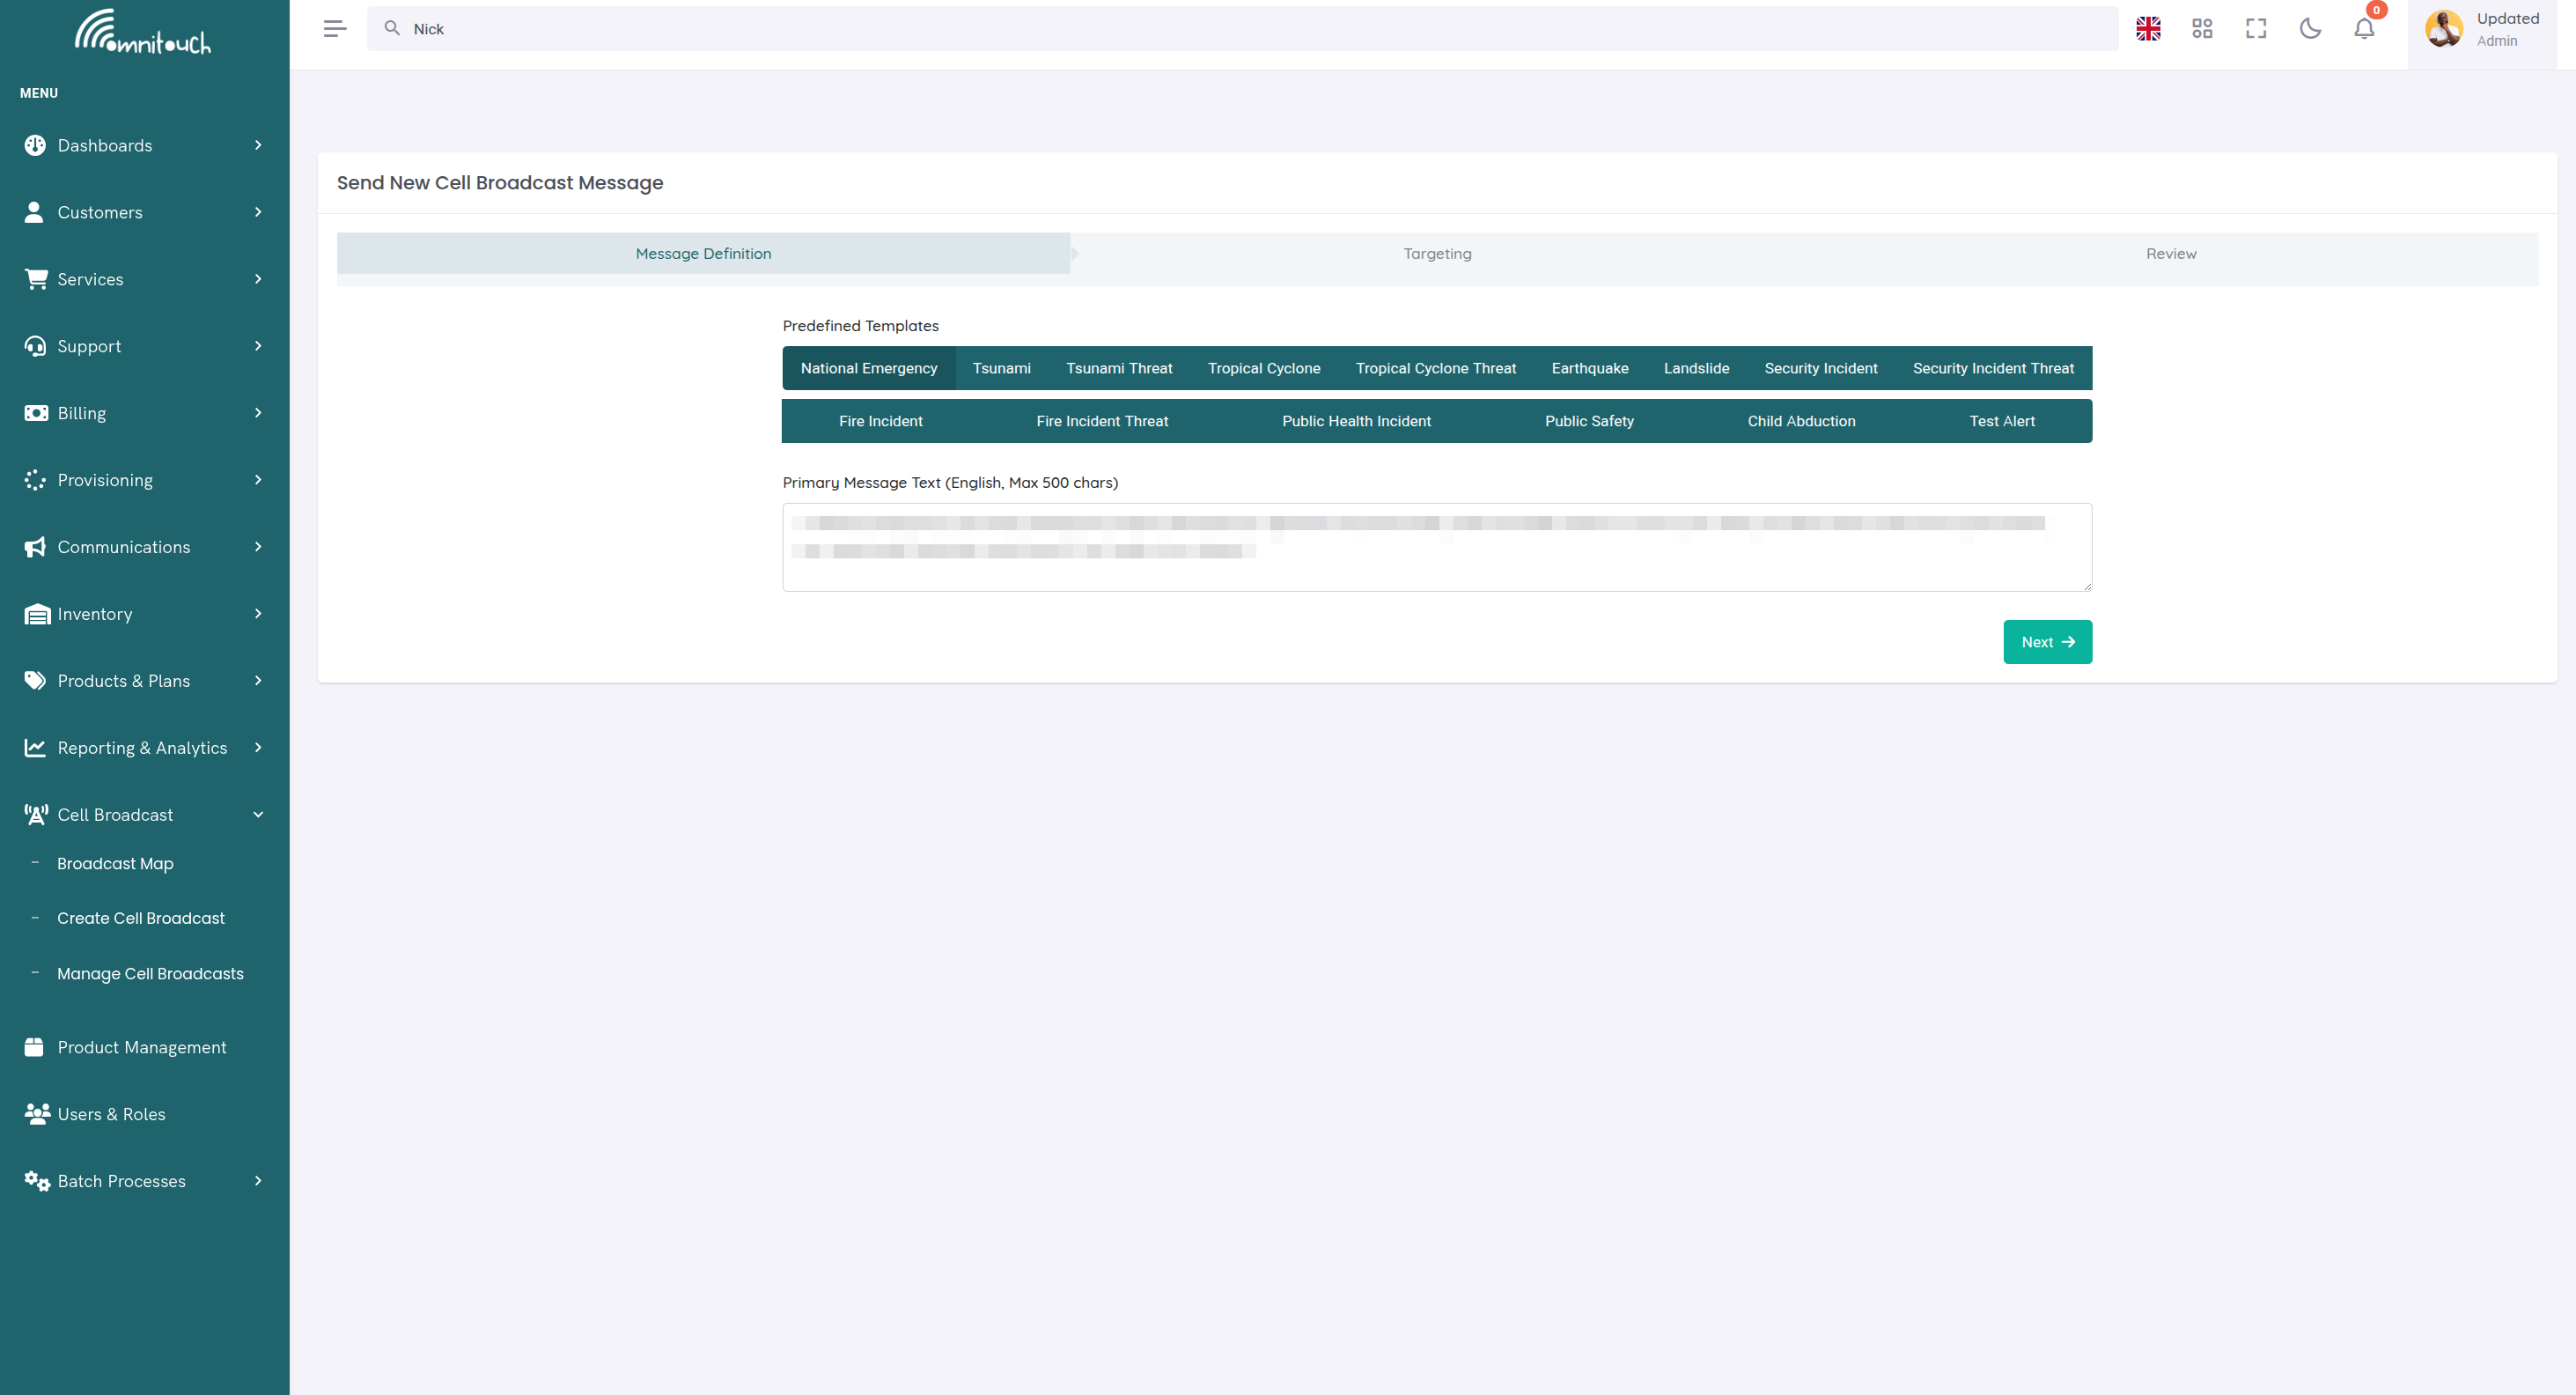
Stage 1: Message Definition
This step defines the basic parameters of the emergency warning message to be broadcast:
Message Identifier
: Different types of messages have different identifiers, which are treated differently by receiving phones. For example, a Monthly Test Message should not alert actual users but they will still receive the message.
Note: Each message template available in the OWL system already has the appropriate Message Identifier (MI) embedded, so system users do not need to manually select this when creating an alert message.
Message Text
: Text body limited to 500 characters containing the message to be displayed to end users. Messages can be provided in multiple languages by adding the second language text underneath the first. Remember the 500-character limit applies to the total message including all languages.
Message Templates
: Hazard alert messages can be predefined in advance as "templates" for different envisioned scenarios such as:
- Floods
- Tsunamis
- Earthquakes
- Periodic tests
- Other disaster scenarios
Templates save time during emergencies. These templates can be modified as needed when defining the message, or messages can be scripted from scratch.
Message Expiry and Repetitions
: Emergency messages have a finite lifetime for which they are relevant. When defining the message:
- Expires (minutes) - How long the message will continue to be broadcast
- Message Repetitions - How many times it will be retransmitted
Each phone will only show the message to the user once. However, cell sites will continue to transmit messages until the expiry time is reached to ensure people entering the coverage area from outside will receive the message.
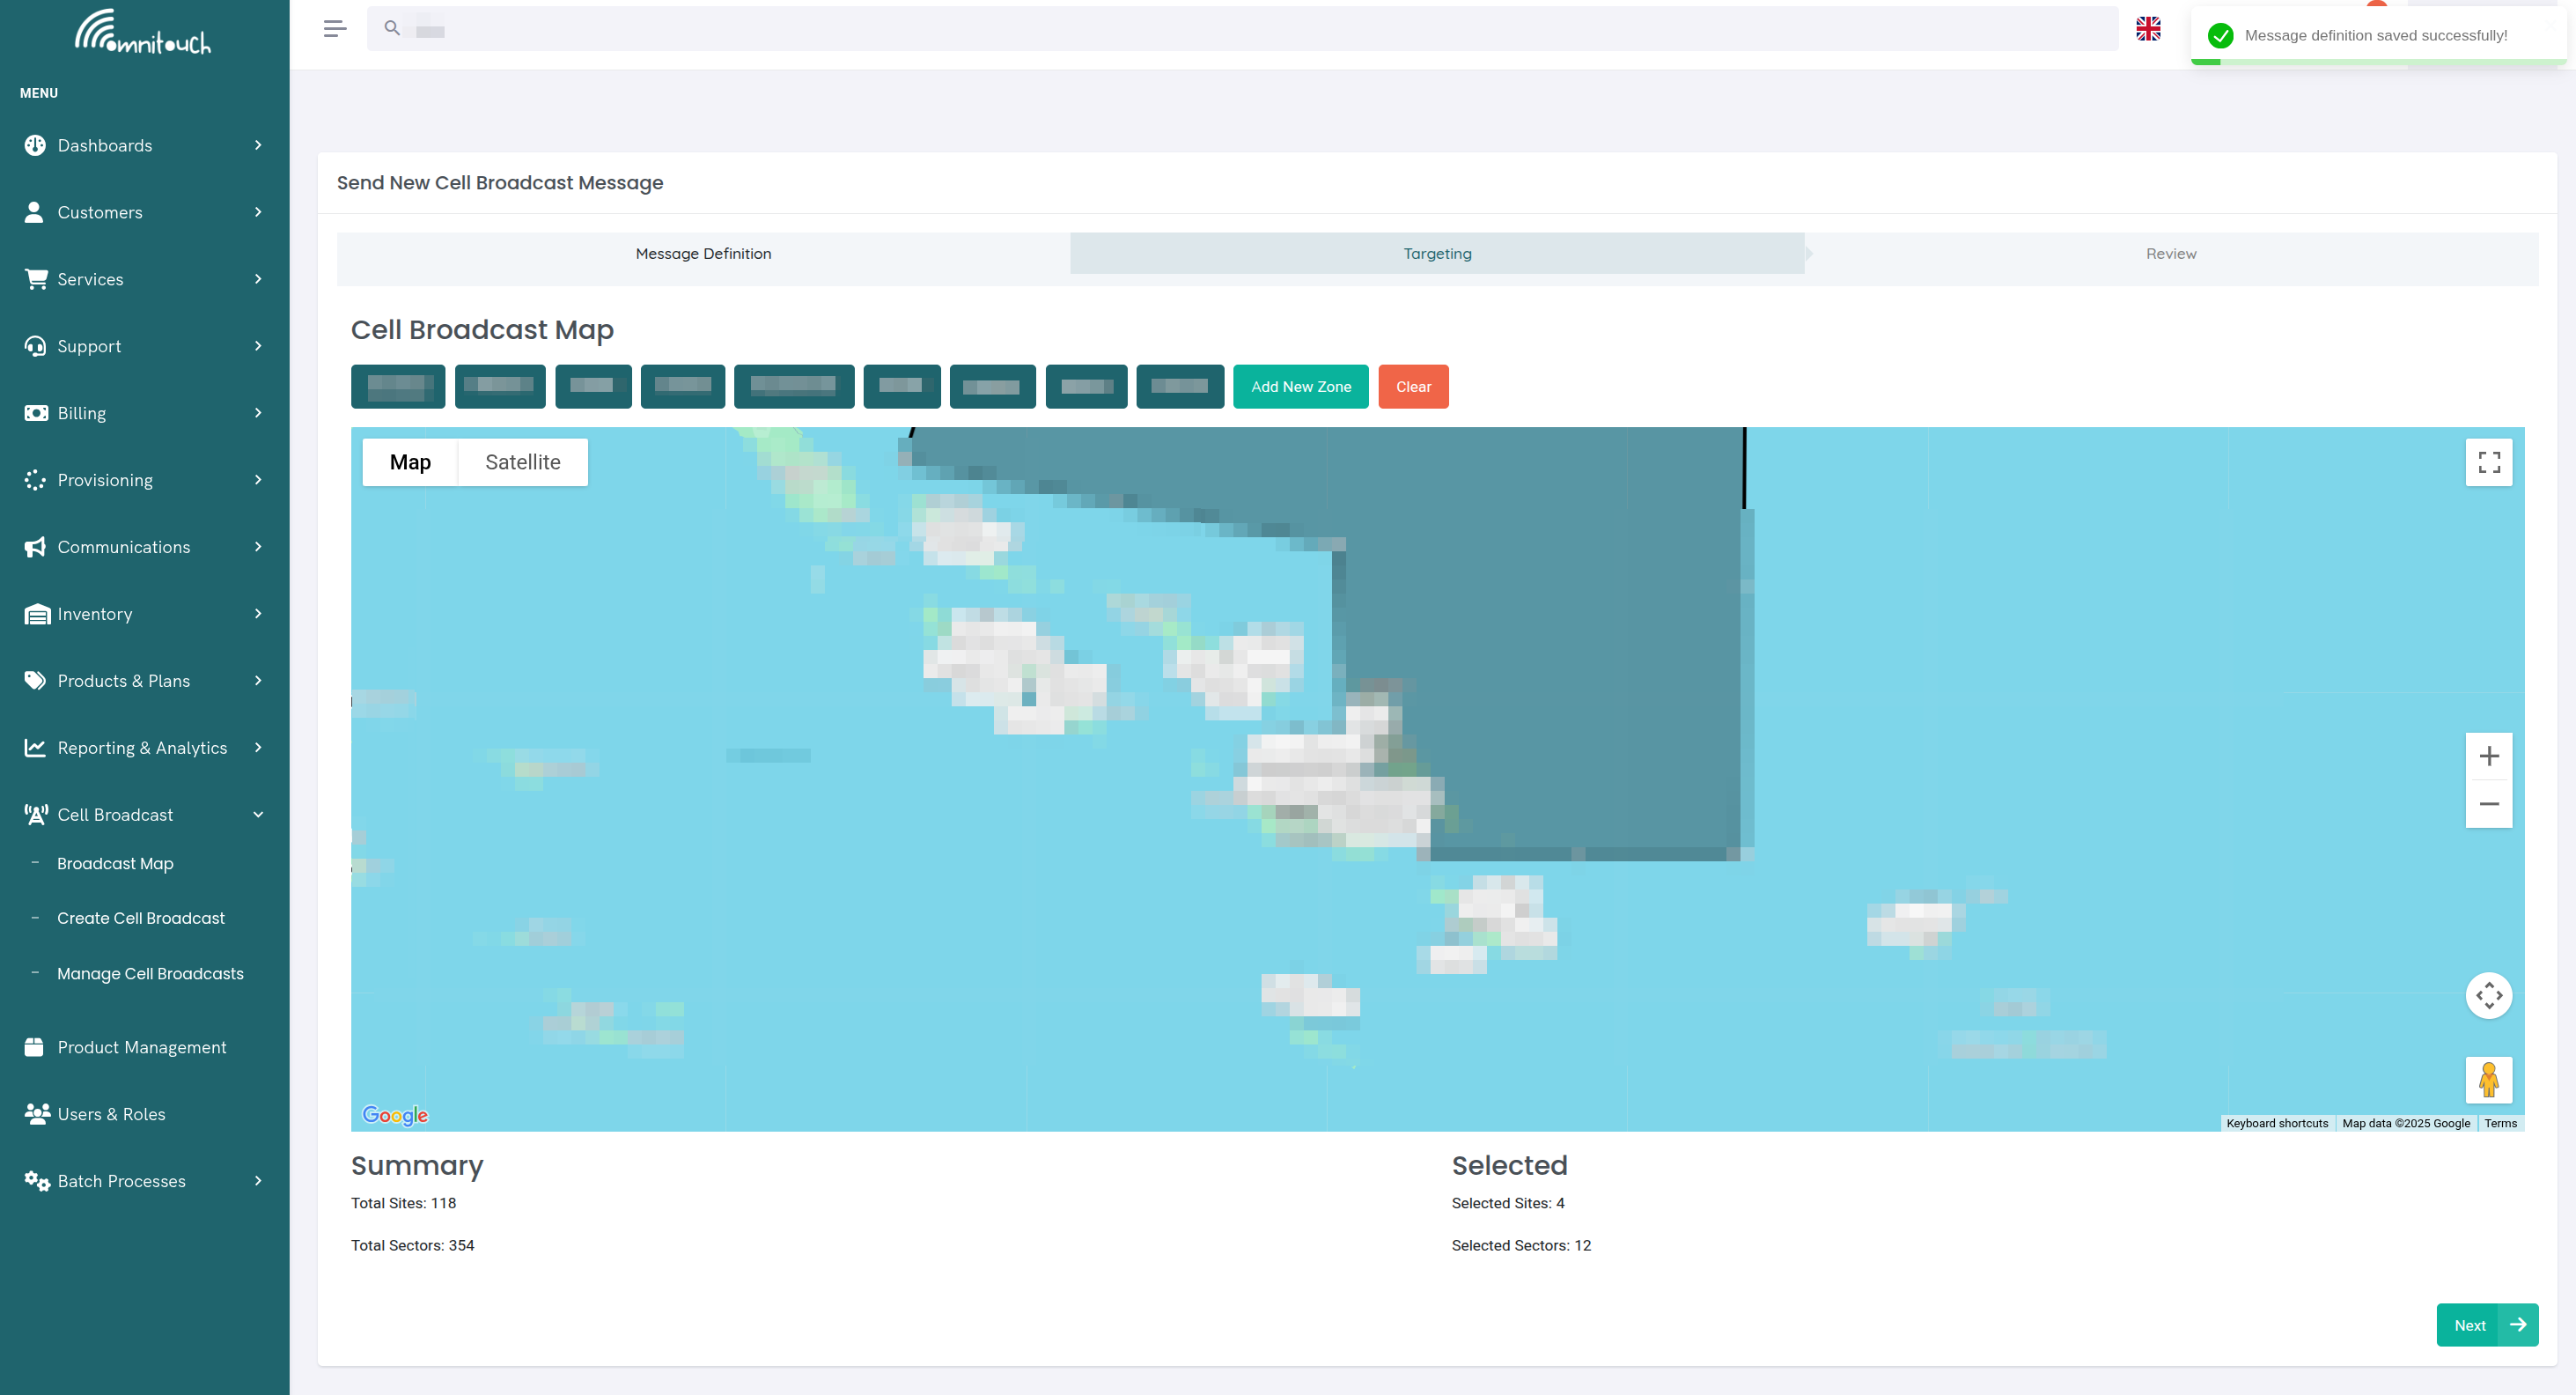
Stage 2: Targeting
Cell Broadcast messages are sent at the cell tower level, and geographic reach can be limited by selecting which towers broadcast the message.
Optional Targeting
: This step is optional. Not entering any targeting information means all cell towers will transmit the emergency warning message.
Predefined Target Areas
: The OWL system has a database of all cell towers and can define target areas on a map. Areas can be targeted using predefined zones (determined in advance for quick selection) or by drawing custom areas on the map.
Map Drawing Tools
: Custom target areas can be created using:
- Polygon tool - Draw precise coverage boundaries
- Circle tool - Quick radius-based alerts
- Rectangle tool - Grid-aligned coverage
The "Add New Zone" feature allows defining custom target areas that can be saved for future use.
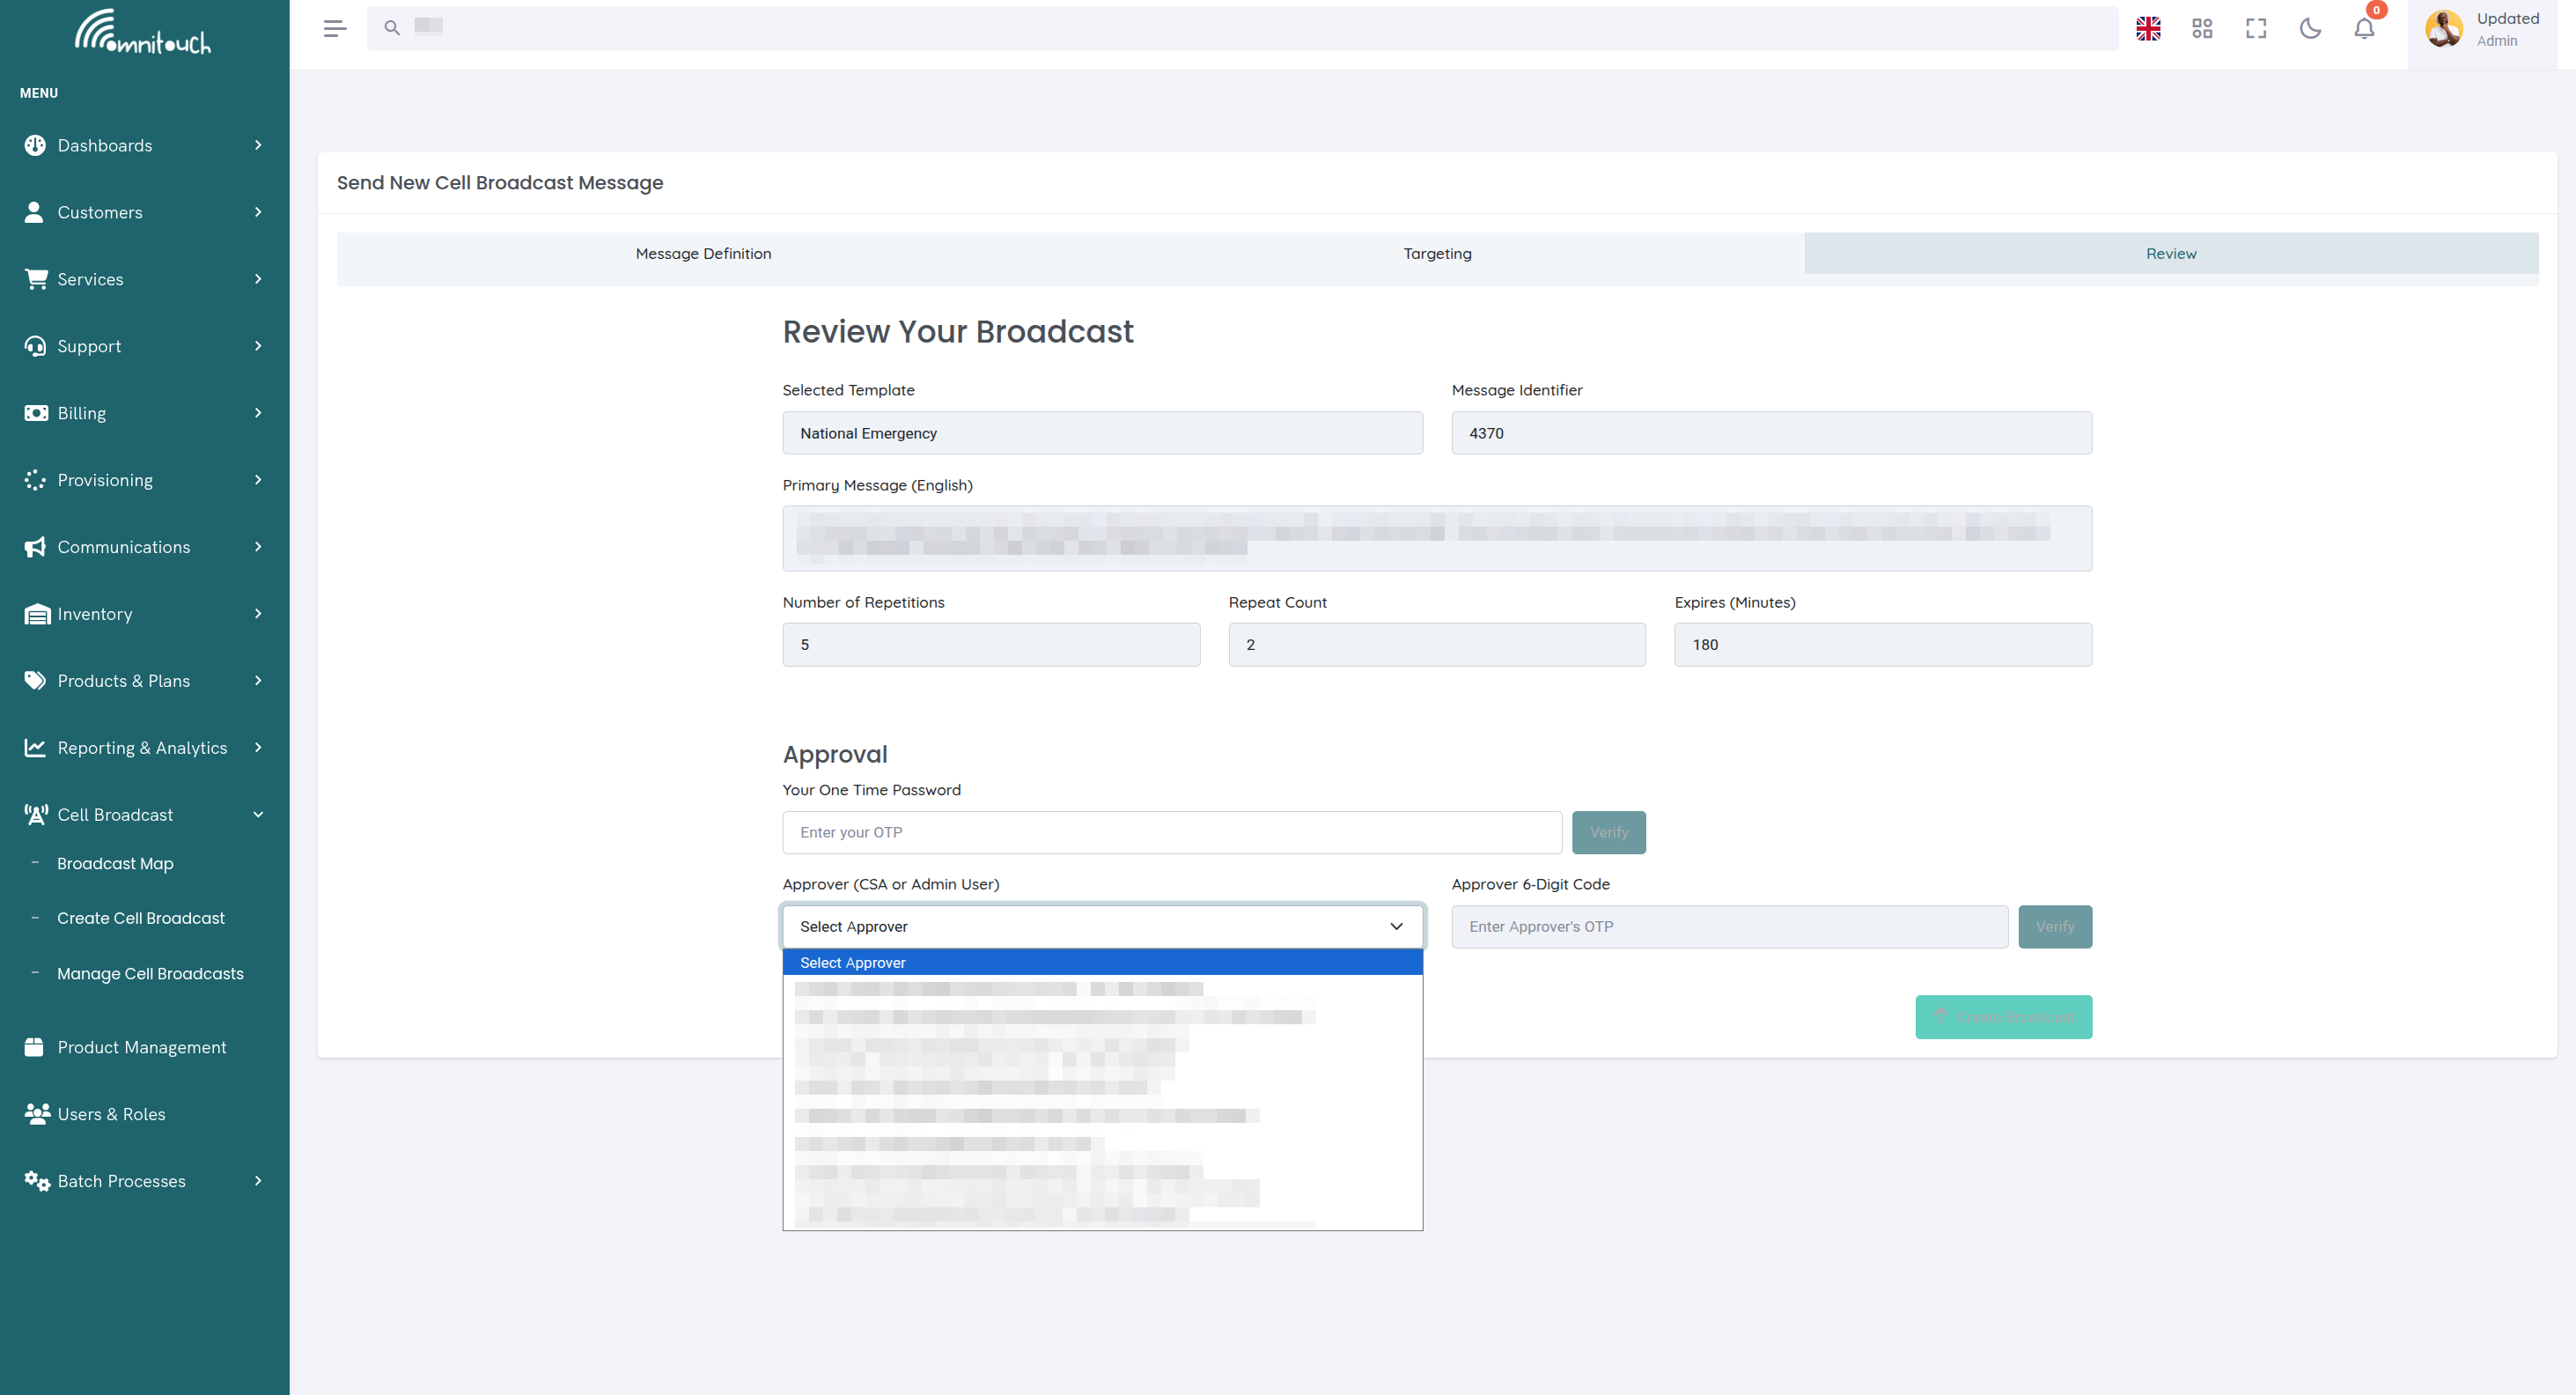
Stage 3: Approval
An approval process validates that the person issuing the Emergency Warning message is authorized to do so.
Two-Factor Authentication
: Uses Time-based One-Time Passwords (TOTP) via:
- Physical token (like an RSA SecurID)
- App-based solution (Google Authenticator, Authy, Microsoft Authenticator, or other TOTP-compatible apps)
Users who will be creating or approving draft message alerts must have an authenticator app on their smartphone to generate the authorization code that the system will request.
Setting Up 2FA
: When first configuring 2FA:
- Install an authenticator app on your smartphone (Google Authenticator, Authy, Microsoft Authenticator, etc.)
- Navigate to your OWL account settings and scan the QR code with your authenticator app
- Enter the verification code to confirm setup
- Save backup codes in a secure location
- Test code generation before emergencies
For detailed 2FA setup instructions, see Two-Factor Authentication .
If you change mobile devices or the app stops syncing with your OWL account, contact your System Administrator for help. Administrators can reset 2FA tokens from the Users and Roles → Users page.
Two-Person Rule
: Where the process requires approval from a second person, the person issuing the alert must input the Time-based One-Time Password of the other person before the process will be allowed to proceed. This provides oversight and minimizes risk of misuse.
Granular User Roles
: Individual user roles can be configured to:
- Allow only certain users to send predefined messages
- Restrict message targeting to specific regions
- Require additional approval workflows
Stage 4: Review
Once Message Definition, Targeting, and Approval stages are complete, the operator must review the message before final broadcast. Once satisfied with the message details, they can transmit the message.
Transmission Speed: In most networks, a broadcast to all devices in the network takes under 10 seconds.
Stage 5: Monitoring and Updates
Once the message broadcast is started, operators can monitor and manage transmitted messages.
Network Feedback
: Cellular networks return information about cell sites that have broadcast the message. If a cell site is offline or unavailable, this will be reported back to the operator.
Automatic Retransmission
: Should any offline cell sites become available again while the Emergency Warning is still active, all phones connected to that cell will receive the message.
In-Flight Updates
: Once broadcast, the message can be:
- Updated as the situation evolves
- Modified with new message body content
- Recalled/stopped at any time
Historical Records
: All information about historical messages can be viewed and reviewed for audit purposes.
Message Structure
Each Cell Broadcast message consists of:
Message Configuration
- Message Identifier - Unique identifier for the alert type (e.g., 4370 for ETWS Earthquake, 4371 for ETWS Tsunami)
- Category - Alert category (normal, emergency, high, extreme)
- Repetition Period - Seconds between broadcast repetitions
- Number of Broadcasts - How many times to broadcast the message
- Warning Period - Duration in seconds the warning is valid
- Channel Indicator - Type of channel used for broadcast
Localized Messages
Each CBC message can include multiple language variants:
- Language - ISO language code (en, es, fr, zh, etc.)
- Message Body - Alert text in that language (up to 1395 characters)
The system automatically broadcasts all language variants, allowing recipients to view alerts in their preferred language.
Tracking Areas
Defines geographic targeting for the alert:
- Tracking Area - Geographic identifier (cell ID, tracking area code)
- Operator - Mobile network operator code (MCC-MNC)
- RAT Type - Radio Access Technology (LTE, 5G, UMTS, GSM)
Multiple tracking areas can be specified to cover larger regions or multiple operators.
Creating a Cell Broadcast Message
Via Web UI:
- Navigate to Cell Broadcast - Access the CBC management interface from the main navigation
- Click "Create Alert" - Opens the message creation form
- Configure Message Parameters:
- Message Identifier (e.g., 4370 for earthquake alerts)
- Category (normal, high, extreme)
- Repetition Period (typically 5-60 seconds)
- Number of Broadcasts (999 for continuous, or specific count)
- Warning Period (duration in seconds)
- Channel Indicator (typically "basic")
- Add Localized Messages:
- Click "Add Language"
- Select language from dropdown
- Enter message text (max 1395 characters for GSM7, less for Unicode)
- Repeat for additional languages
- Define Tracking Areas:
- Click "Add Tracking Area"
- Enter tracking area code
- Select operator (MCC-MNC combination)
- Choose RAT type (LTE, 5G, etc.)
- Repeat for additional geographic areas
- Review and Create - Verify all details and click "Create Alert"
Via API:
Endpoint: PUT /crm/cbc/
Required Permission: CREATE_CBC_MESSAGE
Request Body:
{
  "messageIdentifier": "4370",
  "category": "emergency",
  "repetitionPeriod": 10,
  "numberOfBroadcasts": 999,
  "warningPeriodSec": 3600,
  "channelIndicator": "basic",
  "localized_messages": [
    {
      "language": "en",
      "messageBody": "EARTHQUAKE WARNING: Magnitude 6.5 earthquake detected. Take cover immediately. Drop, Cover, Hold On."
    },
    {
      "language": "es",
      "messageBody": "ADVERTENCIA DE TERREMOTO: Terremoto de magnitud 6.5 detectado. Cúbrase inmediatamente. Agáchese, Cúbrase, Agárrese."
    }
  ],
  "tracking_areas": [
    {
      "tracking_area": "12345",
      "operator": "310-410",
      "rat_type": "LTE"
    },
    {
      "tracking_area": "12346",
      "operator": "310-410",
      "rat_type": "5G"
    }
  ]
}
Response:
{
  "cbc_message_id": 123,
  "cbc_unique_id": "550e8400-e29b-41d4-a716-446655440000",
  "messageIdentifier": "4370",
  "category": "emergency",
  "repetitionPeriod": 10,
  "numberOfBroadcasts": 999,
  "warningPeriodSec": 3600,
  "channelIndicator": "basic",
  "initiating_user": 5,
  "approving_user": null,
  "created": "2025-01-10T14:30:00Z",
  "localized_messages": [...],
  "tracking_areas": [...]
}
The message is immediately sent to the Cell Broadcast Center for transmission.
Managing Existing Messages
View All Messages
Endpoint: GET /crm/cbc/
Required Permission: VIEW_CBC_MESSAGE
Returns list of all CBC messages with their status, timestamps, and configuration.
Update a Message
Endpoint: PATCH /crm/cbc/{cbc_message_id}
Required Permission: UPDATE_CBC_MESSAGE
Updates message content, tracking areas, or broadcast parameters. Updated messages are re-sent to the CBC.
Request Body:
{
  "cbc_message_id": 123,
  "numberOfBroadcasts": 500,
  "localized_messages": [
    {
      "language": "en",
      "messageBody": "UPDATED: Earthquake warning still in effect. Aftershocks possible."
    }
  ]
}
Delete a Message
Endpoint: DELETE /crm/cbc/{cbc_message_id}
Required Permission: DELETE_CBC_MESSAGE
Removes the message from the database and attempts to cancel it on the CBC.
Approval Workflow
Cell Broadcast messages support an optional approval workflow for high-stakes alerts:
- Initiating User - Staff member who creates the alert
(
initiating_userfield) - Approving User - Manager who approves the alert before broadcast
(
approving_userfield)
If approval is required:
- Message is created with
approving_user = null - Message is held in "pending approval" state
- Approving user reviews message and either approves or rejects
- On approval,
approving_useris set and message is broadcast
This workflow is configurable based on organization policy.
Message Identifiers
Standard message identifiers follow 3GPP TS 23.041:
Earthquake and Tsunami Warning System (ETWS):
- 4370 - ETWS Earthquake Warning
- 4371 - ETWS Tsunami Warning
- 4372 - ETWS Earthquake and Tsunami Combined Warning
- 4373-4378 - ETWS Other Emergency Types
- 4379 - ETWS Test Message
Commercial Mobile Alert System (CMAS) / Wireless Emergency Alerts (WEA):
- 4352 - Presidential Alert
- 4353-4355 - Extreme Alerts
- 4356-4359 - Severe Alerts
- 4360-4363 - AMBER Alerts
- 4364-4367 - Public Safety Messages
- 4368-4369 - State/Local Tests
- 4380-4381 - Test Messages
Custom Ranges:
- 0-999 - Reserved for operator-specific alerts
- 1000-4095 - Custom message types
Integration with Cell Broadcast Center
The Cell Broadcast Entity (CBE) needs a mechanism to deliver messages to individual cellular networks. The OWL Cell Broadcast Center (CBC) connects to each cellular network to send Emergency Warning messages to the public.
Multi-Network Redundancy
: In the event that one cellular network operator is unavailable (outage or no coverage), if another operating cellular network is available, users will still receive Emergency Warning messages via the other available networks.
Per-Operator CBC Instances
: To ensure there is no connection between competing networks, OWL runs a separate CBC instance for each MNO; it is not shared between operators.
OWL CBC Configuration
The CBC URL is configured in crm_config.yaml:
cbc_url: "http://cbc.example.com:8080"
Message Transmission:
When a CBC message is created or updated:
- OmniCRM CBE stores the message in its database
- Message is formatted for the CBC API
- HTTP POST request sent to
{cbc_url}/alerts/send - CBC connects to cellular network via appropriate interface (CBSP, SBc-AP, or N50)
- CBC acknowledges receipt and begins broadcast
- Devices in the target tracking areas receive the alert
Message Deletion:
When a message is deleted, the CBE attempts to cancel it on the CBC to stop ongoing broadcasts.
Cellular Network Integration Points
Different generations of cellular networks (2G/3G/4G/5G) each have unique interfaces for connecting to/from the Cell Broadcast Center. Based on the technologies used by each cellular network, the correct interface must be configured.
OWL Cell Broadcast Center supports 2G, 3G, 4G and 5G Cell Broadcast interfaces and has integrated with numerous commonly used cellular network components.
CBSP - 2G/3G - Base Station Controller (BSC)
The Cell Broadcast Service Protocol (CBSP) interface links the CBC to the Base Station Controller (BSC) controlling 2G (GSM) base stations.
- Used for 2G and 3G Cell Broadcast messaging with combined Radio Network Controller/Base Station Controller deployments
- Can be configured either as a client or server arrangement depending on the BSC vendor
- A connection must be established between all BSCs in the network and the OWL CBC
- Interfaces are continuously monitored with alerting to indicate if a CBSP link has gone down
Note: 3GPP defined Service Area Broadcast Protocol (SABP) for use in standalone RNC deployments. This can be used if required when CBSP is not supported for 3G cells on a combined RNC/BSC, however additional testing and support from the RNC vendor may be required.
SBc-AP - 4G/5G Non-Standalone - MME/IWF
The SBc-AP interface links the OWL CBC to the MME (Mobility Management Entity) serving 4G and 5G eNodeB/gNodeBs.
- Used for 4G LTE networks
- Also used for Non-Standalone 5G (the majority of deployments as of 2025)
- A connection must be established between all MMEs in the network and the OWL CBC
- Interfaces are continuously monitored with alerting to indicate if a SBc-AP link has gone down
N50 - 5G Standalone - AMF
For Standalone 5G networks, the N50 interface connects the OWL CBC to the AMF (Access and Mobility Management Function) serving 5G gNodeBs.
- Interface is present in the OWL CBC
- Has not been extensively tested with 3rd party AMFs due to the small number of commercially available 5G SA networks in 2025
- Will be fully supported as 5G SA deployments become more common
MNO Networking Requirements
Networking must be in place between the OWL CBC and the Mobile Network Operator's network to reach the interfaces outlined above.
This is handled case-by-case, but generally requires:
- Dedicated cross-connect/fiber between the CBC and MNO network
- Each interface logically separated
- Connectivity to each integration point (MME, RNC, BSC) in the cellular network
Supported Network Equipment
OWL CBC has been tested and integrates with commonly used cellular network components from major vendors:
Cell Site Data Integration
OWL supports automatic data scraping from:
- Nokia NetAct
- Huawei U2000 / U2020
- ZTE NetNumen / ZXPOS
- Ericsson ENM
Alternatively, cell site data can be provided to the Omnitouch operations team periodically via email.
User Management and Access Control
Role-Based Access Control (RBAC)
The OWL system uses role-based access control (RBAC): people (Registered Users) are assigned one or more Roles, and each Role is a bundle of Permissions. Permissions are the smallest unit of access (e.g., create draft message alert). A Registered User's effective access is the union of Permissions from all assigned Roles.
RBAC Components:
- Users - Real people who sign-in to the OWL system
- Permissions - Micro capabilities (e.g., approve draft message, create message, view reports)
- Roles - Named sets of permissions (e.g., Message Approvers, Message Creators)
- Assignment - Users receive one or more Roles; permissions aggregate
RBAC Benefits:
- Data Protection - Users only see and do what they're allowed to
- Operational Fit - Roles mirror job functions (Admin, Message Creator, Message Approver)
- Simple Admin - Grant access by assigning roles; avoid per-user micromanagement
System Permissions
System permissions generally follow CRUD patterns with four options:
- View - Read or browse messages and reports
- Create - Create or add a message alert
- Update - Edit or modify a draft message alert
- Delete - Delete or remove a draft message alert
Core CBC Permissions:
CREATE_CBC_MESSAGE- Create new broadcast messagesVIEW_CBC_MESSAGE- View existing messages and their statusUPDATE_CBC_MESSAGE- Modify message content or broadcast parametersDELETE_CBC_MESSAGE- Delete messages and cancel broadcasts
Assign these permissions to roles based on your organization's public safety responsibilities.
For comprehensive information on user roles and permissions management, see Users and Roles .
User Account Management
First-Time Login
When a new user is set up in the system, they are provided with login credentials by the System Administrator:
- Navigate to the OWL login URL provided by your System Administrator
- Enter your username and password
- If 2FA is enabled for your account, you will be prompted to set it up (see 2FA section above)
Best Practice: Users should change their initial password immediately after first login for security. Navigate to your user profile settings to change your password.
For more details on authentication flows, see Authentication Flows and Admin Controls .
Password Reset
Users can reset their own passwords:
- From the system login page, select "Forgot Password"
- Follow the email verification process
- Set a new password
Admin Password Reset:
System Administrators can reset passwords for users from the Users and Roles → Users page:
- Navigate to Users and Roles → Users
- Select the user requiring password reset
- Click Reset Password
- System generates a secure random temporary password (12 characters)
- Temporary password is displayed to the admin
- Provide the temporary password to the user via a secure channel (phone or in-person, never via email)
- User can login with the temporary password
- Important: User should change this password immediately after logging in
For more details, see Users and Roles .
Adding New System Users
System Administrators can add new users by navigating to Users and Roles → Users:
Required information for each new Registered User:
- First Name
- Last Name
- Password (temporary)
- Mobile Number
- Role(s)
Best Practice: Implement a New System User Application Form that aligns with your organization's existing policies and procedures. Only add users after proper approval.
Editing User Profiles
System Administrators can change permissions and access for existing users:
- Navigate to Users and Roles → Users
- Select the user to edit
- Modify assigned roles as needed
- Save changes
Deleting System Users
System Administrators can delete users from Users and Roles → Users.
Warning: Once a user has been deleted from the OWL system, the action cannot be undone. Take great care before executing this task.
Viewing All System Users
At any time, the System Administrator can view a list of all Registered Users and see what permissions and roles each one has by navigating to Users and Roles → Users.
Alert Message History
The OWL system keeps a record of all alert messages sent for auditing purposes and to support operational review.
Accessing Message History:
Navigate to Manage Cell Broadcasts to view:
- All previously sent messages
- Message status (active, expired, cancelled)
- Timestamp of transmission
- Initiating and approving users
- Geographic targeting details
- Message content and parameters
This helps with:
- Auditing the system
- Reviewing operating procedures used by the NDMO and other alerting agencies
- Understanding message effectiveness
- Compliance and reporting requirements
Cell Broadcast Map Visualization
The Cell Broadcast Map provides a visual interface for planning geographic coverage areas and identifying which cell towers will broadcast alerts.
Accessing the Map
Navigate to:
Or directly:
Required Permission: VIEW_CBC_MESSAGE or CREATE_CBC_MESSAGE
Map Features
The map displays:
Cell Tower Locations:
- Tower Icons - Cell site positions displayed as cell tower icons
- Sector Indicators - Directional arrows showing antenna sector orientation
- Tower Names - Site identifiers and names
- Coverage Data - Loaded from
cellSites.txtfile
Drawing Tools:
- Polygon Tool - Draw custom coverage areas
- Circle Tool - Create circular broadcast zones
- Rectangle Tool - Define rectangular coverage areas
Coverage Analysis:
- Site List - Table showing all cell sites within the drawn area
- Zone Management - Save and load predefined coverage zones
- Site Count - Real-time count of towers in coverage area
Using the Map
Step 1: Load Cell Site Data
The map automatically loads cell tower locations from /cellSites.txt
on page load. This file contains:
- lat/lng - Tower coordinates
- site_name - Identifier
- sectors - Antenna directions in degrees
Step 2: Draw Coverage Area
Select a drawing tool:
- Click Polygon to draw custom shapes
- Click to add points
- Double-click to complete
- Creates precise coverage boundaries
- Click Circle to draw circular areas
- Click center point
- Drag to set radius
- Useful for quick radius-based alerts
- Click Rectangle to draw rectangular areas
- Click one corner
- Drag to opposite corner
- Efficient for grid-aligned coverage
Step 3: Review Covered Sites
After drawing, the system:
- Calculates which cell sites fall within the area
- Displays list in table below the map
- Shows site names and coordinates
- Provides count of affected towers
Example Coverage Table:
Step 4: Export Coverage Data
Use the coverage data to:
- Identify tracking area codes for the broadcast
- Estimate alert reach based on tower count
- Plan emergency response by understanding affected areas
- Save zone definitions for future use
Workflow Integration
The map visualization integrates with broadcast creation:
Planning an Alert:
- Open CBC Map to visualize affected area
- Draw coverage zone using polygon tool
- Review covered sites and adjust boundaries
- Note tracking area codes for affected cell sites
- Create CBC message with appropriate targeting
Example: Coastal Tsunami Warning
Zone Management
Saving Zones:
Predefined coverage zones can be saved for common scenarios:
- Coastal Region - For tsunami/storm surge warnings
- Wildfire Zones - For evacuation alerts
- Urban Centers - For AMBER alerts in populated areas
- Highway Corridors - For traffic/weather alerts
Zone Data Format:
Zones are stored in site_data.json:
[
  {
    "area": "Coastal Region",
    "polygon": [
      {
        "coord": [
          {"lat": -33.8688, "lng": 151.2093},
          {"lat": -33.8650, "lng": 151.2070},
          {"lat": -33.8600, "lng": 151.2150},
          {"lat": -33.8688, "lng": 151.2093}
        ]
      }
    ]
  }
]
Loading Saved Zones:
- Select zone from dropdown menu
- Polygon displays on map automatically
- Site list updates to show covered towers
- Modify polygon if needed
Map Configuration
Google Maps API:
The map requires Google Maps API key configured in environment:
REACT_APP_GOOGLE_API_KEY=your_google_maps_api_key_here
Cell Site Data:
Update public/cellSites.txt with your network's cell tower locations:
# Format: lat,lng,name,sector1,sector2,sector3
-33.8688,151.2093,SYD_CENTRAL,0,120,240
-33.8650,151.2070,SYD_HARBOUR,45,165,285
Obtain cell site coordinates from:
- Network planning tools
- Tower installation records
- Field surveys with GPS
- Radio network controller (RNC) configuration
Map Styling:
Custom map styles can be configured in mapStyles.js to:
- Highlight emergency services
- Show topographic features
- Emphasize population centers
- Match organizational branding
Use Cases
Emergency Planning:
- Pre-plan coverage zones for known hazard areas
- Test different targeting strategies
- Estimate population reach
- Coordinate with emergency services
Alert Verification:
- Confirm message will reach intended area
- Identify coverage gaps
- Avoid over-alerting adjacent regions
- Validate tracking area codes
Network Analysis:
- Visualize cell tower distribution
- Identify coverage overlaps
- Plan tower deployments for better alert coverage
- Optimize broadcast efficiency
Best Practices
Based on experience with customers around the world, Omnitouch recommends the following best practices for all OWL deployments.
Message Content:
- Keep messages concise and clear (under 360 characters for single-page alerts)
- Use all capital letters for emergency alerts (improves readability)
- Include specific action items ("Evacuate immediately", "Seek shelter")
- Avoid technical jargon
- Test messages with actual devices before emergencies
Language Support:
- Always provide messages in the primary language of the region
- Include additional languages for multicultural areas
- Ensure translations are culturally appropriate
- Test special characters and Unicode support
Geographic Targeting:
- Use smallest necessary tracking areas to avoid alert fatigue
- Consider population density when setting repetition period
- Test geographic targeting before emergencies
- Maintain accurate tracking area documentation
Testing:
- Use test message identifiers (4379, 4380-4381) for drills
- Schedule regular system tests
- Verify CBC integration is functioning
- Train staff on emergency procedures
Alert Fatigue:
- Only use for genuine emergencies
- Avoid over-broadcasting
- Set appropriate repetition periods
- Use severity levels appropriately
User Account Security
2FA Token Security:
- Protect physical 2FA tokens like building access cards
- Report lost or stolen tokens immediately
- Test 2FA regularly to ensure it's functioning
- Save backup codes when setting up 2FA and store them securely offline
- Contact System Administrator if you need 2FA reset
For more information on 2FA setup and recovery, see Two-Factor Authentication .
Data Maintenance
Predefined Target Areas:
As geographic boundaries change, development occurs, and risk areas shift, there is a need to review the Predefined Target Areas. Omnitouch suggests this data is reviewed annually by the NDMO, with support from other alerting agencies where applicable.
Updates to boundaries can be defined using several common GIS platforms or Google Earth, then provided via email to the Omnitouch Operations team who will make the changes to the system.
Predefined Message Templates:
The predefined message templates should be reviewed at least annually by the NDMO, with support from other alerting agencies where applicable, to ensure:
- Message content still accurately reflects the hazard and call to action
- Contact information and instructions are current
- Language translations remain accurate
- Message tone and urgency are appropriate
- References to emergency services or procedures are up to date
Updates can be provided via email to the Omnitouch Operations team who will make the changes to the system.
Cell Site Data:
- Review and update cell site data whenever network changes occur
- Typical update frequency: monthly or quarterly
- Coordinate with MNO network planning teams
- Verify accuracy after major network upgrades or expansions
System Architecture
All Omnitouch products are designed to support geographically distributed deployments.
Deployment Options
All components can run as:
- Containers (K8s) - Kubernetes orchestrated containerized deployments
- Virtual Machines - VMware, Proxmox, HyperV
- Private Cloud - On-premises cloud infrastructure
- Public Cloud - AWS, GCP
- Bare Metal - Direct hardware deployment
Distributed Architecture
The distributed architecture allows:
- Local Disaster Management Offices to access OWL CBE and distribute messages even if a region becomes isolated from the national network
- Multiple Cell Broadcast Entities and multiple Cell Broadcast Centers per operator/per country
- Local disaster response agencies (Municipal Government, Police, Fire, etc.) to issue alerts to their region even if the main NDMO (National Disaster Management Office) loses access
This is particularly valuable when MNOs have distributed their cellular network with local BSC/MME resources.
CBE and CBC Networking
To ensure there is no connection between competing networks, each MNO has a separate CBC instance (not shared).
Networking requirements between CBE and CBC:
- All traffic is encrypted between CBE & CBC
- Authentication based on mutual certificates
- Connectivity from CBE to CBC over TLS on TCP port 443
- Coordination required between MNOs and the NDMO or agency hosting the CBE
Access Considerations
The agency hosting the CBE will need to define access procedures for end users (ie. Citrix, VPN, etc.), keeping in mind that the system must be accessible in non-ideal scenarios such as:
- Large scale outages of public power networks
- Telecommunications network failures
- Natural disasters affecting infrastructure
Deployment Requirements
CBE VM Requirements (NDMO / Government)
3x Virtual Machines:
- 2x CBE VMs (Ideally in different datacenters/availability zones)
- 1x Monitoring VM
Each VM requires:
- Storage: 50GB
- CPU: 2x Virtual CPU
- RAM: 8GB
- OS: Base OS provided by Omnitouch
- Networking: Allow traffic to CBC VMs on TCP port 443 for TLS traffic to control the CBCs
CBC VM Requirements (MNO)
3x Virtual Machines:
- 2x CBC VMs (Ideally in different datacenters/availability zones)
- 1x Monitoring VM
Each VM requires:
- Storage: 50GB
- CPU: 2x Virtual CPU
- RAM: 8GB
- OS: Base OS provided by Omnitouch
- Connectivity: To each of the Integration Points in the cellular network (MME, RNC, BSC)
- Networking: Allow traffic from CBE VMs on TCP port 443 for TLS traffic to be controlled by the CBEs
Integration Steps
Deploying OWL involves the following steps:
- Source new operator/s - Identify participating mobile network operators
- Project admin (set-up) - Establish project governance and administration
- Select hosting location for CBE - Determine where CBE will be hosted
- Define Users & Message Flows/Procedures - Establish approval workflows and user roles
- Define Polygons for Target Areas and Message Templates - Pre-configure common scenarios
- IP Address allocations - Allocate IP addresses for NDMO and MNOs
- Set up site-to-site VPN - Establish secure connection to Omnitouch team
- Deploy CBE VMs to NDMO - Install Cell Broadcast Entity
- Deploy CBC VMs to MNO - Install Cell Broadcast Center at each operator
- Configure Network Elements - Set up connectivity to CBC from cellular network equipment
- Networking between CBE and CBC VMs - Establish secure communication
- Networking between CBC VMs and Network Elements - Connect to BSC/MME/AMF
- Setup API access to NMS - Configure cell site data integration
- Monitoring setup & tested - Verify monitoring and alerting
- Verification/Testing of test alerts - Conduct system testing
- Public warning test - Perform end-to-end public test
Character Limits
Cell Broadcast messages have strict character limits based on encoding:
GSM 7-bit Encoding (English, basic Latin characters):
- Single page: 93 characters
- Multi-page: 15 pages × 93 = 1395 characters maximum
Unicode UCS-2 Encoding (non-Latin scripts, emojis):
- Single page: 41 characters
- Multi-page: 15 pages × 41 = 615 characters maximum
OWL Platform:
- Message text limited to 500 characters
- Web UI displays remaining character count and warns when approaching limits
Monitoring and Logs
Cell Broadcast activity is logged for audit purposes:
- Message creation, update, and deletion events
- Initiating and approving users
- Timestamps and message identifiers
- CBC API responses and errors
- Geographic targeting details
Access logs via the Activity Log or database queries:
SELECT * FROM cbc
WHERE created >= '2025-01-01'
ORDER BY created DESC;
Integration with Mobile Devices
Cell Broadcast messages are received by compatible mobile devices:
Device Support:
- Most smartphones from 2015 onwards support Cell Broadcast
- Feature phones may have limited support
- Device must be connected to the network (no data/SMS credits required)
- Works even during network congestion when SMS fails
User Experience:
- Alert displays as full-screen notification
- Unique alert tone plays
- Alert persists until acknowledged
- No user subscription required
- Cannot be blocked by users for presidential/extreme alerts
Testing Device Reception:
To verify devices can receive alerts:
- Send test message (identifier 4379 or 4380-4381)
- Ensure device is in the target tracking area
- Check device has Cell Broadcast enabled in settings
- Verify with multiple device models and OS versions
Additional Functionality
The OWL platform can be extended with optional features to complement Cell Broadcast messaging:
Mass Text / SMS
Sending regular SMS to individuals for supplementary notifications.
- Often used for downgraded alerts to inform people the immediate threat has passed, in a less-obtrusive way
- Much slower than Cell Broadcast but can include a confirmation mechanism to verify the message was received
- Useful for targeted follow-up communications
Voice Calling for Fixed Line
Automatically call fixed line numbers and play emergency warning messages.
- Pre-recorded message playback
- Text-to-speech rendition of emergency warning message
- Reaches populations without mobile phones
- Can verify message delivery through call completion
Cross-post to Social Media
Automatically post Emergency Warning messages to official social media channels.
- Extends reach beyond cellular network
- Provides reference for those who missed initial alert
- Allows for extended messaging beyond character limits
Automatic Radio/TV Transmission
Automatically broadcast emergency messages via radio and television.
- Pre-recorded message playback
- Text-to-speech rendition of emergency warning message
- Reaches populations during network outages
- Complements Cell Broadcast for comprehensive coverage
External Warning Devices
The OWL CBC can connect to a variety of external sources:
- Social media platforms
- Public APIs
- Voice call systems
- Radio broadcast systems
- Physical alarms and sirens
- Electronic signage
Customization options can be explored as part of the design phase.
Customization and Maintenance
Periodic Testing
Periodic testing of the solution should be performed at regular intervals to ensure:
- The solution and all components are functioning correctly
- All staff are familiar with the processes and procedures required for issuing Emergency Warning Messages
- Integration points remain operational
- Message templates are current and effective
Recommended Testing:
- Monthly test messages using identifiers 4379, 4380-4381
- Quarterly full system tests including approval workflows
- Annual public warning tests with advance notification
- Regular training sessions for authorized users
Cell Site Data Maintenance
When operators add or remove cell sites, or change Tracking Areas/Identifiers of cell sites, this information must be shared with the Omnitouch team to ensure the mapping tool data remains accurate.
Automatic Data Integration
OWL supports automatic data scraping from:
- Nokia NetAct
- Huawei U2000 / U2020
- ZTE NetNumen / ZXPOS
- Ericsson ENM
Manual Data Updates
Alternatively, cell site data can be provided to the Omnitouch operations team periodically via email in various formats.
Update Frequency: Review and update cell site data whenever network changes occur, typically monthly or quarterly.
Predefined Target Areas
As geographic boundaries change, development occurs, and risk areas shift, there is a need to review the Predefined Target Areas used in the Targeting stage.
Annual Review: Predefined target areas should be reviewed annually by the NDMO (National Disaster Management Office).
Update Process: Updates to boundaries can be defined using several common GIS platforms or Google Earth, then provided to the Omnitouch operations team.
Predefined Message Templates
Annual Review: Predefined message templates should be reviewed annually by the NDMO to ensure:
- Message content reflects current emergency procedures
- Language translations are accurate
- Message identifiers are appropriate
- Contact information and instructions are current
Update Process: Updates can be provided via email to the Omnitouch operations team.
Message Approval Flows
Different regions have different requirements regarding issuing of messages and approval flows.
Two-Person Rule: Use of the two-person rule is advocated wherever practical to ensure oversight in message submission.
Granular User Roles: Individual user roles can be configured to:
- Allow only certain users to send predefined messages
- Restrict targeting to specific regions
- Require additional approval steps
- Minimize risk of misuse
2FA / Security Maintenance
The Omnitouch operations team can support with:
- Resetting 2FA tokens
- Re-issuing lost/damaged/expired tokens
- Security audit and token management
Token Security Procedures:
When tokens are issued, a procedure is detailed for steps to take should a token become lost or unaccounted for. The person accepting the token must follow these procedures to ensure the system is not abused.
Immediate Actions for Lost Tokens:
- Report lost token immediately to authorized personnel
- Token is deactivated in the system
- Security review conducted
- New token issued following security verification
External API Integration
A full suite of APIs is available for the Cell Broadcast Entity to allow 3rd party systems to integrate and interact with the CBE.
API Capabilities:
- Reporting/Monitoring - Verify status and reach of transmitted messages
- Message Creation - Create and broadcast new messages programmatically
- Health Checks - Periodically check system health with routine test message traffic generation
- Status Queries - Retrieve message status, delivery statistics, and system metrics
See the API Reference section below for detailed endpoint documentation.
API Reference
All CBC endpoints require authentication and appropriate permissions.
Create Message:
PUT /crm/cbc/
Get All Messages:
GET /crm/cbc/
Update Message:
PATCH /crm/cbc/{cbc_message_id}
Delete Message:
DELETE /crm/cbc/{cbc_message_id}
See the Swagger documentation at /crm/docs/ for detailed API
specifications.